![]()
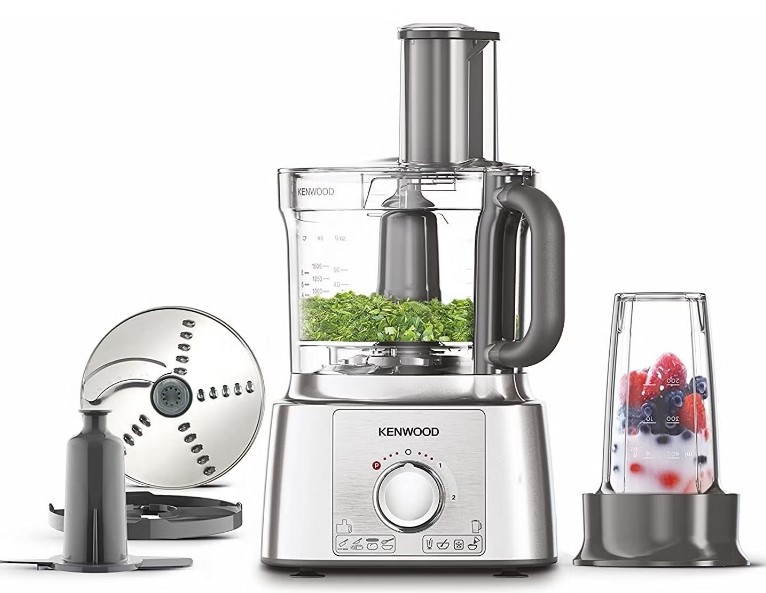
Kenwood FDP65 Multipro Express Food Processor
About Kenwood
Kitchen appliances from Kenwood, such as stand mixers, blenders, food processors, kettles, and toasters, are designed, manufactured, and sold.
Kenneth Maynard Wood established the business in 1947 at 79 Goldsworth Road in the town of Woking. The business relocated to Havant in 1962, where it is still located today.
Safety
- Read these instructions carefully and retain them for future reference.
- Remove all packaging and any labels.
- If the plug or cord is damaged it must, for safety reasons, be replaced by Kenwood or an authorised Kenwood repairer to avoid a hazard.
- DO NOT touch the sharp blades. The blades and discs are very sharp and handled with care. Always hold by the finger grip at the top, away from the cutting edge, when handling the sharp cutting blades, emptying the bowl and during cleaning.
- DO NOT process hot ingredients.
- Be careful if hot liquid is poured into the food processor or blender as it can be ejected out of the appliance due to sudden steaming.
- Never leave the appliance unattended when it is operating.
- Do not exceed the maximum capacities stated in the recommended usage chart.
- Do not operate your appliance for longer than the times specified below without a rest period. Processing continuously for longer periods can damage your appliance.

- Do not lift or carry the processor by the handle – or the handle may break resulting in injury.
- Always remove the knife blade before pouring contents from the bowl.
- Keep hands and utensils out of the processor bowl and blender goblet whilst connected to the power supply. If food needs to be pushed down use a suitable utensil such as a spatula.
- CAUTION: Before removing the lid from the bowl, blender or mill from the power unit:
- switch off;
- wait until the attachment/blades have completely stopped;
- be careful not to unscrew the bottle or mill jar/lid from the blade assembly.
- Do not use the lid to operate the processor, always use the on/off speed control.
- This appliance will be damaged and may cause injury if the interlock mechanism is subjected to excessive force.
- Never use an unauthorised attachment.
- Never use a damaged appliance. Get it checked or repaired: see ‘service and customer care’.
- Never let the power unit, cord or plug get wet.
- Do not let excess cord hang over the edge of a table or worktop or touch hot surfaces.
Blender/Blend-Xtract 2GO
- DO NOT process hot ingredients.
- SCALD RISK: Hot ingredients must be allowed to cool to room temperature before placing in the goblet/bottle or before blending.
- Always take care when handling the blade assembly and avoid touching the cutting edge of the blades when cleaning.
- Only operate the blender with the lid in place.
- Never run the blender empty.
- Smoothie recipes – never blend frozen ingredients that have formed a solid mass during freezing, break it up before adding to the goblet/bottle.
Blend-Xtract 2GO
- Only use the bottle with the blade assembly supplied.
- Never drink any hot liquids from the bottle.
- When drinking through the lid, take care that the drink is smooth. Some experimentation may be necessary to achieve the desired result, particularly when processing firm or unripened foods as you may find that some ingredients remain unprocessed.
- Do not blend frozen ingredients or ice cubes without liquid.
- Never blend dry ingredients (e.g. spices, nuts) or run the Blender empty.
Mill Attachments
- Never fit the blade assembly to the power unit without the jar/ lid fitted.
- Never unscrew the jar/lid while the mill is fitted to your appliance.
- Do not touch the sharp blades – Keep the blade assembly away from children.
- Never remove the mill until the blades have completely stopped.
- The appliance will not work if the mill is incorrectly fitted.
- Do not process hot ingredients in the mill allow them to cool down to room temperature before processing.
Mini Chopper/Mill
- The processing of spices is not recommended as they may damage the plastic parts.
Grinding Mill
- Do not process dried turmeric root as it is too hard and may damage the blades.
Juice extractor
- Do not use the juicer if the filter, juicer lid or bowl are damaged or have visible cracks.
- The cutting blades on the base of the filter drum are very sharp, take care when handling and cleaning the drum.
- Only use the pusher supplied. Never put your fingers in the feed tube. Unplug before unblocking the feed tube.
- Before removing the lid, switch off and wait for the filter to stop.
Express Dice/Express Serve Attachment and Discs
- The cutting grid and discs are very sharp; handle with care when fitting, removing and cleaning. Always hold the finger grip away from the cutting edge when handling the sharp cutting blades, emptying the bowl and during cleaning.
- Never use your fingers to push food down the feed tube. Only use the pusher supplied.
- Do not use excessive force to push food down the feed tube – you could damage your attachment.
- Before removing the lid, switch off and wait until the disc has completely stopped.
- Do not pour hot liquids down the feed tube.
Express Serve
- Avoid contact with moving parts. Keep fingers out of the food outlet opening.
- Do not operate when using the Dicer or Discs without the slinger plate fitted. If the slinger plate is not fitted food will clog under the plate and not exit the food outlet, resulting in damage to your attachment.
- The citrus juicer is not designed to be used with the Express Serve. Always use the citrus juicer with the main bowl.
Before plugging in
O Make sure your electricity supply is the same as the one shown on the underside of your appliance.
Important – Plug and Fuse Information
- The wires in the cord are coloured as follows:
- Blue = Neutral
- Brown = Live
- If the plug supplied with your appliance has a fuse fitted and the fuse fails it must be replaced with one of the same rating.
- If the plug or cord requires replacing a new cord set should be fitted by an Authorised Kenwood Repairer.
Note: - For non-rewireable plugs, the fuse cover MUST be refitted when replacing the fuse. If the fuse cover is lost then the plug must not be used until a replacement can be obtained. The correct fuse cover is identified by colour and a replacement may be obtained from your Kenwood Authorised Repairer (see Service).
- If a non-rewireable plug is cut off it must be DESTROYED IMMEDIATELY. An electric shock hazard may arise if an unwanted non-rewireable plug is inadvertently inserted into a socket outlet.
- This appliance conforms to EC Regulation 1935/2004 on materials and articles intended to come into contact with food.
Before using it for the first time
- Remove the plastic blade covers from the knife blade. Take care the blades are very sharp. These covers should be discarded as they are to protect the blade during manufacture and transit only.
- Wash the parts see ‘care and cleaning’.
Key
Processor – Express Prep
- Pushers
- Feed tube
- Lid
- Bowl
- Detachable drive shaft
- Power unit
- Speed/pulse control
- Safety interlocks
- Cord storage (at back)
- Plastic Blender (if supplied)
- Goblet with fixed blade
- Lid with drip feed
Standard Attachments
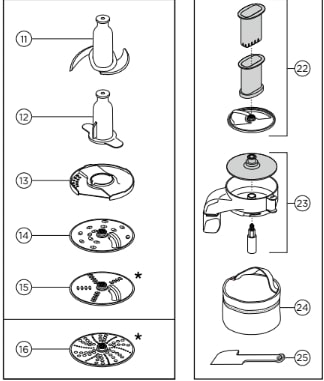
- Knife blade
- Dough tool
- Emulsifying disc
- 4mm slicing/grating disc
Optional Attachments - 2mm slicing/grating disc (if supplied)
- Extra fine grating disc (if supplied)
- Citrus juicer (if supplied)
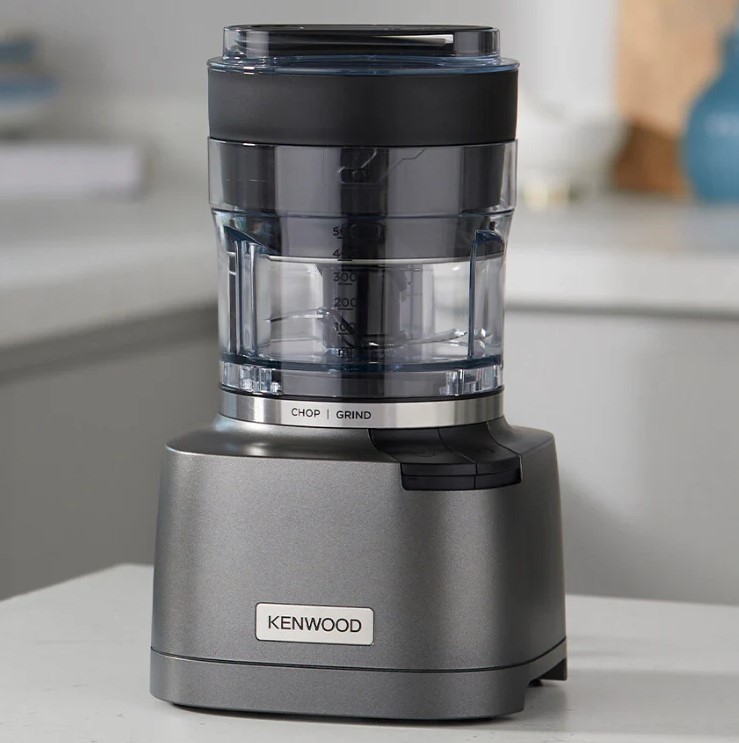
- Mini chopper/mill (if supplied)
- Grinding mill (if supplied)
- Blend-Xtract 2GO (if supplied)
- Juice extractor (if supplied)
- Express Dice (if supplied)
- Express Serve (if supplied)
- Storage bag (if supplied)
- Spatula
To Use Your Food Processor
Illustrations

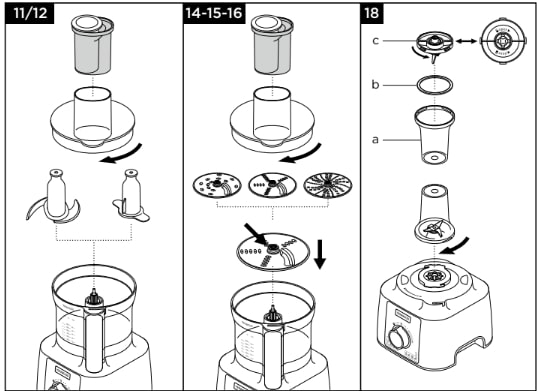
- Fit the detachable drive shaft onto the power unit.
- Then fit the bowl to the power unit and turn clockwise until it locks into position.
- Fit an attachment over the bowl drive shaft.
- Always fit the bowl and attachment onto the processor before adding ingredients.
- Fit the lid – ensuring the top of the drive shaft/tool is located in the centre of the lid.
- Do not use the lid to operate the processor, always use the on/off speed control.
- Plug in, switch on and select a speed. (Refer to the recommended usage chart).
- The processor will not operate if the bowl or lid is not fitted correctly into the interlock. Check that the feed tube and bowl handle are situated in the right front-hand corner.
- Use the pulse (P) for short bursts. The pulse will operate for as long as the control is held in position.
- Reverse the above procedure to remove the lid, attachments and bowl.
- Always switch off and unplug before removing the lid.
Plastic Blender (if supplied)
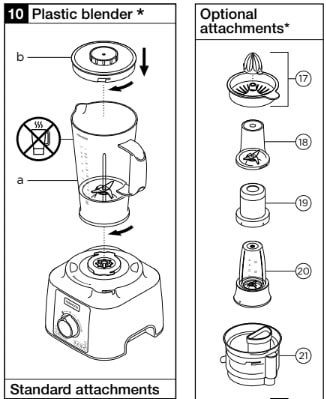
- To assemble and use – refer to the Blender illustrations and the Recommended Usage Chart.
- Put your ingredients into the goblet.
- Fit the lid onto the goblet and turn clockwise until it clicks.
- Fit the blender to the power unit and turn it clockwise to lock in position.
- The appliance will not operate if the blender is incorrectly fitted to the interlock.
Knife Blade
Follow the instructions under ‘To Use Your Food Processor’.
Dough Tool
Use for yeasted dough mixes. Follow the instructions under ‘To Use Your Food Processor’.
Emulsifying Disc
(use in conjunction with Dough Tool 12 )
- Fit the emulsifying disc over the dough tool – align the fins on the dough tool with the slots in the disc.
- Turn the dough tool anti-clockwise to lock it in place.
- To separate the parts turn clockwise and lift the disc off the dough tool shaft.
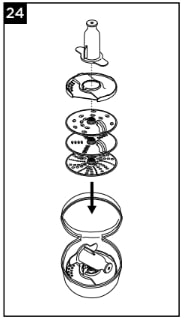
Discs
- Fit the drive shaft and bowl onto the power unit.
- Holding by the centre grip, place the disc onto the drive shaft with the appropriate side uppermost.
- Fit the lid.
- Put the food in the feed tube. Choose which size feed tube you want to use. To use the small feed tube – first put the large pusher inside the feed tube. Use for individual thin ingredients. Do not use the small pusher without the larger pusher fitted, otherwise you may damage the bottom of the pusher. To use the large feed tube – use both pushers together.
- Switch on and push down evenly with the pusher 1 – never put your fingers in the feed tube.
Citrus Juicer (if supplied)
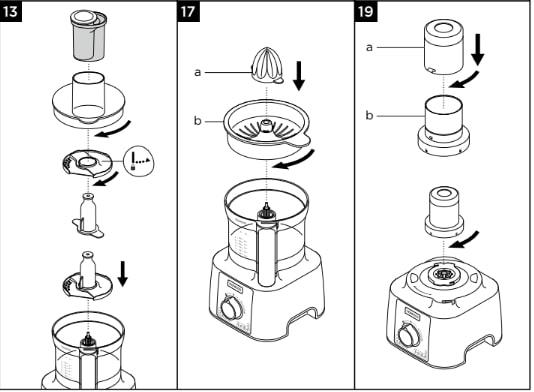
- Cone
- Sieve
To use the citrus juicer
- Fit the drive shaft and bowl onto the power unit.
- Fit the sieve into the bowl – ensuring the sieve handle is locked into position directly over the bowl handle.
- Place the cone over the drive shaft turning until it drops down.
- Cut the fruit in half. Then switch on and press the fruit onto the cone.
Mini Chopper/Mill (if supplied)
- Jar
- Sealing ring
- Blade assembly
- Put the ingredients into the jar.
- Fit the sealing ring into the blade assembly.
- Turn the blade assembly upside down. Lower it into the jar, blades down.
- Screw the blade assembly onto the jar until the finger is tight.
Refer to the graphics on the underside of the blade assembly as follows:- Unlocked position
- Locked position
- Place the mill onto the power unit and turn it clockwise to lock in the position
- Select Maximum speed or use the pulse (P).
Grinding Mill (if supplied)
- Mill lid
- Grinding mill blade assembly
- Place your ingredients into the blade assembly.
- Fit the lid and turn clockwise to lock.
- Place the mill onto the power unit and turn clockwise to lock.
- Select maximum speed or use the pulse (P).
Blend-Xtract 2GO (if supplied)
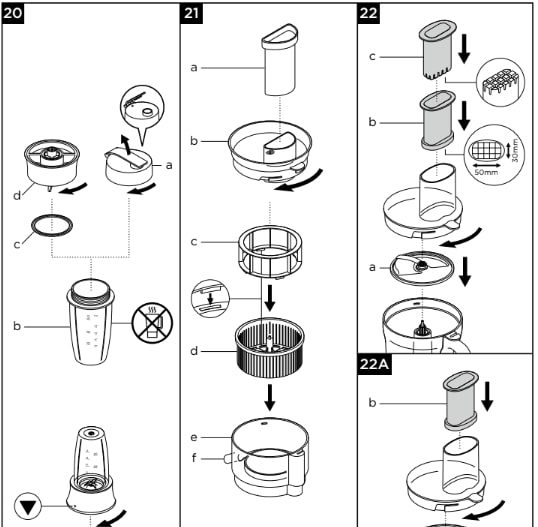
- Dispensing lid
- Bottle
- Sealing ring
- Blade assembly
- Add ingredients to the bottle up to the 400ml level mark.
- For best blending performance always add ice/frozen ingredients to the bottle first.
- When adding frozen ingredients (i.e. frozen fruit, yoghurt, ice cream or ice) do not blend more than 60g or 3 ice cubes.
- Do not blend frozen ingredients without liquid.
- Fit the sealing ring to the blade unit, ensuring the seal is located correctly in the grooved area.
- Leaking will occur if the seal is damaged or incorrectly fitted.
- Hold the underside of the blade unit and lower it onto the bottle, blades down.
- Screw the blade holder onto the bottle – turn clockwise to lock.
- Shake to disperse the ingredients.
- Place the blender onto the power unit and turn clockwise to lock.
- Select maximum speed. Allow the ingredients to blend until smooth.
- Once your drink has reached the desired consistency, you can use the pulse (P) to ensure all ingredients are thoroughly blended.
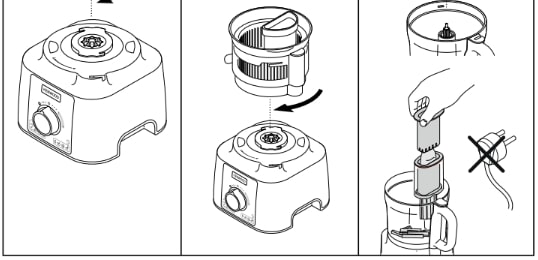
Juice Extractor (if supplied)
- Pusher
- Juicer lid
- Pulp remover
- Filter drum
- Bowl
- Juicing spout
Express Dice (if supplied)
- Dicing disc
- Dicing grid
- Dicing pusher
To use the Express Dice
- Fit the drive shaft and bowl onto the power unit.
- Add the dicing disc and fit the lid.
- Fit the dicing grid into the feed tube.
- Switch on and use the dicing pusher to process food items through the dicing grid.
The Express Dice can also be used to produce French fries, crudités and batons.
- Fit the dicing grid without the dicing disc.
- Then manually push the food through the grid without switching the appliance on.
Cleaning the grid
Use the end of the pusher to dislodge any food which may become trapped in the dicing grid.
Express Serve (if supplied)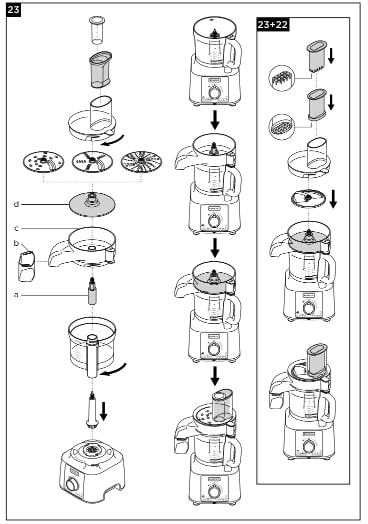
- Express serve drive shaft
- Extension chute
- Base
- Slinger plate
- Fit the drive shaft and bowl onto the power unit.
- Fit the small drive shaft to the main shaft – the Express serve will not operate unless fitted.
- Fit the required attachment/disc – do not apply excessive force. Refer to the Discs and Express Dice sections for further information, hints and tips.
- Fit the lid.
Storage Bag
Store your discs, emulsifying discs and dough tools in the bag supplied. For safety reasons, the knife blade should be stored in the main bowl instead of the storage bag when not in use.
Care and Cleaning
- Always switch off and unplug before cleaning.
- Handle the blade and cutting discs with care they are extremely sharp.
- Some foods may discolour the plastic. This is perfectly normal and will not harm the plastic or affect the flavour of your food. Rub with a cloth dipped in vegetable oil to remove the discolouration.
Power Unit
- Wipe with a damp cloth, then dry. Ensure that the interlock area is clear of food debris.
- Do not immerse the power unit in water.
- Push any excess cord into the storage area at the back of the power unit.
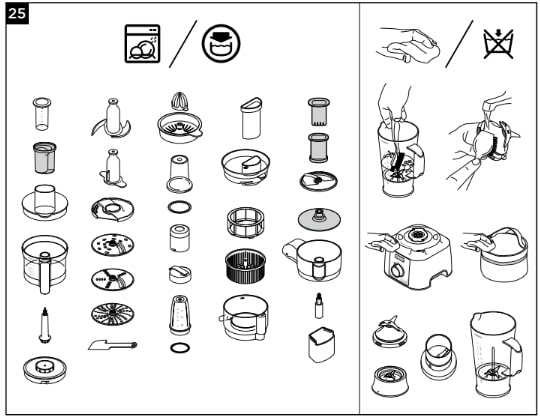
Cleaning Instructions – Refer to the relevant Illustration 25.
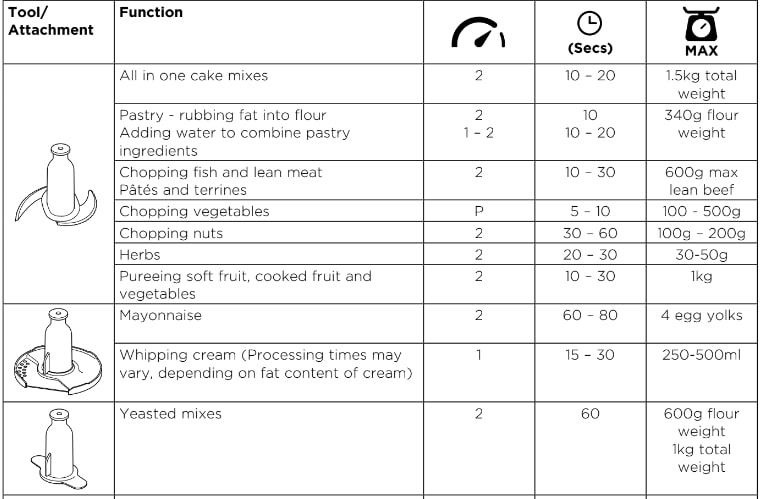
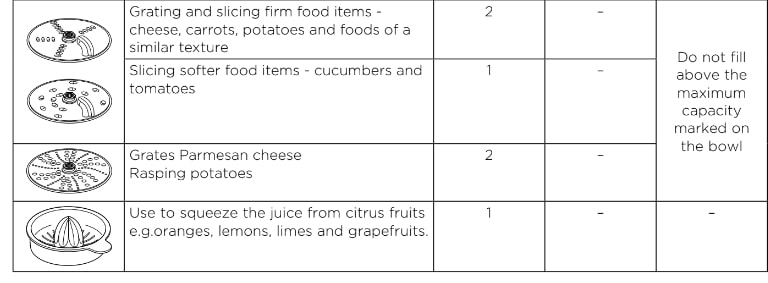
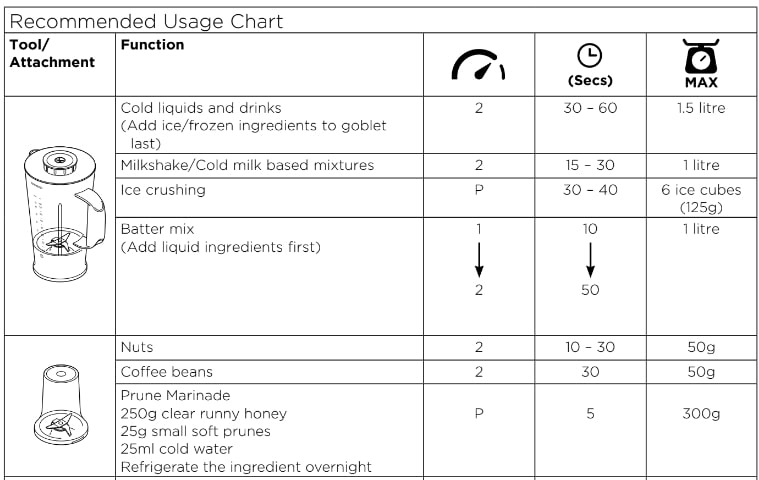
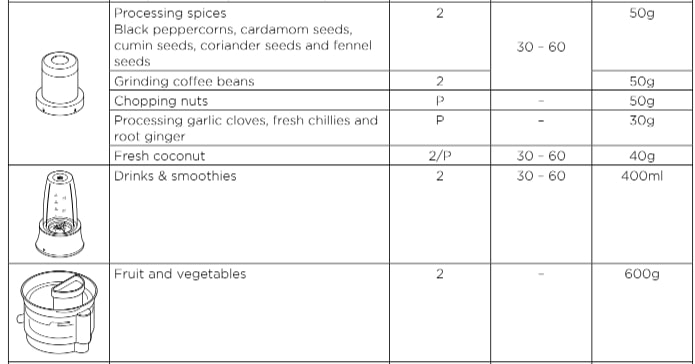
Recommended Usage Chart
Do not operate your appliance for longer than the times specified below without a rest period. Do not exceed the maximum capacities stated in the chart below. Processing continuously for longer periods can damage your appliance. Processing information supplied is for guidance only and will vary depending on the exact recipe and ingredients being processed. Do not process hot ingredients

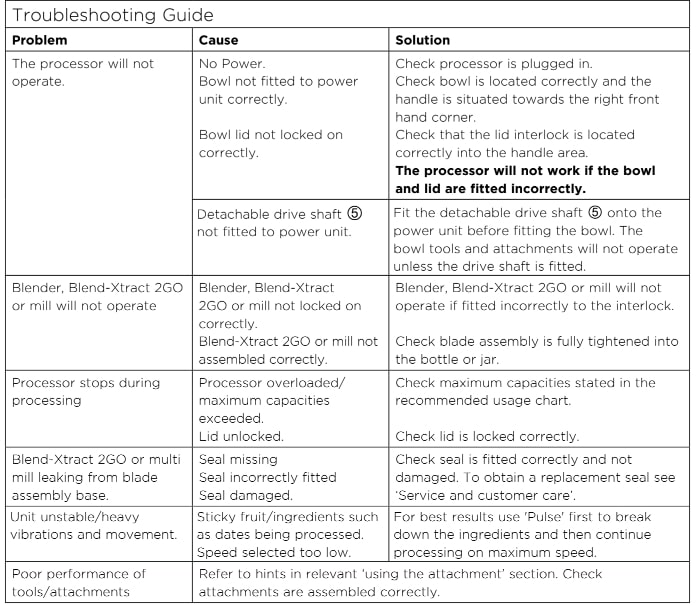
Troubleshooting Guide
Service and Customer Care
If you need help with:
- using your appliance or
- servicing, spare parts or repairs (in or out of guarantee) call Kenwood customer care on 0345 222 0458. Have your model number (e.g. TYPE: FDP65) and date code (5-digit code e.g. 21T04) ready. They are on the underside of the power unit.
- spares and attachments call 0844 557 3653.
Other countries
- If you experience any problems with the operation of your appliance, before requesting assistance refer to the ‘Troubleshooting Guide’ section in the manual or visit www.kenwoodworld.com.
- Please note that your product is covered by a warranty, which complies with all legal provisions concerning any existing warranty and consumer rights in the country where the product was purchased.
- If your Kenwood product malfunctions or you find any defects, please send it or bring it to an authorised KENWOOD Service Centre. To find up-to-date details of your nearest authorised KENWOOD Service centre visit www.kenwoodworld.com or the website specific to your Country.
- Designed and engineered by Kenwood in the UK.
- Made in China.
IMPORTANT INFORMATION FOR CORRECT DISPOSAL OF THE PRODUCT by THE EUROPEAN DIRECTIVE ON WASTE ELECTRICAL AND ELECTRONIC EQUIPMENT (WEEE)
At the end of its working life, the product must not be disposed of as urban waste. It must be taken to a special local authority, a differentiated waste collection centre, or a dealer that provides this service.
Guarantee UK only
- If your food processor goes wrong within one year from the date you bought it, we will repair it (or replace it if necessary) free of charge provided:
- these instructions have been used.
- you have not misused, neglected, or damaged it;
- it has not been modified (unless by KENWOOD);
- it is not second-hand
- it has not been used commercially;
- you have not fitted a plug incorrectly; and
- you supply your receipt to show when you bought it.
This guarantee does not affect your statutory rights.
New Lane
Havant
Hampshire
PO9 2NH
kenwoodworld.com
© Copyright 2021 Kenwood Limited. All rights reserved
FAQs About Kenwood FDP65 Multipro Express Food Processor
How can I turn on my Kenwood food processor?
Make sure the CPU is turned on and plugged into the electrical socket before moving it to the first speed. Pull the food processor’s handle firmly in your direction, clockwise, if it still won’t start. As it locks, it might click. After that, the processor will begin operating, making the next interlocks considerably simpler.
Is the Kenwood food processor up to par?
“A food processor that is small enough to fit inside half of a kitchen cupboard at last!” “I was surprised to find it to be small and powerful!” “A potent, versatile processor. It is simple to use, store, and clean.
Is the brand Kenwood good?
Kenwood receives great marks and has no ties to any issues about nuclear, fossil fuel, armaments, or political donations. The stove brand received great marks for both human rights and animal welfare.
How is a food processor cleaned?
Pour water into the bowl until it’s about ⅓ full, add a few drops of dishwashing liquid, then run the food processor on high for 30 seconds to swiftly clean the inside of the appliance and its blades.
Do blenders combine food?
Although they aren’t leakproof and are more likely to overflow, food processors can also be used to blend liquids, but the results won’t be as smooth.
A food processor is good for what?
You can chop vegetables, shred cheese, and make dough.
In addition to generating pie crust, food processors are excellent for slicing vegetables for a variety of uses, mixing salad dressings, and even creating truffle batter.
How is the Kenwood MultiPro stored?
If you’re looking for a processor that doesn’t cause any clutter, the MultiPro Go Food Processor is ideal. It has a small motor base and a bowl that fits all attachments nicely. The Kenwood MultiPro Go is so small that it fits neatly beneath shelves, in drawers, and cabinets. It is only 30 cm tall.
Why does Kenwood cost so much?
To suit different price ranges, Kenwood provides a large selection of automobile audio devices. Even while their high-end items sometimes cost more, the outstanding performance and build quality make them worth it. Kenwood’s dedication to producing dependable, feature-rich devices guarantees that you will receive excellent value for your money.
Is Kenwood of Japanese descent?
JVC and Kenwood Management Integration: A Look Back. Japanese businesses are Victor Company of Japan, Limited (“JVC”) and KENWOOD Corporation (“KENWOOD”).
Is water suitable for use in a food processor?
Using water in the food processor to ground food items is another common error. The food materials being ground in the food processor will overflow rather than produce the best-chopped outcome.
For More Manuals by Kenwood, Visit the Latest Manual
- Kenwood HMP50 650W Hand Mixer Instructions Manual
- Kenwood HMP50 650W Hand Mixer Instructions Manual
- Kenwood HDP406 Hand Blender Instruction Manual
- Kenwood CHP80 Mini Chopper Grinder Instruction Manual
- Elite Gourmet EPN-2976 2-in-1 Nonstick Panini Press Instruction Manual
 |
Kenwood FDP65 Multipro Express Food Processor Instructions Manual [pdf] |

