Black Decker G48TD Waffle Maker
About BLACK DECKER
Established in 1910, Black+Decker is an American firm that produces power tools, accessories, hardware, home appliances, home improvement goods, and fastening systems. Its headquarters are located in Towson, Maryland, which is north of Baltimore.
We create items for every area of your house so you can enjoy it more both indoors and out. Learn about our past and how we have facilitated easier living at home since our founding.
WELCOME! Congratulations on your purchase of the Black+Decker™ 12-Cup Programmable Coffeemaker. We have developed this guide to ensure optimal product performance and your complete satisfaction.
Save this use and care manual and be sure to register your appliance online at www.prodprotect.com/ blackanddecker.
IMPORTANT SAFEGUARDS
When using electrical appliances, basic safety precautions should always be followed to reduce the risk of fire, electric shock, and/or injury, including the following:
- READ ALL INSTRUCTIONS BEFORE USING.
- Do not touch hot surfaces. Only use the heat-resistant handle.
- To protect against electrical shock, do not immerse the cord, plug, or appliance in water or other liquid.
- Close supervision is necessary when any appliance is used by or near children.
- Unplug from the outlet when not in use and before cleaning. Allow to cool before putting on or taking off parts, and before cleaning the appliance.
- Do not operate any appliance with a damaged cord or plug, or if the appliance malfunctions or has been damaged in any manner. Contact consumer support at the toll-free number listed in the warranty section.
- The use of accessory attachments not recommended by the appliance manufacturer may cause injuries.
- Do not use outdoors.
- Do not let the cord hang over the edge of the table or counter, or touch hot surfaces.
- Do not place on or near a hot gas or electric burner, or in a heated oven.
- Extreme caution must be used when moving an appliance containing hot food.
- To disconnect, turn the control knob to the OFF position, then grasp the plug and remove it from the outlet. Do not yank on the cord.
- Do not use the appliance for other than intended use.
- This appliance is not intended for use by persons (including children) with reduced physical, sensory, or mental capabilities, or lack of experience and knowledge unless they have been given supervision or instructions concerning the use of the appliance by a person responsible for their safety.
- Children should be supervised to ensure that they do not play with the appliance.
- When using the appliance, provide adequate air space above and on all sides for circulation.
- Do not use this appliance on an unstable surface.
- Do not attempt to heat or cook non-food items in this appliance.
POLARIZED PLUG (120V models only) This appliance has a polarized plug (one blade is wider than the other). To reduce the risk of electric shock, this plug is intended to fit into a polarized outlet only one way.
If the plug does not fit fully into the outlet, reverse the plug. If it still does not fit, contact a qualified electrician. Do not attempt to modify the plug in any way
TAMPER-RESISTANT SCREW Warning: This appliance is equipped with a tamper-resistant screw to prevent removal of the outer cover.
To reduce the risk of fire or electric shock, do not attempt to remove the outer cover. There are no user-serviceable parts inside. Repair should be done only by authorized service personnel.
ELECTRICAL CORD
- A short power-supply cord is provided to reduce the risk resulting from becoming entangled in or tripping over a longer cord.
- Extension cords are available and may be used if care is exercised in their use.
- If a long extension cord is used:
- The marked electrical rating of the extension cord should be at least as great as the electrical rating of the appliance.
- If the appliance is of the grounded type, the extension cord should be a grounding-type 3-wire cord.
- The cord should be arranged so that it will not drape over the countertop or tabletop where it can be pulled on by children or tripped over unintentionally.
Note: If the power cord is damaged, please contact the warranty department listed in these instructions.
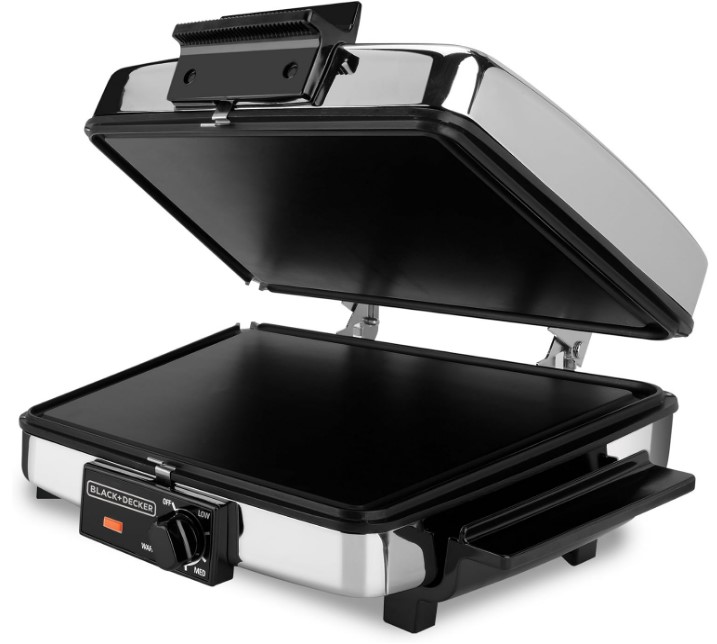
GETTING TO KNOW YOUR WAFFLE MAKER
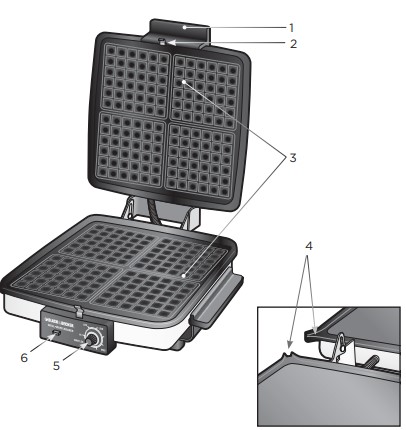
- Handles
- Grid clips
- Non-stick cooking grids (part # 165746-01)
- Grease spouts
- Control knob
- Signal light
The product may vary slightly from what is illustrated.
HOW TO USE This appliance is intended for household use only.
GETTING STARTED
- Remove all packing material, stickers, and plastic bands around the power plug.
- Remove and save literature.
- Please go to www.prodprotect.com/applica to register your warranty.
- Remove the cooking grids by pressing down on the grid clips at the front of the unit and sliding the grids forward and out. Wash them with hot water and dish soap, rinse, dry thoroughly, and replace them in the unit. When replacing the grids, be sure the lip of each grid fits into the notch at the back of the unit and that each is securely clipped into place before plugging in and operating. Grids should have matching surfaces.
- IMPORTANT: Condition the non-stick cooking surfaces with a light coating of cooking oil before first use. Do not use non-stick cooking spray to “condition.” Brush the oil onto the cooking surfaces or wipe on with a paper towel. Be sure to coat the cooking surfaces as this will reduce sticking. Wipe off excess oil with paper towels. The first waffle may absorb excess oil and appear greasy. If so, discard it.
BAKING WAFFLES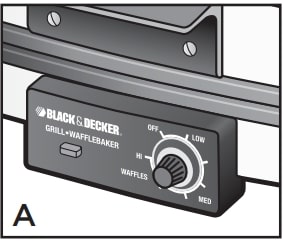
- Be sure the Cooking Grids are securely attached with the waffle sides showing. Close the unit and plug the cord into a standard electrical outlet.
- Turn the control knob to WAFFLES. The signal light (A) will come on to indicate the unit is heating. Use the pre-heat time to prepare your batter (see “Recipes”). When the signal light goes out (from 5-8 minutes), the unit is ready.
- Open the unit and pour about 1 cup of batter onto the lower cooking surface. Spread the batter toward the edges using a rubber spatula for even waffles.
- Carefully close the top. Keep hands away from the unit as steam may escape when baking begins. The signal light will come back on and may cycle on and off during baking. Cooking time is 3-5 minutes depending on the type of batter/ingredients you used. The hinge between the sections is designed to be loose.
- When the waffles are done, open the top and remove the waffle using a rubber or wooden spatula. Be careful not to scratch the non-stick finish. You may want to have a plate nearby when removing waffles in case they separate as this unit is designed to semi-cut waffles into 4 sections. If sticking occurs, lightly re-oil the cooking surfaces. You can make additional batches right away — no need to let the unit cool down. Keep the lid closed between cooking batches to preserve heat.
- When all waffles are baked, turn the control knob to OFF, unplug the cord, open the unit, and allow it to cool.
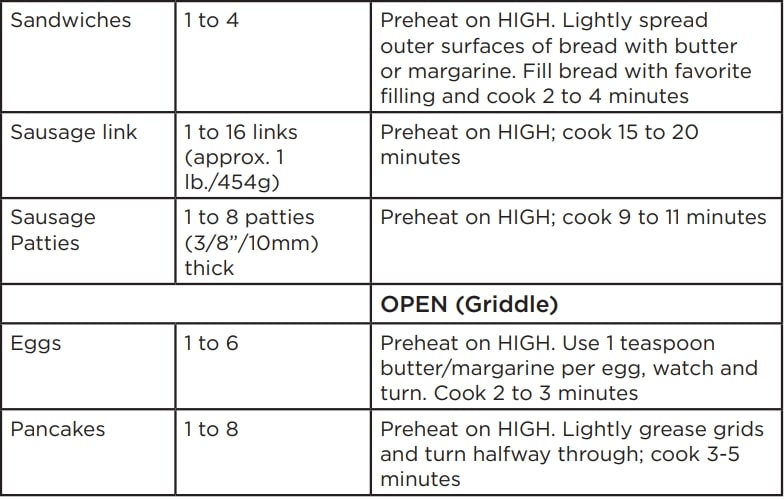
GRILLING This versatile unit is designed for open grilling to prepare griddle-style foods such as pancakes, eggs, or bacon strips, or closed grilling for hamburgers, hot dogs, or sandwiches such as grilled cheese. See the charts for preparation.
- Be sure the cooking grids are securely attached with the flat grill sides showing. Close the unit and plug the cord into a standard electrical outlet.
- Depending on the kind of food you’re grilling (such as bacon or chops), you may want to place a small can or container under the grease spouts at the corners to catch grease or drippings from the built-in grease channel.
- For Closed Grilling: turn the control knob to high and preheat the unit closed for 8-10 minutes until the signal light goes out. Use the charts to help you determine the best setting, depending on the food. Open the unit, place the food on the lower grid, and close the grill.
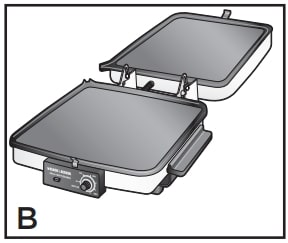
- For Open Grilling: close the grill and turn the control knob to high to preheat for 8-10 minutes until the signal l goes out. Use the charts to help you determine food amounts and times. Open the grill and slowly lower down the top half so that it forms a flat, griddle-like cooking surface. (B). If cooking on only one side, place the food on the bottom grid. Watch and turn food as needed. To keep food warm while serving, turn the control knob to LOW.
- When finished grilling, turn the control knob to OFF, unplug the cord, open the unit, and allow it to cool.
TIPS
- To avoid damaging the non-stick surfaces, do not use sharp utensils or cut food on the Grid surfaces. Use rubber or wood utensils.
- Baked waffles freeze well. Cook all the batter. Cool the waffles and place paper towels between them. Wrap waffles in plastic wrap or freezer bags, and freeze.
- To keep foods from sticking, you may want to re-oil cooking surfaces before each use or use a cooking spray.
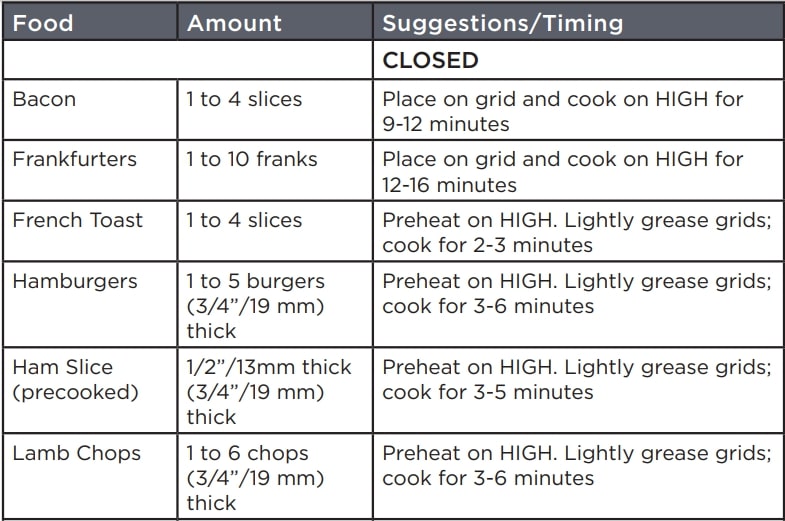
GRILLING Use the grill in the CLOSED position to press hamburgers or other meats (i.e. chops, Canadian bacon) or as a sandwich maker. Preparing meats in the CLOSED position will help cut down on spatter and speed up cooking times.
NOTE that ALL the foods listed for CLOSED grilling can also be prepared in the OPEN (Griddle) position but will take 5 to 10 minutes longer than CLOSED and will require watching and turning for doneness.
CARE AND CLEANING
This product contains no user-serviceable parts. Refer service to qualified service personnel.
- Unplug and allow the unit to COOL completely before cleaning. DO NOT IMMERSE THE UNIT nor run water directly onto the cooking surfaces.
- Unclip the Grids and wash them in hot, soapy water. Rinse and dry thoroughly. DO NOT PLACE THEM IN A DISHWASHER. Do not use steel wool pads or other abrasive cleaners on the cooking surfaces as they may damage the non-stick coating. To remove cooked-on food, use a plastic bristle brush or nylon mesh pad. Be sure to clean the handles after each use.
- Clean the outside surfaces by wiping them with a damp sponge or cloth. Dry thoroughly with a soft cloth. Do not use harsh or abrasive cleaners. Never spray or apply cleaners directly to the unit; instead, apply the cleaner to a cloth and rub it on. Rubbing a soft dry cloth or paper towel over the chrome surface after cleaning will restore the shine. Cleaning the outside surfaces after each use will prevent grease from burning onto the chrome and discoloring it.
WARRANTY INFORMATION
For service, repair, or any questions regarding your appliance, call the appropriate 800 number listed within this section. Please DO NOT return the product to the place of purchase. Also, please DO NOT mail the product back to the manufacturer, nor bring it to a service center.
You may also want to consult the website listed on the cover of this manual.
Two-Year Limited Warranty (Applies only in the United States and Canada) What does my warranty cover?
- Your warranty covers any defect in material or workmanship provided; however, the liability of Spectrum Brands, Inc. will not exceed the purchase price of the product.
For how long?
- Two years from the date of original purchase with proof of purchase.
What will we do to help you?
- Provide you with a reasonably similar replacement product that is either new or factory refurbished.
How do you get service?
- Save your receipt as proof of date of sale.
- Visit the online service website at www.prodprotect.com/applica, or call toll-free 1-800-231-9786, for general warranty service.
- If you need parts or accessories, please call 1-800-738-0245.
What does your warranty not cover?
- Damage from commercial use
- Damage from misuse, abuse, or neglect
- Products that have been modified in any way
- Products used or serviced outside the country of purchase
- Glass parts and other accessory items that are packed with the unit
- Shipping and handling costs associated with the replacement of the unit
- Consequential or incidental damages (Please note, however, that some states do not allow the exclusion or limitation of consequential or incidental damages, so this limitation may not apply to you.)
How does state law relate to this warranty?
- This warranty gives you specific legal rights. You may also have other rights that vary from state to state or province to province.
Customer Service Should you have any questions or concerns with your new product, please call our Customer Service Line at 1-800-231-9786 (US and Canada). Please do not return to the store.
Comercializado por: Spectrum Brands de México, S.A de C.V Autopista México Querétaro No 3069-C Oficina 004 Colonia San Andrés Atenco,
Tlalnepantla Estado de México, C.P. 54040 Mexico. Tel: (55) 5831 – 7070 BLACK+DECKER and the BLACK+DECKER logo are trademarks of The Black & Decker Corporation and are used under license. All rights reserved.
www.BlackAndDeckerAppliances.com © 2016 The Black & Decker Corporation and Spectrum Brands, Inc. Middleton, WI 53562 15246-00
FAQS About Black Decker G48TD Waffle Maker
How long to cook waffles on black and Decker?
The waffle maker heats up rapidly; when the “ready” indicator light illuminates, the waffle maker is ready. Then, it cooks waffles to golden perfection in only three to four minutes.
Are waffle makers waterproof?
Cooking sprays in aerosol form may leave a sticky residue on nonstick surfaces. An electric waffle maker should never be submerged in water. Avoid using metal or sharp utensils to remove the cooked waffles or scrape off caked-on batter.
Do you have to flip waffles in a waffle maker?
As soon as you shut the lid on your waffle maker with batter inside, you flip it. The batter will cook more steadily throughout and be distributed more evenly over the plates thanks to gravity.
How to know when a waffle maker is ready?
Waffle makers usually take four to six minutes to cook a waffle through, but if yours doesn’t have an indicator light, wait for the waffle to be fully cooked, or remove it when the steam from the iron stops rising. Move the waffle to a plate with a fork.
How much time does it take to cook waffles?
Depending on your waffle machine and batter quantity, cook times vary.
What is the best material for a waffle maker?
Professional waffle makers choose to use cast iron because of its great thermal conductivity, remarkable durability, and capacity to keep a constant temperature. Selecting a waffle iron made of cast iron guarantees uniform frying and unmatched longevity.
What causes waffles to stick?
Additionally, watch out that you don’t try to remove the waffle from the pan too quickly because it will stick if it isn’t cooked through. See Making Waffles Just Got More Delicious for some amazing waffle recipes.
How do you keep waffles from separating?
Every day before work, we lubricate the waffle iron with oil after turning it off to keep it from drying out. We also scrub the plates for a few minutes with a slotted wire brush to get rid of any baked batter deposits that have softened from the previous day, then wipe them dry with a cotton towel and lubricate only the…
Why do you rotate a waffle maker?
They function as follows: The batter spreads and cooks on the bottom plates of the waffle maker as soon as it is poured upon it. For the batter to pour onto the top plates, you must then turn the machine over and enable direct contact. By doing this, the waffle will cook more quickly and brown on both sides equally.
How long does it take to cook a waffle in black and decker?
Making two waffles takes about three to four minutes. Depending on how much time you give it to warm up before using it.
How long does to leave the waffle batter in the waffle maker?
As directed by the manufacturer, preheat a waffle maker, lightly coat the surface with a small amount of oil, and then pour in enough batter to barely cover it. Cook the waffles for the recommended amount of time (typically 5 to 6 minutes) or until they are crisp and golden brown.
 |
Black Decker G48TD Waffle Maker User Manual [pdf] |

