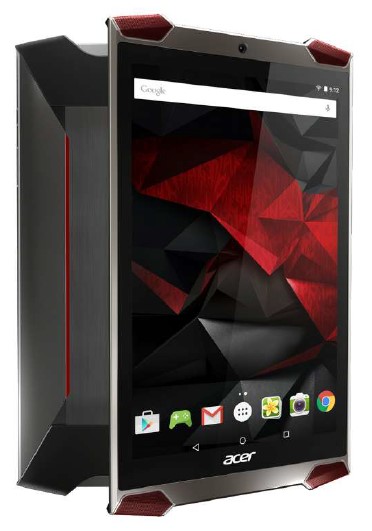
Acer Predator 8 Gaming Tablet
About Acer
Acer is a Taiwanese multinational hardware and electronics corporation that specializes in the production of computer-related products. The company was founded in 1976 and has become one of the world’s largest computer manufacturers.
Acer produces many products, including desktop and laptop computers, tablets, monitors, projectors, servers, and various accessories. They cater to consumer and business markets, offering products ranging from budget-friendly options to high-performance devices.
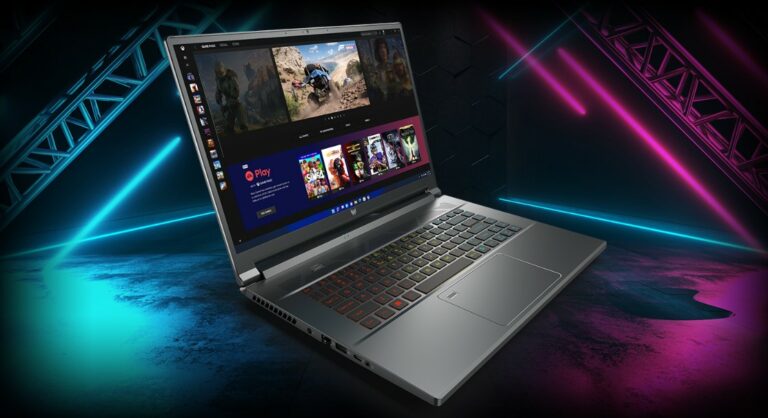
One of Acer’s notable product lines is its laptops. They offer laptops in various categories, including ultra-thin and lightweight models, gaming laptops, 2-in-1 convertibles, and traditional notebook computers. Acer laptops are known for their affordability and solid performance, making them popular among consumers.
GETTING STARTED WITH YOUR TABLET
Features And Functions
Your new tablet offers lead, easy-to-access multimedia and entertainment features. You can:
- Connect to the Internet via Wi-Fi.
- Access your email while on the move.
- Keep in touch with your friends via your People and social networking apps.
Unpacking your tablet
Your new tablet comes packed in a protective box. Carefully unpack the box and remove the contents.
If any of the following items are missing or damaged, contact your dealer immediately:
- Predator tablet
- Product setup and safety information
- USB cable
- AC adapter
- Warranty card
Getting to know your tablet
Views
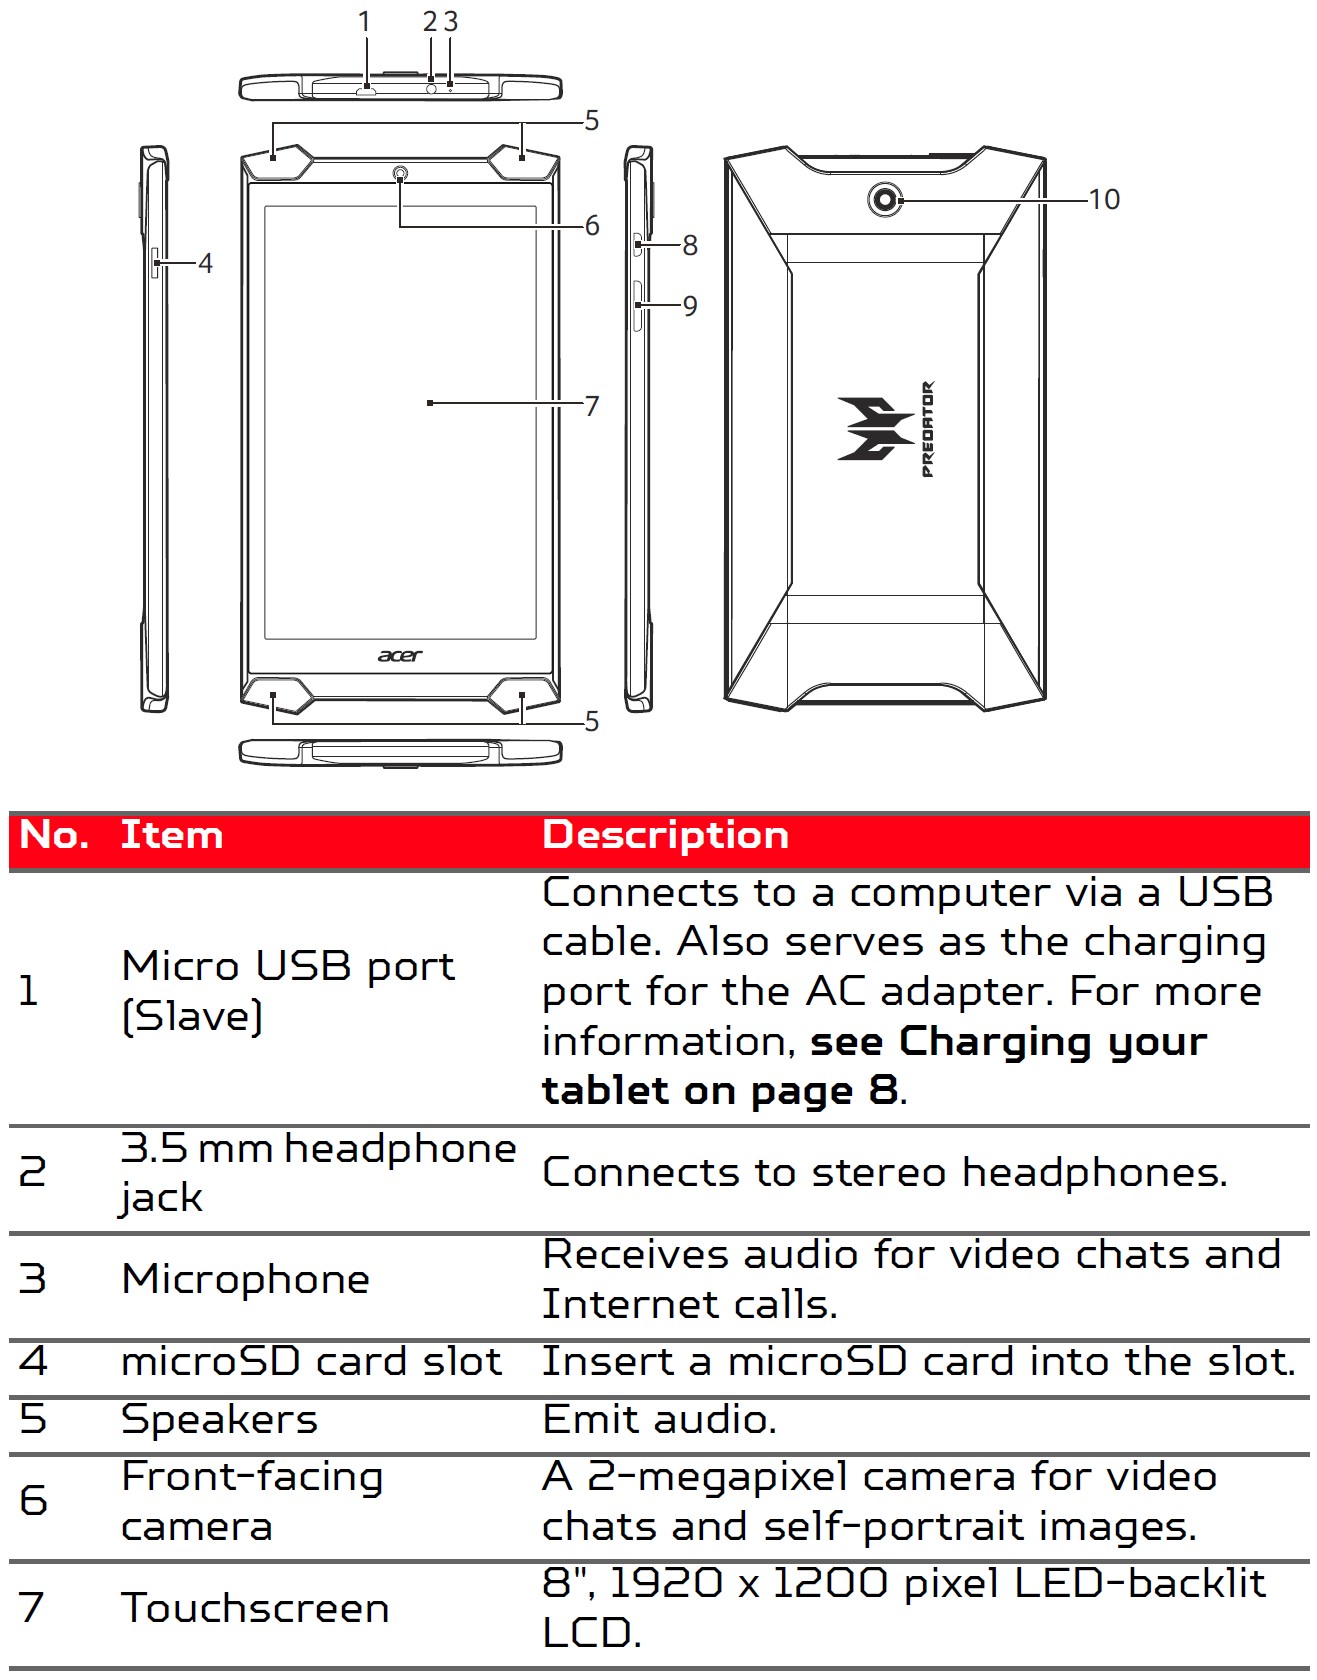
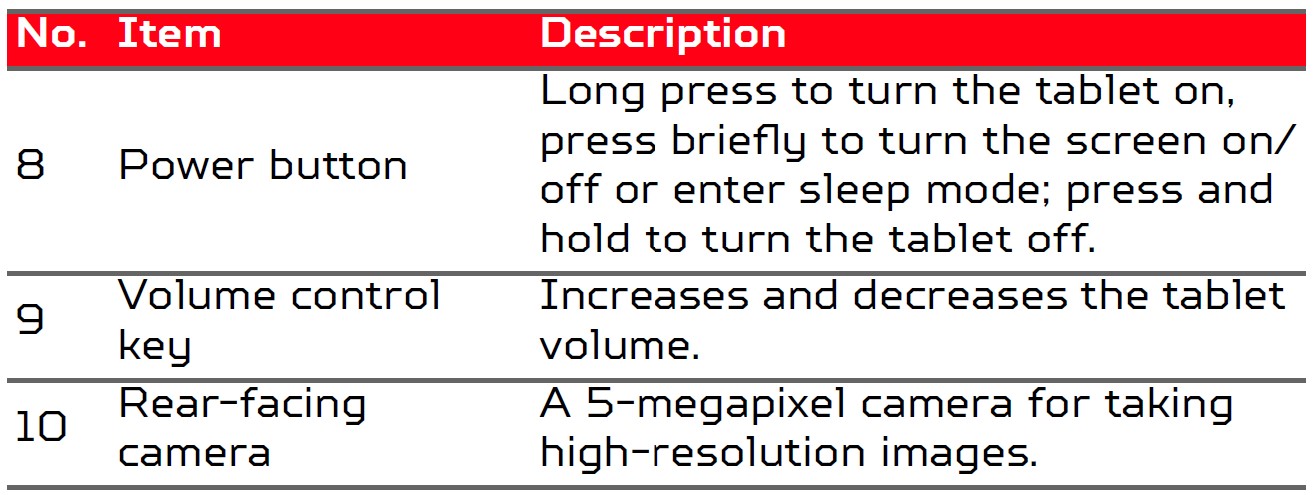
Turning on for the first time
To turn on your tablet, press and hold the power button until you see the Acer logo. Wait a moment for your tablet to boot up. You will then be asked some questions before you can use your tablet.
To start, tap to select your language then tap the arrow. Follow the rest of the instructions as they are displayed.
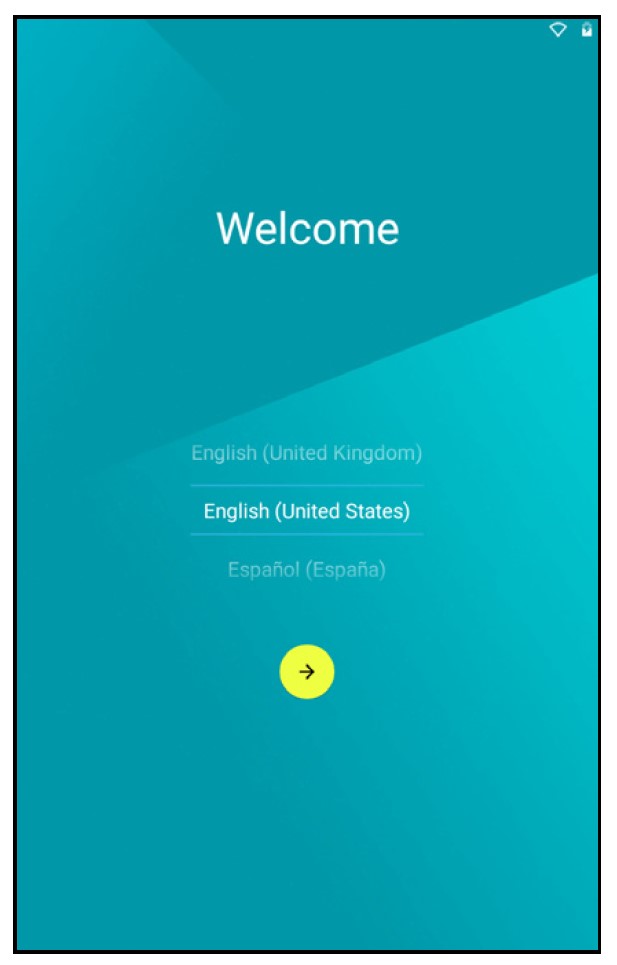
If the tablet’s screen turns off, it has entered sleep mode. Briefly press the power button to wake it up.
Sign in to or create a Google account
If you have Internet access, your tablet allows you to synchronize information with a Google account.
During the start-up process, you may create or sign in to an account, which will be used to synchronize your contact list, email, calendar, and other information. If you do not yet have Internet access or do not want to use this feature, then tap Skip.
CHARGING YOUR TABLET
Assembling the power adapter
Your tablet is bundled with one of two types of USB power adapters: a fixed-prong type or a removable-prong type. Both types are described in this manual.
Fixed-prong type
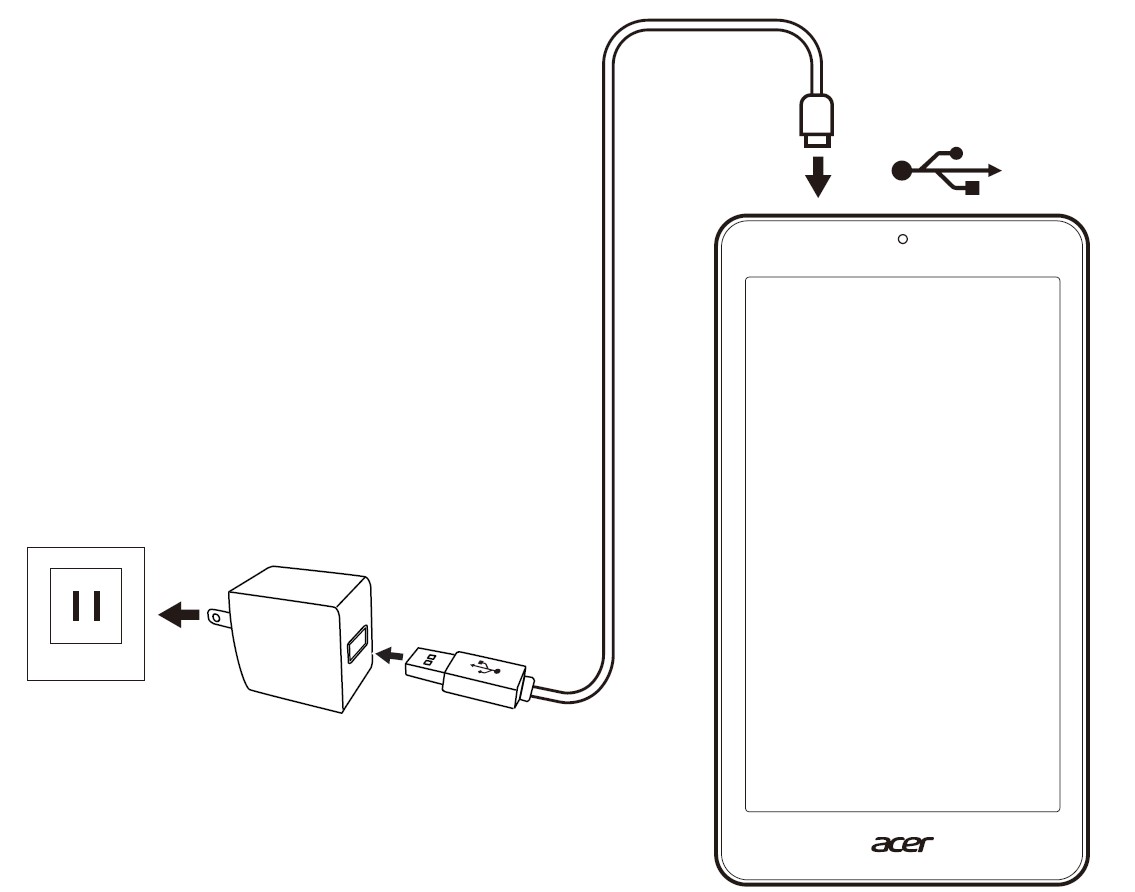
The prongs and power adapter body form a complete piece, no assembly is required. Simply slide the large end of the USB cable into the power adapter body (it will fit in only one direction). You cannot remove or switch the prongs with this type of adapter.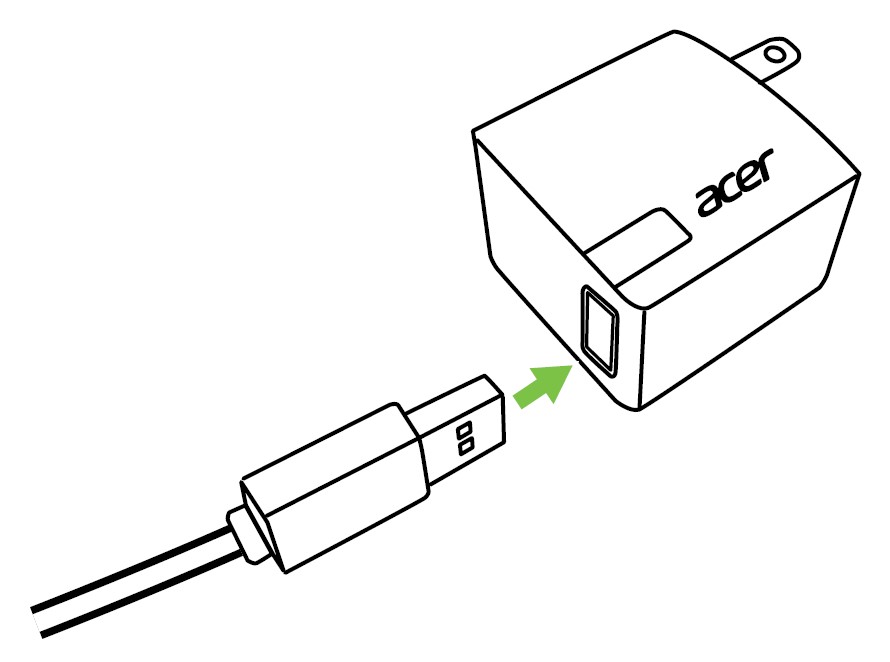
Removable-prong type
Align arrows on the power adapter head and body. Insert the head onto the power adapter body and turn the head towards the “CLOSE” printed on the head until it clicks into place. Simply slide the large end of the USB cable into the power adapter body (it will fit in only one direction).
Connecting power
Connect the power connector to your tablet and plug the AC adapter into any AC outlet.
USING YOUR TABLET
Using the touchscreen
Your tablet uses a touchscreen for selecting items and entering information. Use your finger to tap the screen.
- Tap: Touch the screen once to open items and select options.
- Drag: Hold your finger on the screen and drag across the screen to select text and images.
- Tap and hold: Tap and hold an item to see a list of actions available for that item. On the pop-up menu that appears, tap the action you want to perform.
- Scroll: To scroll up or down the screen, simply drag your finger up or down the screen in the direction that you want to scroll.
The Home screen
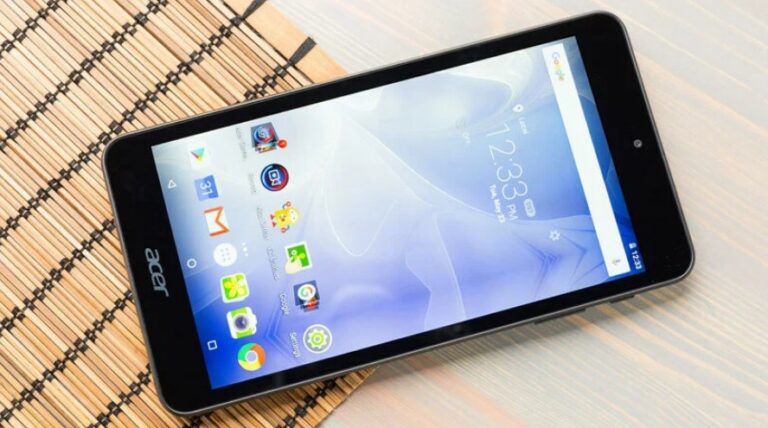
When you start your tablet or wake it from power saving, it will display the Home screen. This screen gives you quick access to information and simple controls with widgets or shortcuts to apps.
Widgets display information such as the time and weather or provide additional controls and direct access to apps. Some have been pre-installed on your tablet, while others may be downloaded from Google Play.
The Home screen already features some useful controls and information.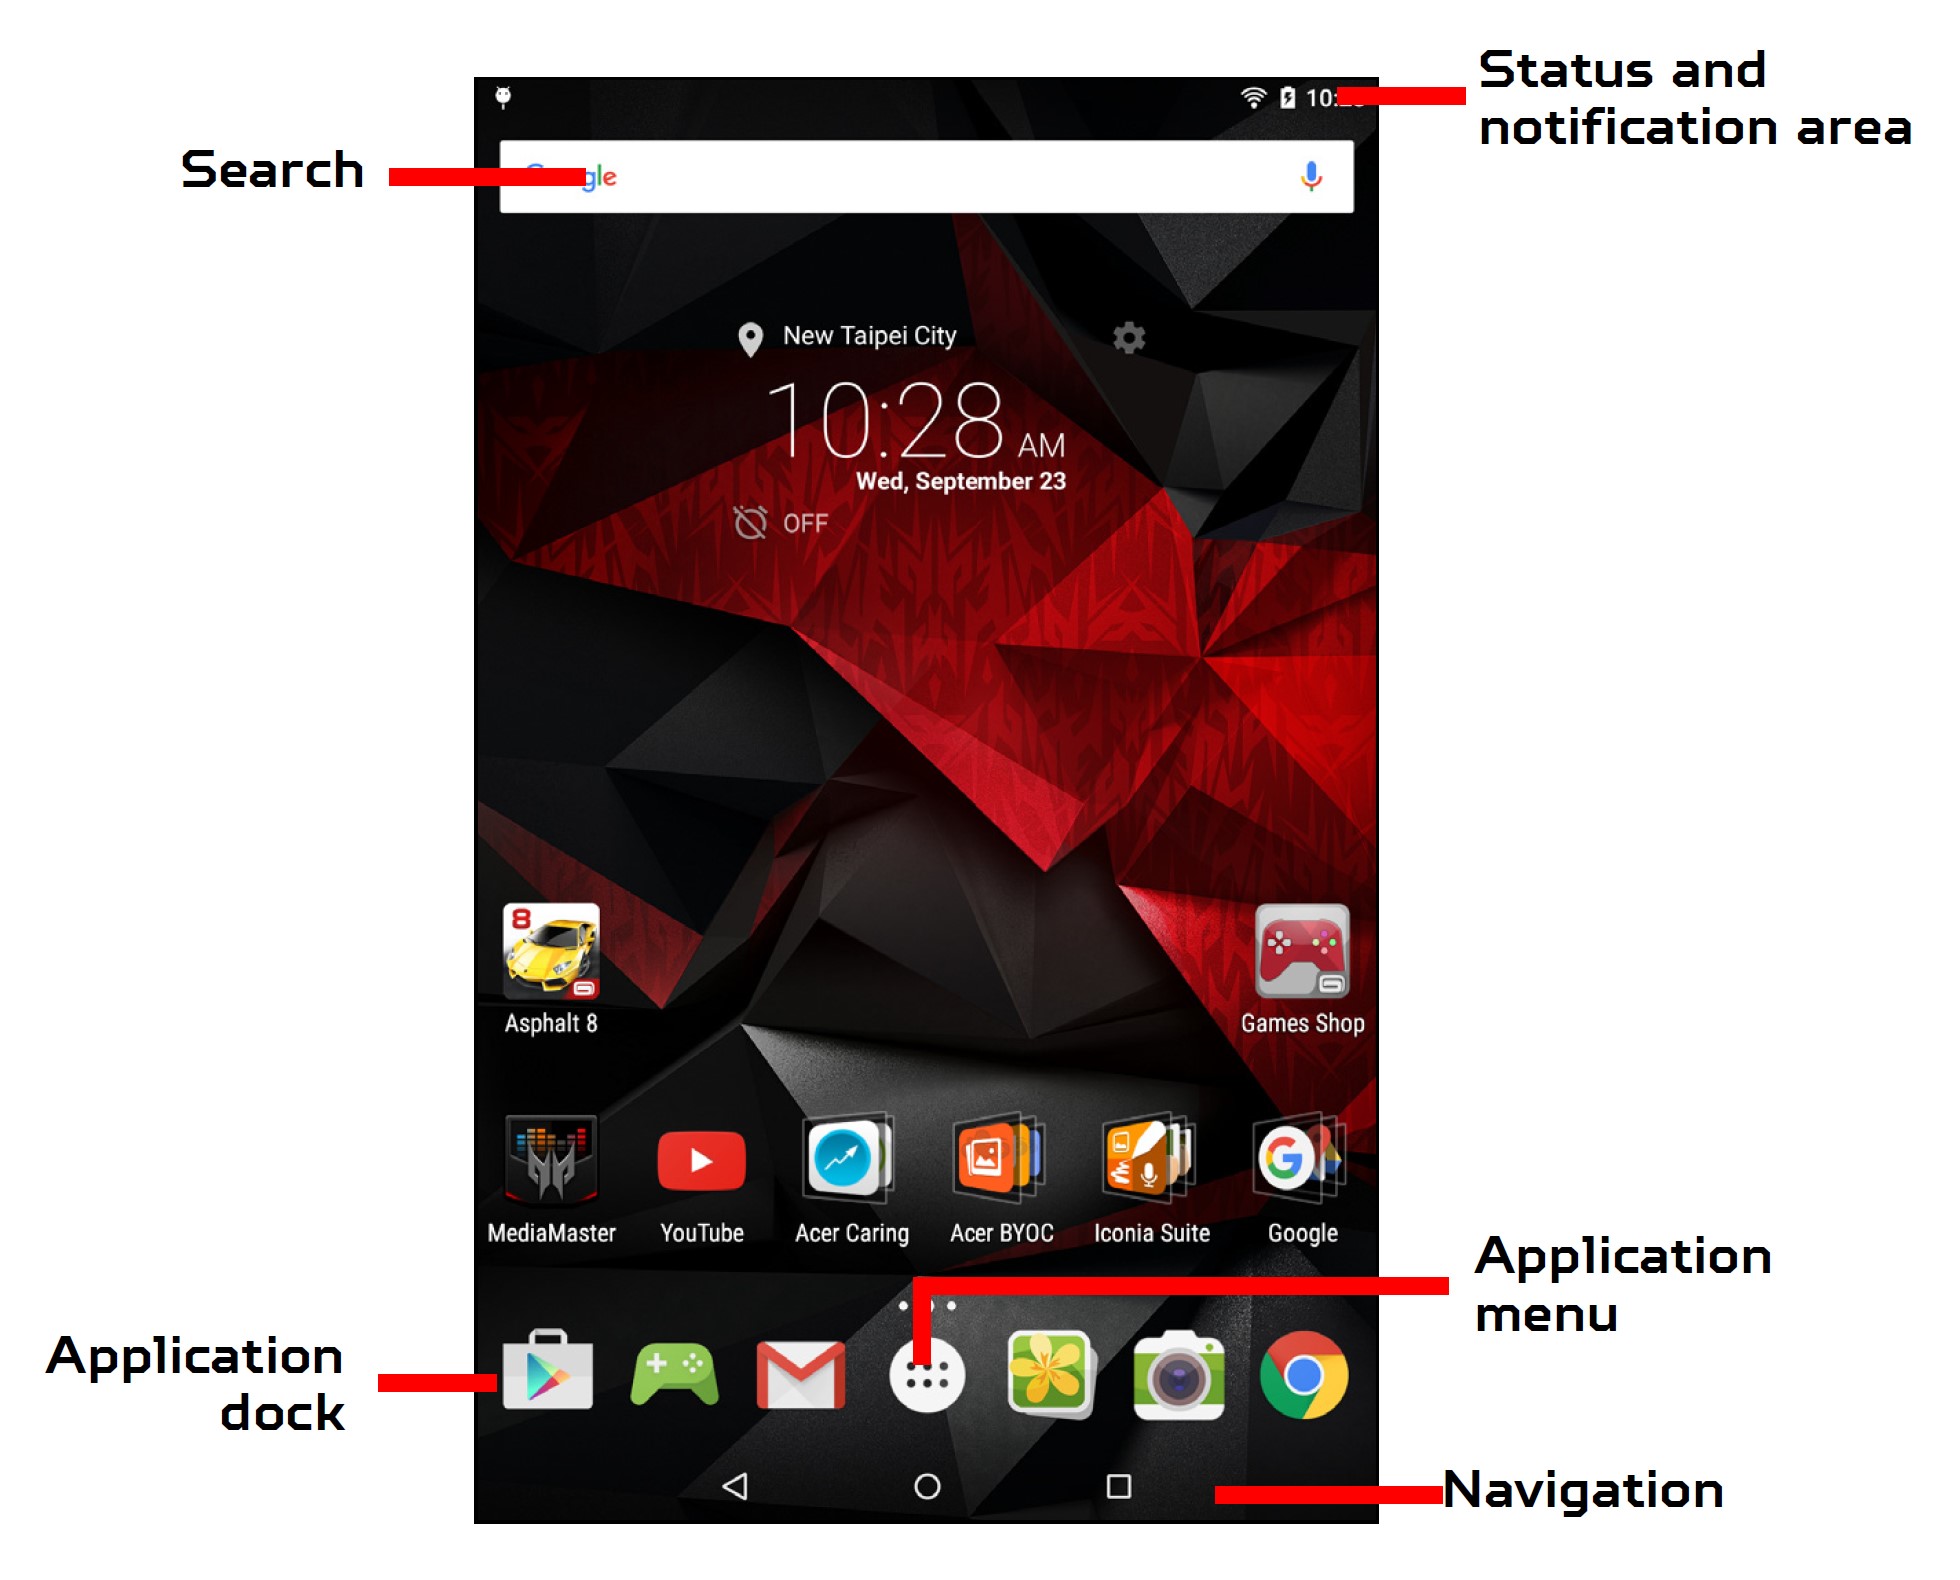
Search
To search for apps, files, or information on the internet, tap the Google icon. Simply enter the text you want to find. Tap the arrow or Enter key to search the internet, or tap one of the suggestions, apps, or files shown in the list.
Alternatively, you can search using your voice. Simply say the words “OK Google” and then the content you want to search for. The results display just as if you typed the words. To search or browse the internet, you must be connected to a wireless network.
To filter the Web search results by news, images, and more, tap the desired filter at the bottom of the results screen. The filter list also has an option called Tablet that searches your tablet for the term/s you searched for. You can also choose what the Tablet searches for.
After searching for something, tap the Menu icon > Settings > Tablet search. Select the items you want to be included in a tablet search.
Voice search
If voice search is available, tap the microphone and speak your search request.
Navigation
To navigate through menus and options, three (or more) icons are shown in the bottom-left corner.
Back
Tap this icon to go to the previous page, or to go up one level in a menu. This icon may be replaced with the hide icon in certain cases (such as if the keyboard or list of recent apps is shown).
Home
Tap this icon to go directly to the Home screen.
Recent
Tap this icon to see recently opened apps. Tap an application to open it, or tap anywhere on the screen to return to the Home screen.
The extended Home screen
You can extend the Home screen to give you more room to add widgets or organize shortcuts. To do so, you must add an app or widget.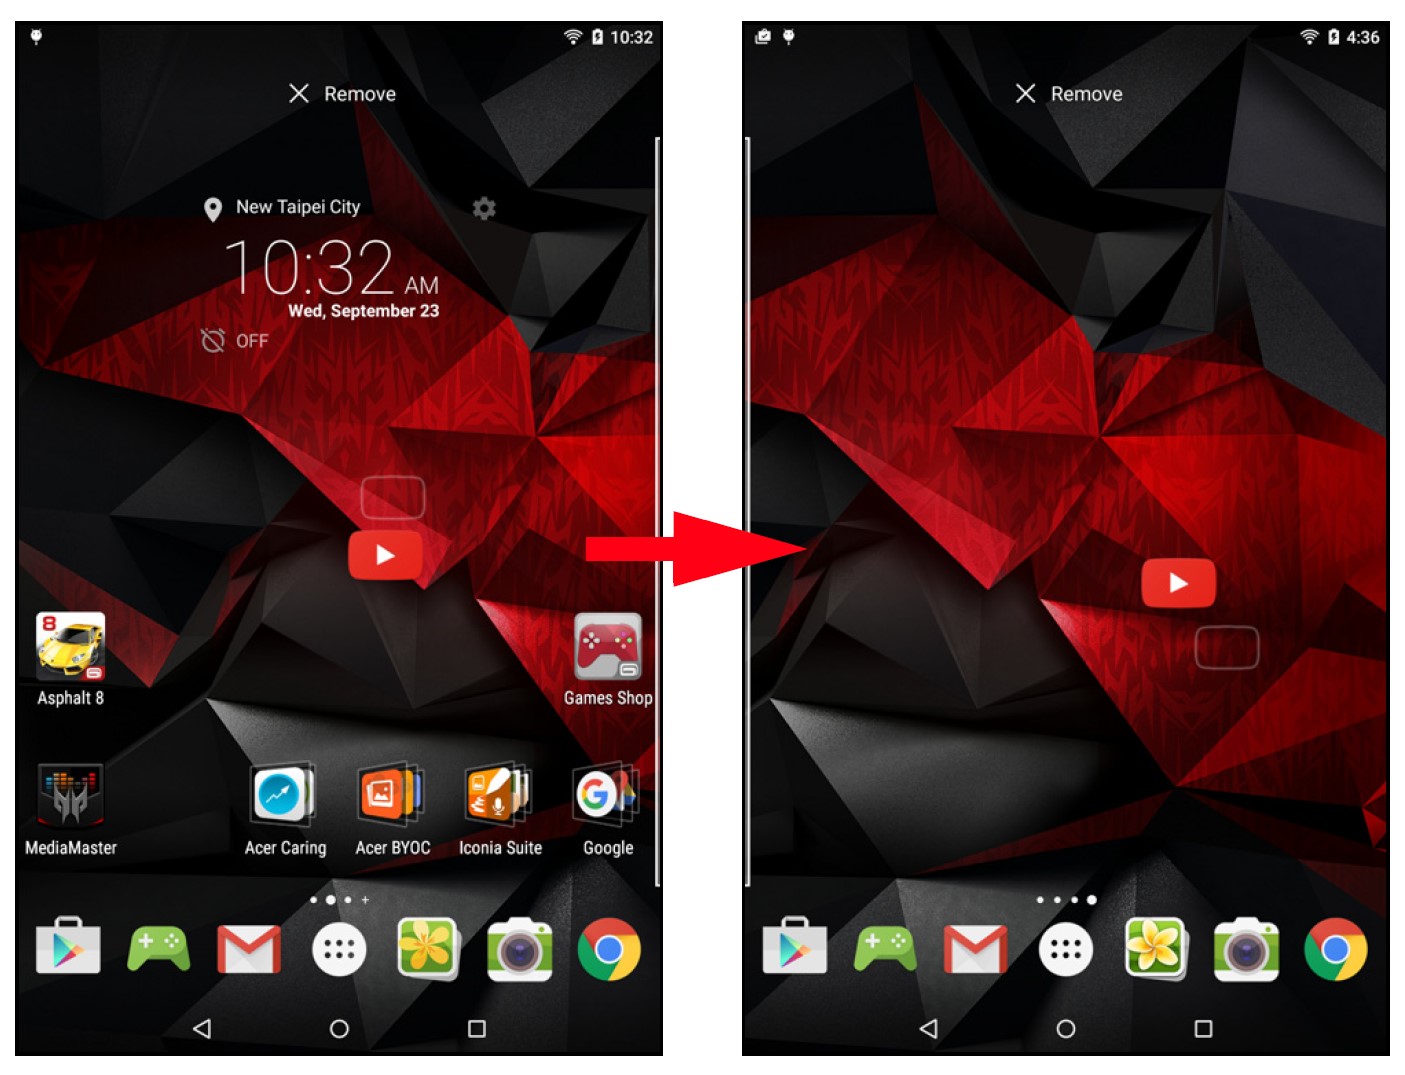
The Application menu
To access the Application menu, tap
in the center of the application dock. The Application menu displays apps available on your tablet. Apps are displayed in alphabetical order. Swipe to the left to see more apps. Tap the Play Store icon to open Google Play.
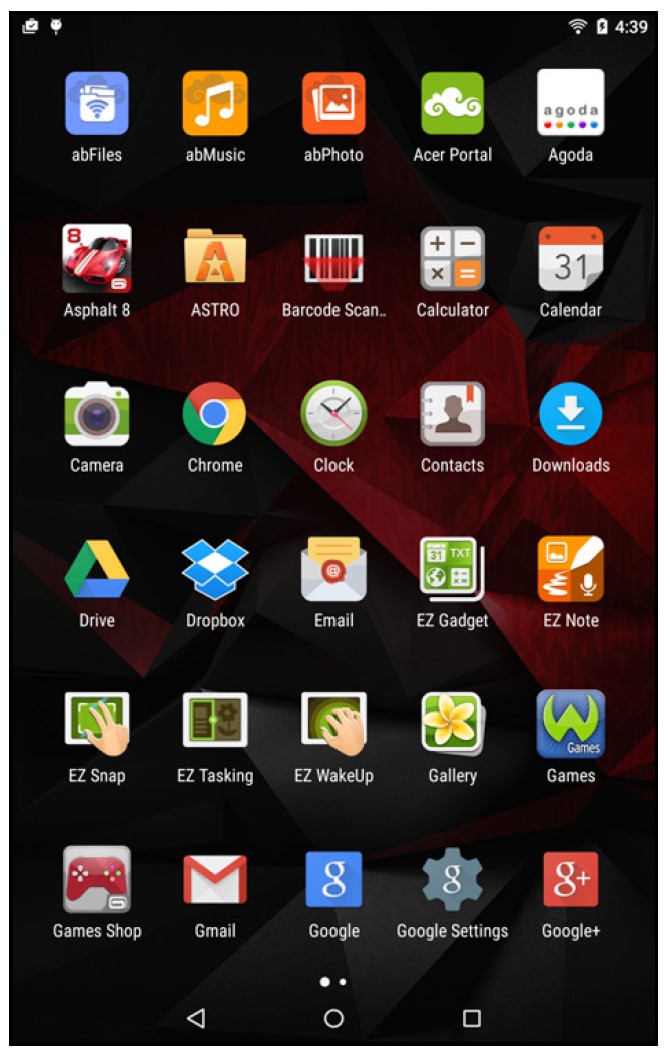
Adding an application to a Home screen
Open the Application menu and tap and hold an app you’d like to have on the Home screen. Release your finger to place the app.
If you wish to place the app on an extended Home screen, do the following:
- Slide your finger to the right side of the screen.
- Hold the app there until you have cycled through to the desired Home screen.
- Otherwise, hold your finger until you have cycled through all extended Home screens and a new one is created.
- Release your finger to place the app.
Status and notification area
Status and notification icons are shown at the top of the screen. The top-right area displays a variety of information, such as time, battery status, and connectivity. The top-left area displays event icons, such as a new message.

Swipe down from the top to display notification details such as current downloads and media controls such as “play/pause” and “next track” when music is playing, and to display Quick Settings.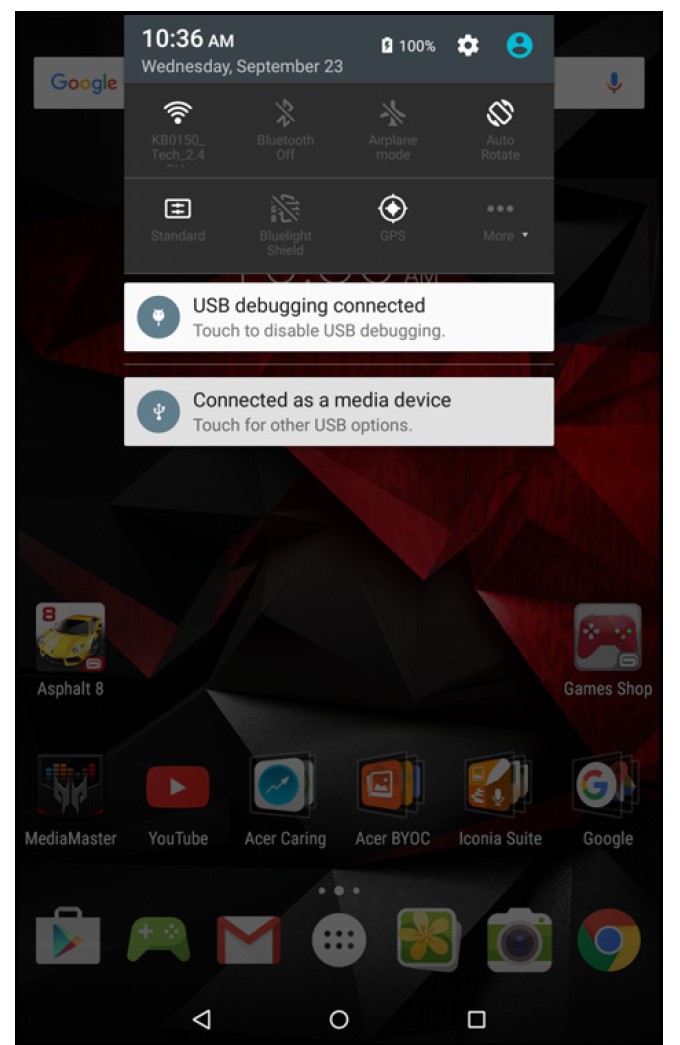
Priority notifications
With priority notifications turned on, the types of notifications you’ve set as important will show up at the top of the notification screen (even when notifications are muted).
You can finetune priority notification settings by opening the Applications menu and tapping Settings > Sound & notification > Interruptions.
Quick Settings icons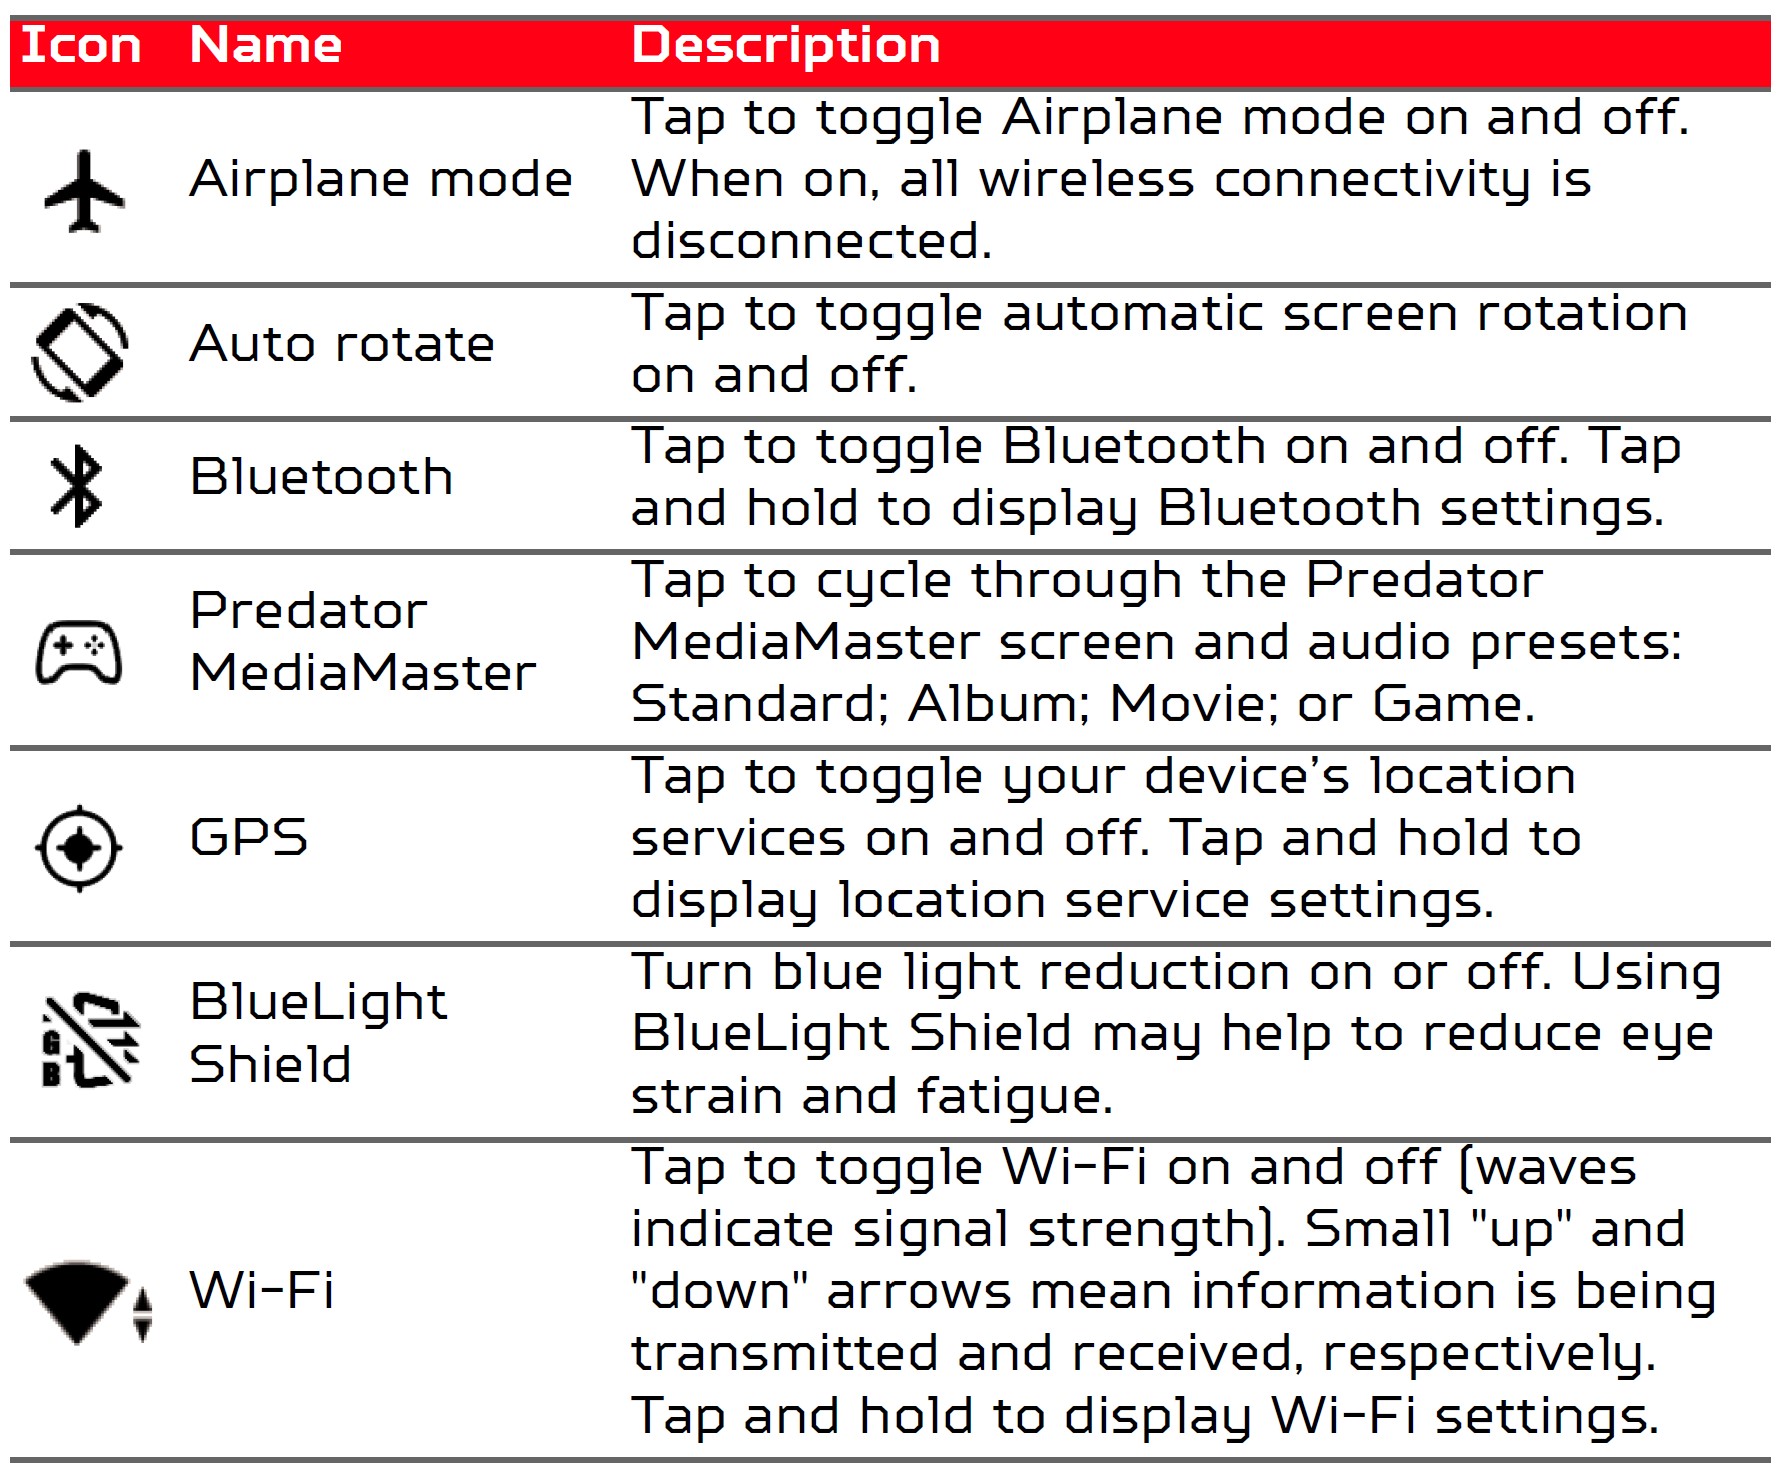
Personalizing the Home screen
You may personalize your Home screen by adding or removing application shortcuts or widgets, and by changing the wallpaper.
Adding or removing shortcuts or widgets
To add widgets, tap and hold any open space on the Home screen.
Tap WIDGETS to see small apps and links (such as custom shortcuts, contacts, or bookmarks) that you can add to a Home screen.
Widgets are small apps that display constantly updated information or quick shortcuts to apps or special functions.
To move a widget to the Home screen, tap and hold an item until it is selected. The Home screen will open. Drag the item to any free area on the screen.
To view information about the widget, drag it to App info at the top of the screen.
If you wish to place a widget on an extended Home screen, do the following:
- Slide your finger to the right side of the screen.
- Hold the widget there until you have cycled through to the desired Home screen.
- Otherwise, hold your finger until you have cycled through all extended Home screens and a new one is created.
- Release your finger to place the widget.
Removing an item from the Home screen
To remove an item from the Home screen, tap and hold the item until the Remove option appears at the top of the screen. Simply drag the item to the Remove option.
Changing the Home screen wallpaper
Tap and hold any open space on the Home screen and tap WALLPAPERS. To choose from pre-selected background images, tap a photo at the bottom of the screen and tap Set wallpaper.
To choose an image to use as wallpaper from a variety of locations, tap Pick Image. Then tap the Pick Image to display a list of locations where you might have images stored, such as Google Drive, Gallery, Dropbox, and others. Once you have selected your wallpaper image, tap Set wallpaper.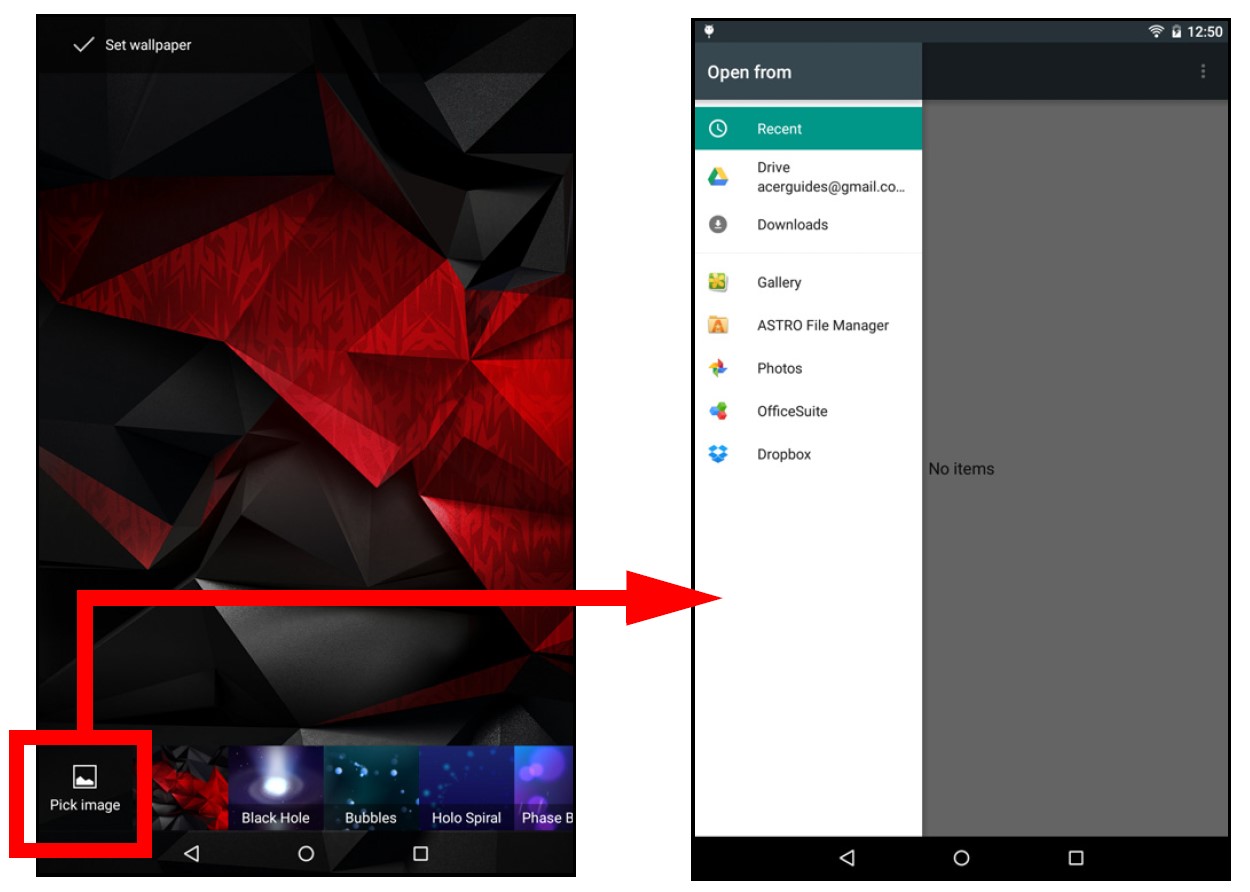
The onscreen keyboard
When you tap a text box to enter text, an onscreen keyboard will appear. Simply tap on the keys to enter text.
Tap the? 123 buttons to see numbers and special characters, and then tap the ~ [ < key to see more options. Tap and hold a key to select alternative characters (if available for that key), such as letters with accents or related symbols.
Changing Google keyboard settings
To use a different keyboard language or change settings, open the Application menu and tap Settings. Tap Language & Input and under Keyboard & Input methods, tap the option you want to modify.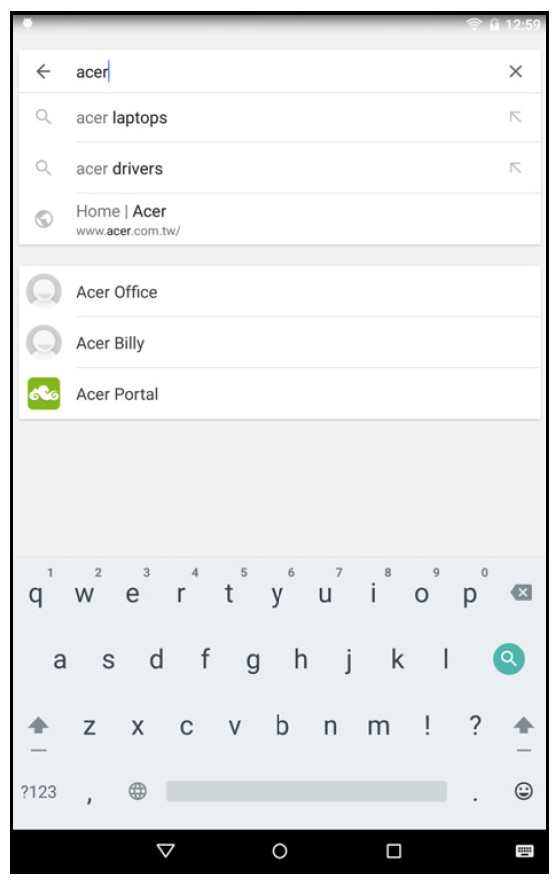
Predictive text or auto-correction
The Google keyboard can provide predictive text input. As you tap the letters of a word, a selection of words is displayed above the keyboard that continue the sequence of letters tapped, or are a close match allowing for errors.
The word list changes after every key press. If the word you need is displayed, you can tap on it to insert it into your text.
To turn predictive text on or off with the Google keyboard, open the Application menu and tap Settings. Tap Language & Input and under Keyboard & Input methods, tap Google Keyboard > Text correction.
Tap Show correction suggestions to toggle this feature on or off. In addition, tap Auto correction and select one of the options to set the keyboard’s auto-correction level.
Editing text
You can select and edit text in certain apps, such as text you have entered in a text field. Selected text can be cut or copied and later pasted within the same application, or to a different application.
Waking your tablet
If the screen is off and the tablet does not react to any taps on the screen, then it has been locked and is in sleep mode.
To wake your tablet, press the power button. Your tablet will display the Lock screen. To unlock the screen, press the lock button and follow the lock to the right side of the circle.
Security Options
For additional security, you may set a code or number that must be entered to access the tablet, such as an unlock pattern (a set of dots that must be tapped in the correct order). Open the Application menu and tap Settings > Security > Screen lock.
Shutting down your tablet
If you won’t use your tablet for an extended period, turn it off to save battery power. To turn off your tablet (even when locked), press and hold the power button until a menu displays (about one second).
Tap Power off and confirm the shutdown. To force a shutdown, press and hold the power button until the tablet shuts down (about four seconds).
CONNECTING DEVICES TO YOUR TABLET
Inserting a microSD card
You may install a microSD card into the microSD slot on the left-hand side of the device to expand your device’s storage space. Ensure that the microSD card is inserted into the card slot.
To check card capacity, open the Applications menu and tap Settings > Storage. Your card’s current capacity is listed under the SD card.
Transferring files between your tablet and PC
Your tablet and any connected storage devices can be accessed from a PC with a USB connection.
Connecting to a PC as a USB storage device
If you wish to transfer information between your device and your computer (either the microSD card in your device or the device’s internal memory), you can connect your device to a PC using the supplied USB cable.
- Plug the USB sync cable into the micro USB connector on your device.
- Plug the USB client connector into an available USB port on your computer.
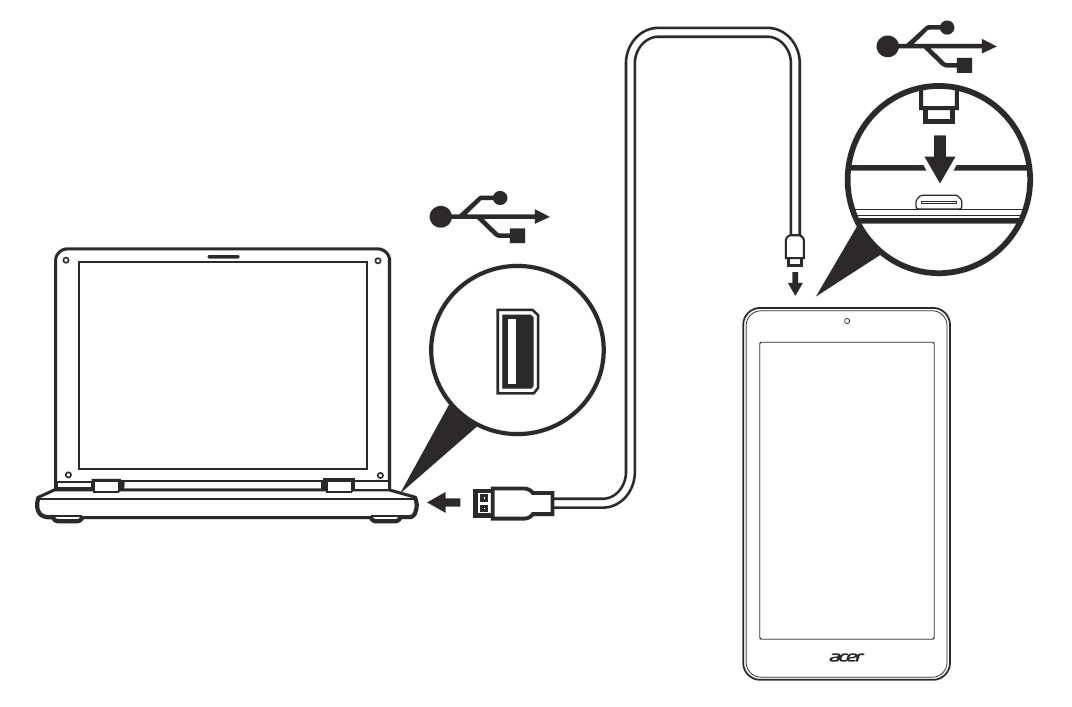
- Swipe down from the top of the screen to display the notification area and tap Connected as a media device to choose whether to connect as a Media device (MTP) (the default option) or a Camera (PTP).
Your device will now be available as a drive in your computer’s file explorer.
Connecting a Bluetooth device
To connect to a Bluetooth device, you must first pair the devices.
To do so, do the following:
- Open the Application menu and tap Settings, then under Wireless & Networks tap Bluetooth.
- Turn Bluetooth on and the tablet instantly starts scanning for nearby Bluetooth devices.
- Tap the device you want to connect to and follow any on-screen instructions.
After the initial pairing, you only need to ensure your tablet’s Bluetooth is on and the device is on to connect the two. For more information on connecting to another Bluetooth device, see the device’s operating instructions.
Only A2DP stereo headsets (playback only, no microphone) are supported.
Accessories
For a complete list of accessories, visit store.acer.com.
ADVANCED SETTINGS
You can personalize your device and configure wireless connections, change sounds and notifications, or adjust items such as the screen brightness of your device’s Settings, which you can open from the Applications menu.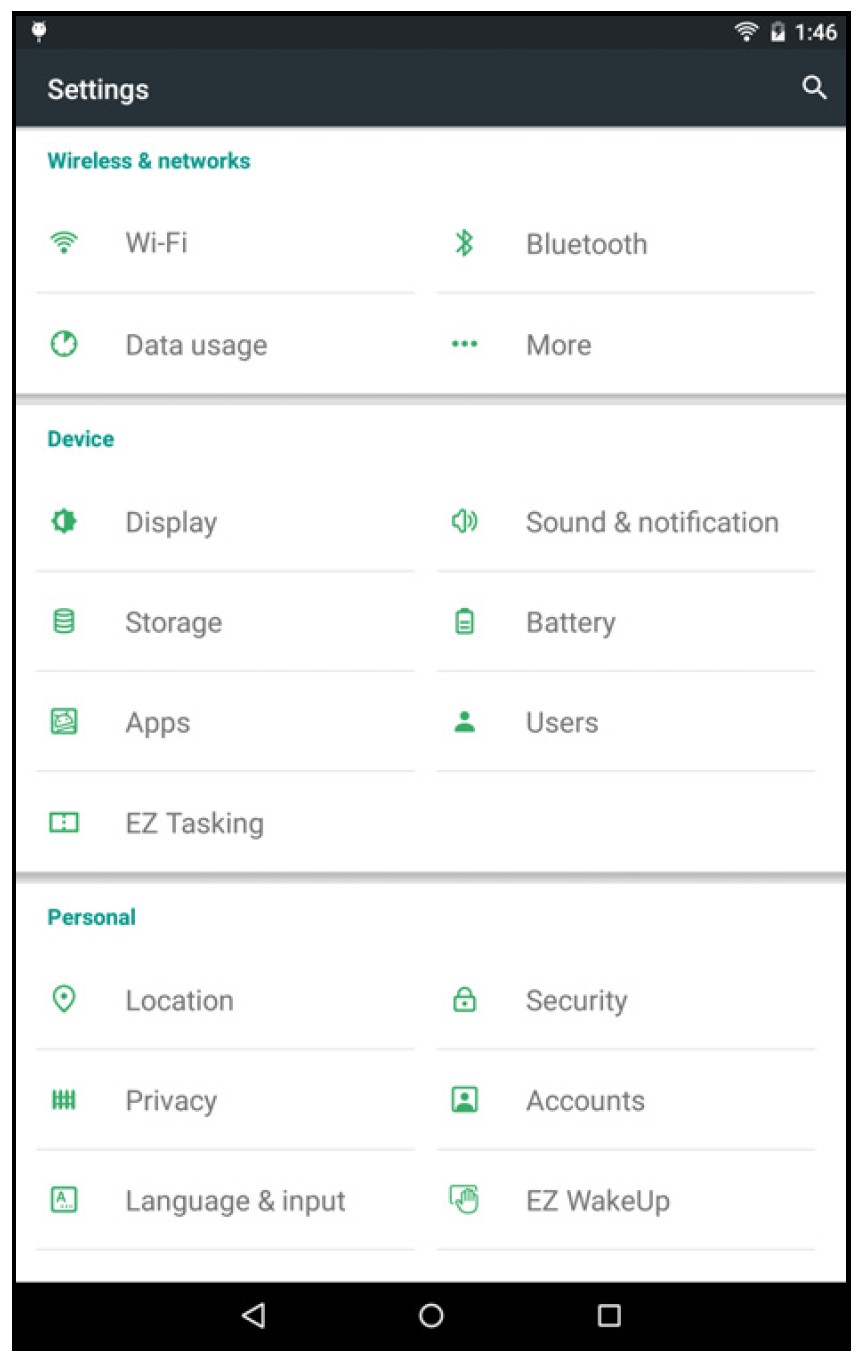
Wireless & Networks
Activating or deactivating Wi-Fi connections
Displays all available wireless networks. Turn the Wi-Fi function on or off. Wireless networks may require a password.
Adjusting Bluetooth settings
Displays all available devices you can use Bluetooth to exchange information. Here you can switch Bluetooth on or off, rename the tablet, and show received files.
Tap Refresh to scan for nearby devices. To connect to a device, tap the device in the list of available devices. You may be asked to enter a PIN on both devices to establish the connection.
Data Usage
The Data Usage section shows how much data has been transmitted to your tablet, either in total or for each app. This information is useful if you are using a metered service.
More…
Putting your tablet in Airplane mode
You can enter Airplane mode (also known as flight mode) to turn off network and Bluetooth functions and use your tablet during a flight. Check with your airline to make sure this is permitted onboard.
Switch your tablet off during takeoff and landing as it may interfere with aircraft electronic systems. To turn Airplane mode on or off, tap Settings, then under Wireless & Networks tap More… > Airplane mode. Alternatively, swipe down from the top of the screen to toggle airplane mode on or off.
Virtual Private Network (VPN)
This option enables you to connect to a private network, such as a secure work or office environment. Add a VPN by tapping Settings, then under Wireless& Networks tap More… > VPN > Add VPN network. You need to set a lock screen PIN or password before you can use credential storage.
Device
Sound & notification
Adjust the volume of your tablet using the volume buttons on the side of the tablet.
Display
You can adjust your tablet screen settings by tapping Settings > Display.
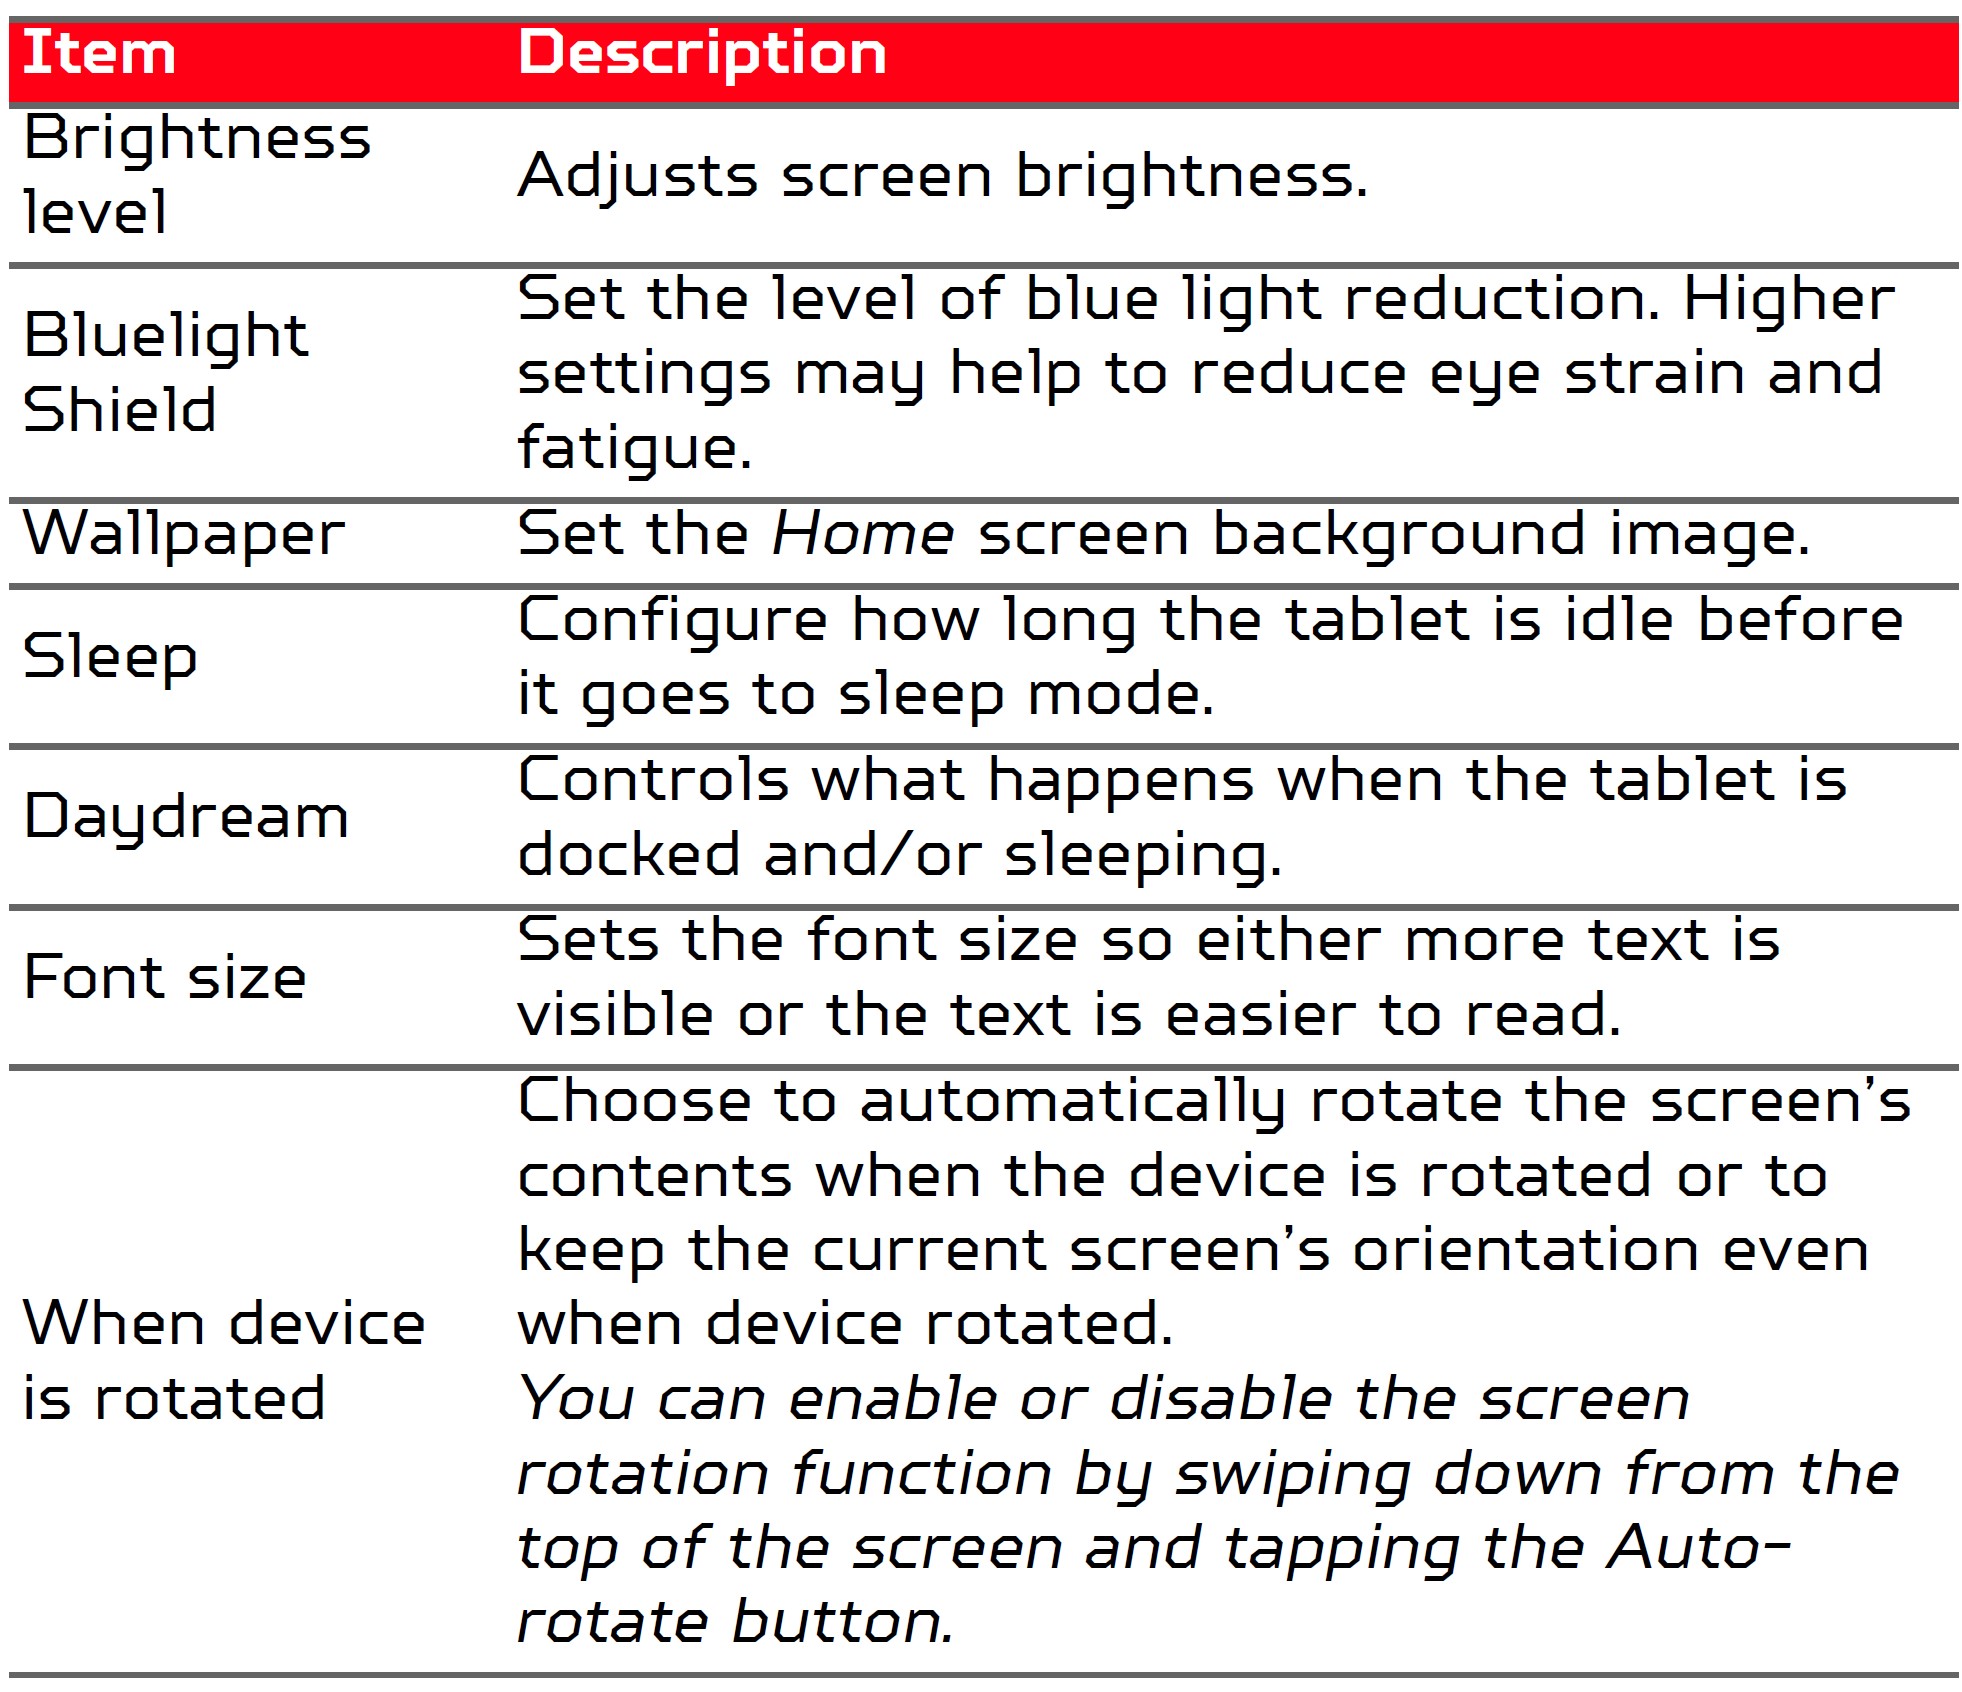
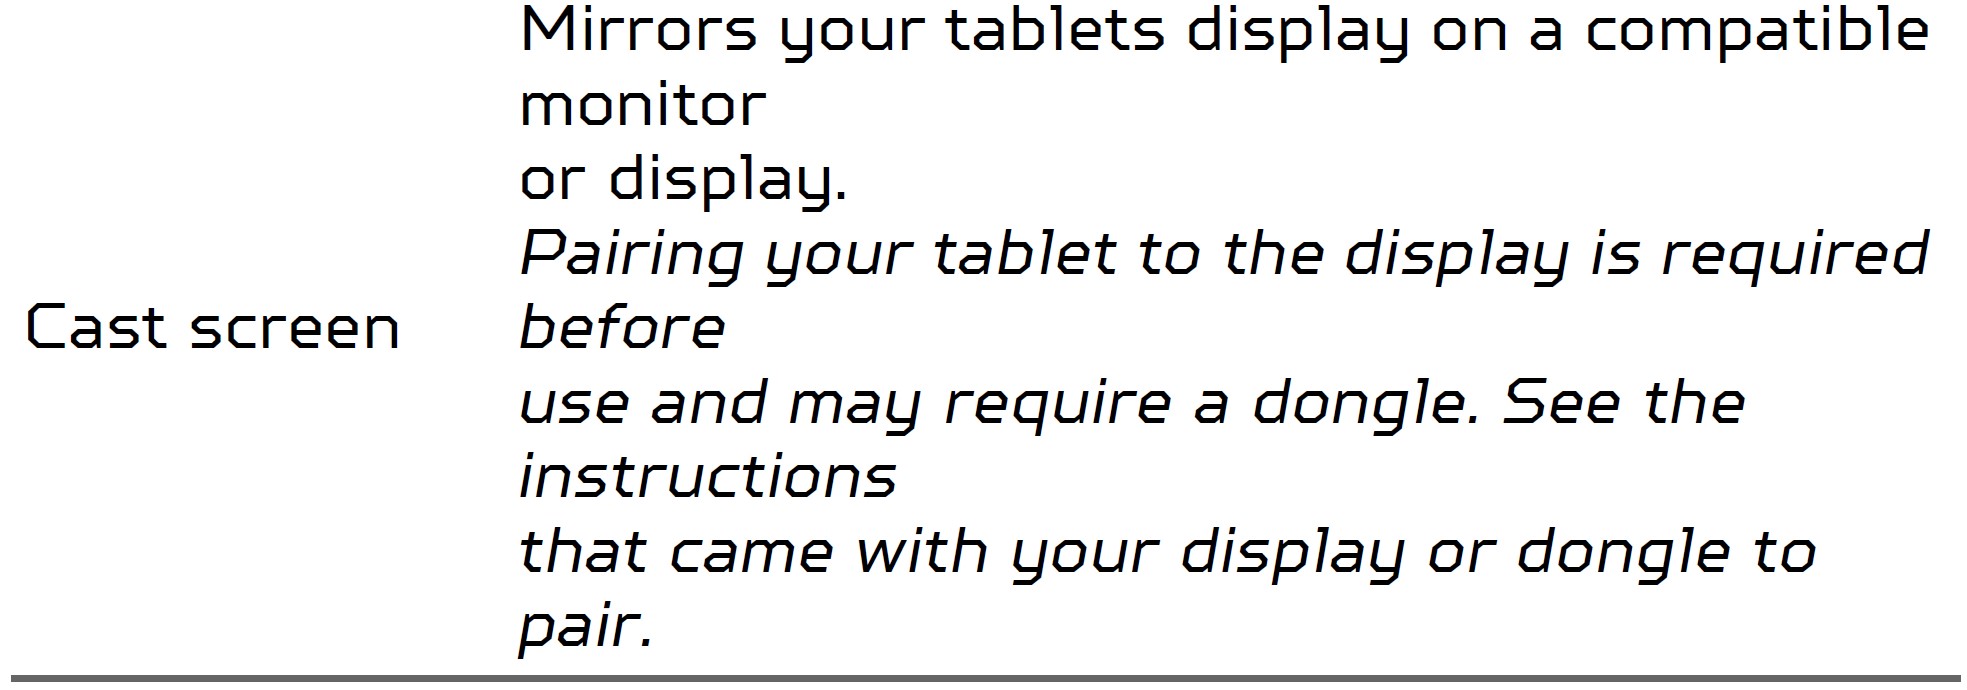
Apps
Closing an application
To close an active application, go to Settings > Apps. Swipe over to the Running tab, then tap the program you wish to close. Select STOP to close the program.
Uninstalling an application
You can remove programs installed on your tablet to free up extra storage memory. Tap the program icon from the Application menu and drag it into the Uninstall area in the top-left corner.
Alternatively, you can go to Settings and select Apps. Tap the application you wish to uninstall, tap UNINSTALL, and confirm the uninstall.
FAQ AND TROUBLESHOOTING
This section lists frequently asked questions that may arise during the use of your tablet and gives easy answers and solutions to these questions.
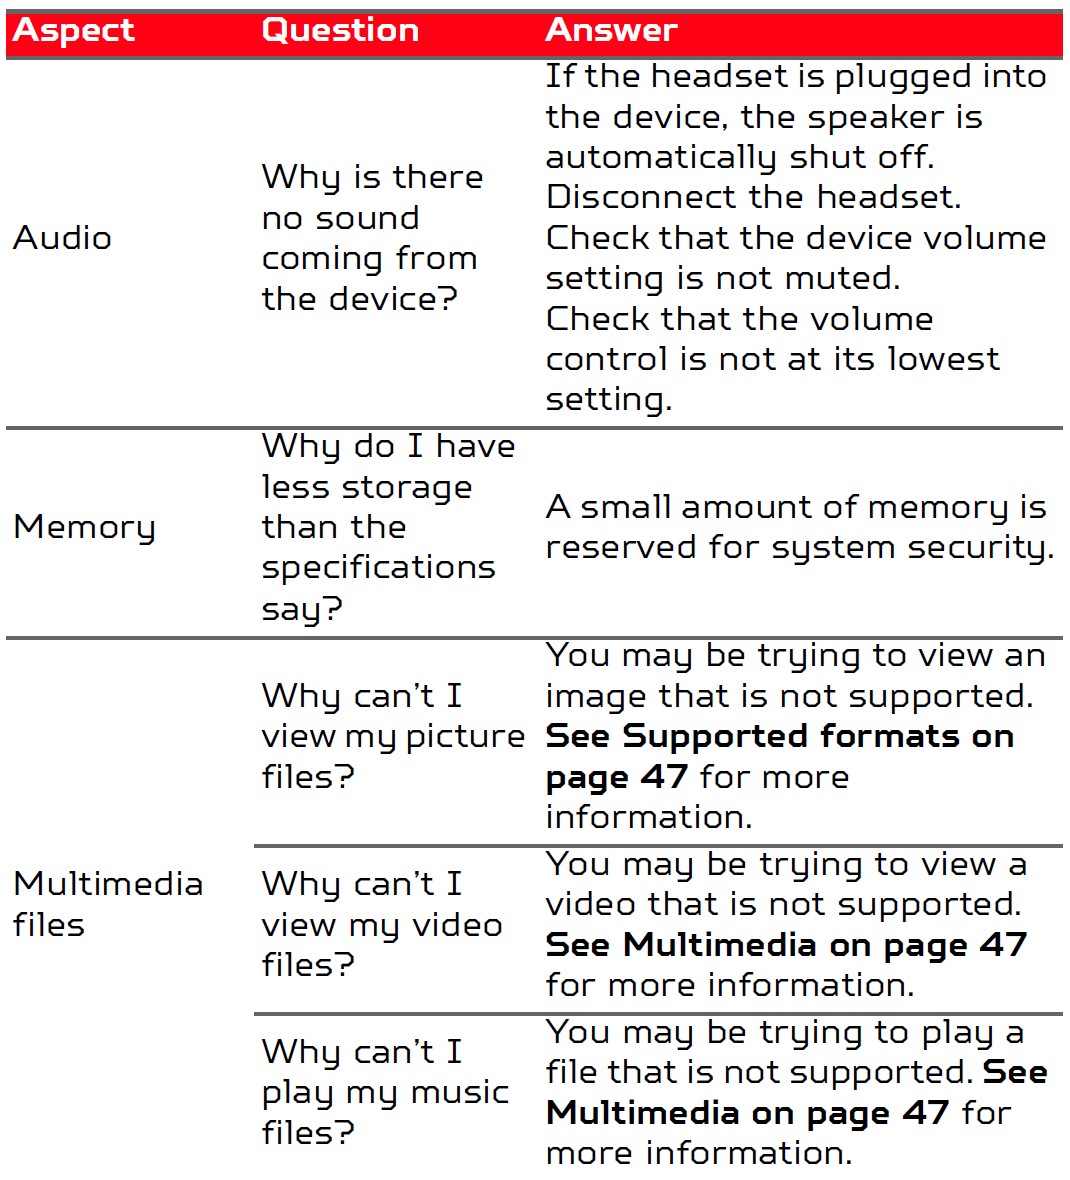
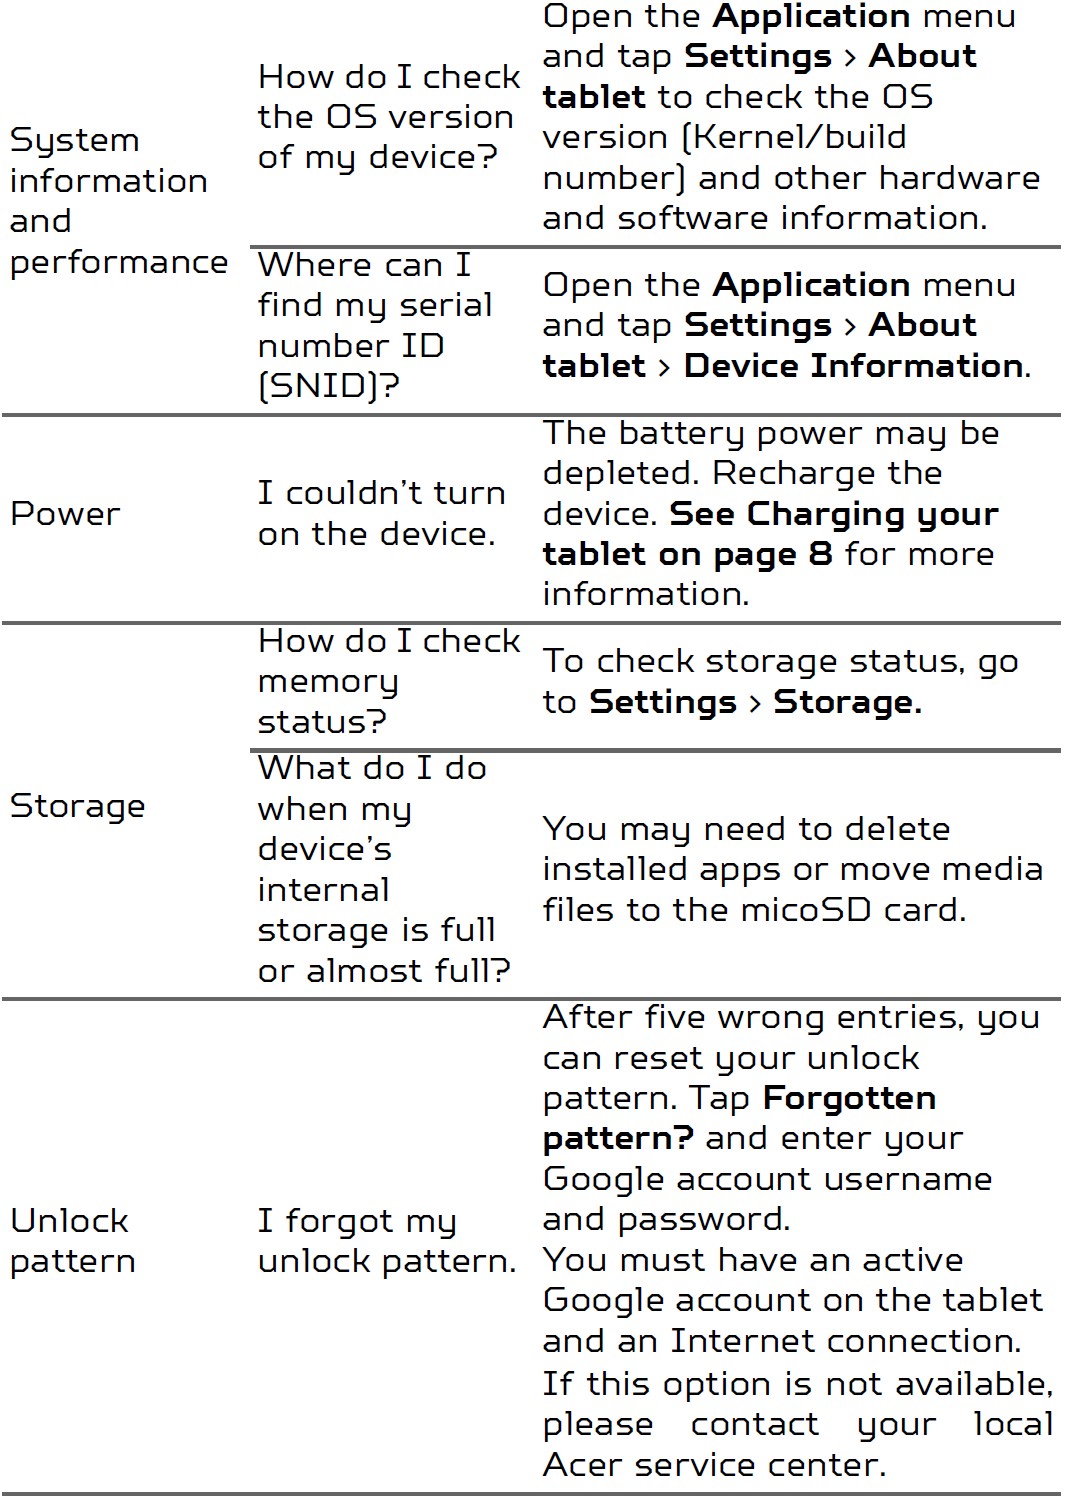
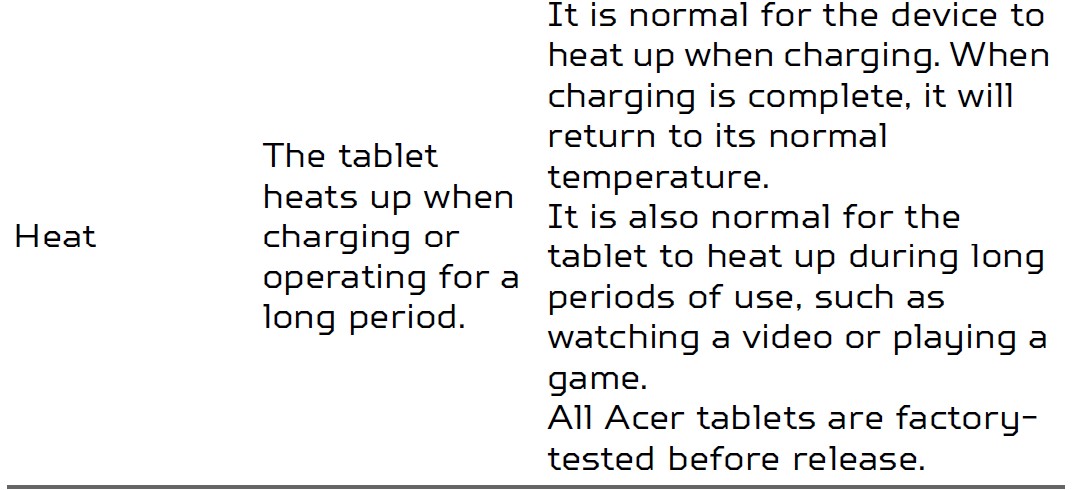
SPECIFICATIONS
Performance
- Intel Atom x7-Z8700 processor
- Intel HD Graphics
- 8th-generation, low-power, 16EU, 600 MHz
- System memory:
- 2 GB of LPDDR3 RAM
- 32 or 64 GB of flash memory
- Google Android 5.1 (Lollipop) operating system
Display
- 8″ TFT-LCD capacitive multi-touch screen
- 1920 x 1200 resolution
Multimedia
- Four speakers
- Built-in microphone
Supported formats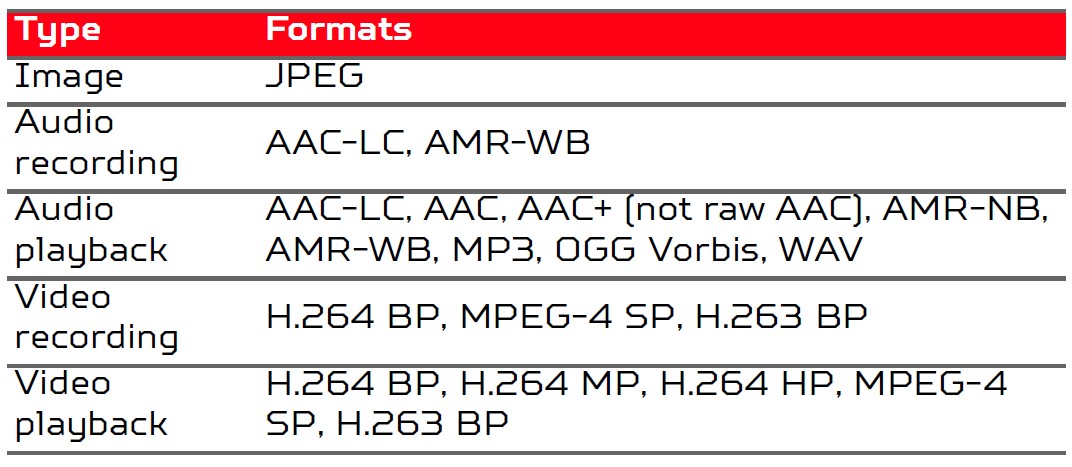
USB connector
- Micro USB port
Power
- DC power-in (5 V, 2 A)
- Qualcomm Quick Charge 2.0 Class A charging supported
Connectivity
- Bluetooth 4.0
- 802.11a/b/g/n wireless LAN
- GPS; GLONASS
Camera
- Front Camera
- 2-megapixel
- HD audio/video recording
- Rear camera
- 5-megapixel
- Full HD audio/video recording
Expansion
- microSD card slot (up to 128 GB)
Battery
- 17.3 Wh 4550 mAh 3.8 V 1-cell Li-ion battery pack
- Battery life: Up to 8.5 hours (based on video playback test results)
Dimensions
General
- Supports dual haptic feedback
Environment
Temperature
- Operating: 0° C to 35° C Non-operating: -20° C to 60° C
Humidity (non-condensing)
- Operating: 20% to 80%Non-operating: 20% to 80%
GUIDELINES FOR SAFE BATTERY USAGE
This notebook uses a Lithium battery. Do not use it in a humid, wet, or corrosive environment. Do not put, store, or leave your product in or near a heat source, in a high-temperature location, in strong direct sunlight, in a microwave oven, or a pressurized container, and do not expose it to temperatures over 60° C (140° F).
Failure to follow these guidelines may cause the battery to leak acid, become hot, explode or ignite, and cause injury and/or damage. Do not pierce, open, or disassemble the battery.
If the battery leaks and you come into contact with the leaked fluids, rinse thoroughly with water and seek medical attention immediately. For safety reasons, and to prolong the lifetime of the battery, charging will not occur at temperatures below 0° C (32° F) or above 40° C (104° F).
The full performance of a new battery is achieved only after two or three complete charge and discharge cycles. The battery can be charged and discharged hundreds of times, but it will eventually wear out. When the operation time becomes noticeably shorter than normal, buy a new battery.
Use only the approved batteries, and recharge your battery only with the approved chargers designated for this device.
Use the battery only for its intended purpose. Never use any charger or battery that is damaged. Do not short-circuit the battery.
Accidental short-circuiting can occur when a metallic object such as a coin, clip, or pen causes a direct connection of the positive (+) and negative (-) terminals of the battery. (These look like metal strips on the battery.)
This might happen, for example, when you carry a spare battery in your pocket or purse. Short-circuiting the terminals may damage the battery or the connecting object.
The capacity and lifetime of the battery will be reduced if the battery is left in hot or cold places, such as in a closed car in summer or winter.
Always try to keep the battery between 15° C and 25° C (59° F and 77° F). A device with a hot or cold battery may not work temporarily, even when the battery is fully charged. Battery performance is especially limited in temperatures well below freezing.
Do not dispose of batteries in a fire as they may explode. Batteries may also explode if damaged. Dispose of batteries according to local regulations.
Please recycle when possible. Do not dispose of it as household waste. Wireless devices may be susceptible to interference from the battery, which could affect performance.
Manufactured under license from Dolby Laboratories. Dolby, Dolby Audio, and the double-D symbol are trademarks of Dolby Laboratories.
TouchSense Technology and TouchSense System 4000 Series Licensed from Immersion Software Ireland Limited.
TouchSense System 4000 Series and other Immersion software contained herein are protected under one or more of the U.S. Patents at the following address www.immersion.com/patent-marking.html and other patents pending.
FAQs About Acer Predator 8 Gaming Tablet
When was the Acer Predator released?
2008
Who manufactures Acer Predator?
Acer owns the Predator Gaming brand and line of computer hardware, which caters to gamers.
The predator tablet costs what?
The ‘Grey’ version of the Acer Predator 8 Gaming Tablet costs $299 (about INR 19,800).
Is there a touchscreen on the Acer Predator?
Acer Predator Triton 900 17.3″ 4K UHD Touchscreen Gaming Laptop, NVIDIA GeForce RTX 2080 8GB, 32GB RAM, 1TB SSD. Windows 10 Pro.
What sort of a company is Acer?
Acer Inc. (Acer) is a corporation that develops, designs, markets, and sells information technology (IT) products. Personal computers, projectors, tablet PCs, smartphones, wearable technology, smart devices, LCDs, servers, and ICT equipment are all part of the company’s product line.
How much does the Acer Predator tablet cost in Pakistan?
Features an 8.0-inch display, an Intel Atom X7-Z8700 processor, a 5-megapixel rear camera, a 2-megapixel front camera, a 4420 MAh battery, 64 GB of storage, and 2 GB of RAM. The price for the Acer Predator 8 in Pakistan starts at Rs 96,600.
Predator is a brand of what?
By contributing to a significant gaming discussion, Acer develops its Predator Gaming brand.
Does Predator work well in games?
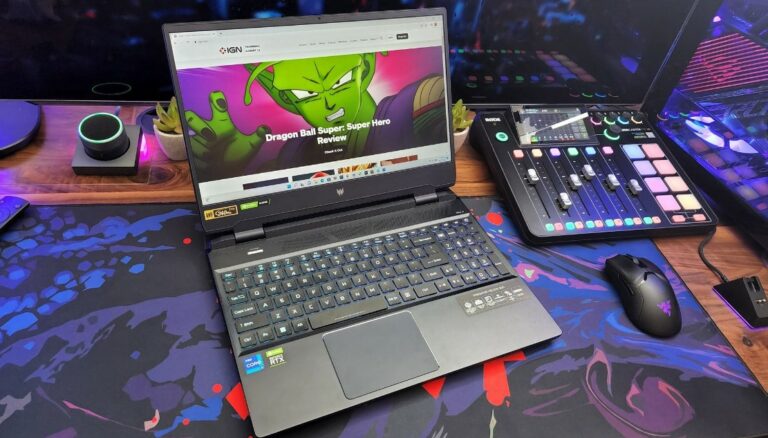
For the past few years, the Acer Predator Helios 300 has established itself as one of the top choices for gamers looking for a potent laptop at a reasonable price. In its most recent incarnation, the visuals have been slightly updated, but the primary objective has not changed. You’ll purchase this laptop due to its value for money.
For More Manuals by Acer, Visit the Latest Manual
- Redmi 23073RPBFL Electronic Tablet User Guide
- Acer Iconia One 7 Tablet User Manual
- Acer Aspire 5 Windows Laptop User Manual
- Acer Predator Triton 500 SE Gaming Laptop User Guide
- Acer Predator Helios 300 Gaming Laptop User Manual
 |
Acer Predator 8 Gaming Tablet User Manual [pdf] |

