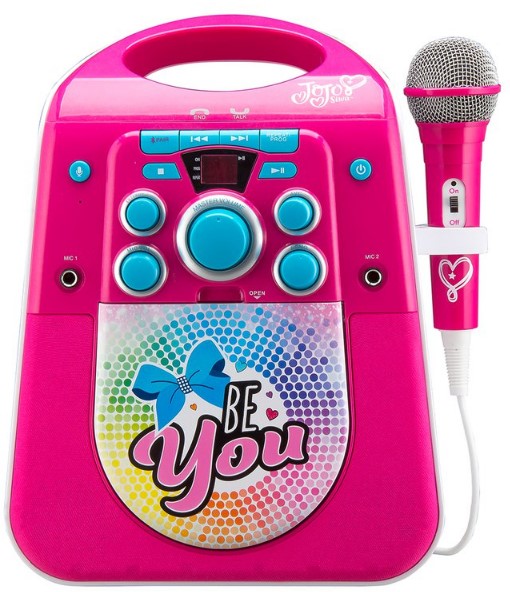
Ekids JJ-672 JoJo Siwa CD+G Karaoke
About Ekids
The leading producer of cutting-edge interactive electronic toys, educational tools, and actual electronics for children of all ages is eKids. Our extensive product selection, which includes toys licensed by Disney, Marvel, Nickelodeon, DreamWorks, Universal, Warner Brothers, Netflix, and other leading brands, is based on recognizable characters from a wide range of well-known films, television shows, and streaming services.
KIDdesigns, the parent company of eKids, was founded in 1988 and has won some of the most prestigious accolades in the business. Highlights include Mattel’s Licence of the Decade, The Toy Insider’s Top Holiday Toy, The Great American Toy Test’s “Top Toy” award, Family Fun’s “Toy of the Year” award, and the “Best New Product Innovation” award.
Important Message to Customers
Thank you for purchasing one of our many top-quality electronic products. Please take a moment to read through these instructions to help you understand the safe and proper way to use this toy to extend its usability. Keep these instructions for future reference as they contain important information.
CAUTION-ELECTRICALLY OPERATED PRODUCT
NOT RECOMMENDED FOR CHILDREN UNDER 8 YEARS OF AGE. AS WITH ALL ELECTRIC PRODUCTS, PRECAUTIONS SHOULD BE OBSERVED DURING HANDLING AND USE TO PREVENT ELECTRIC SHOCK. AC 100~240V, 50~60Hz 0.8A UL LISTED.
What’s Included

Installing the Batteries
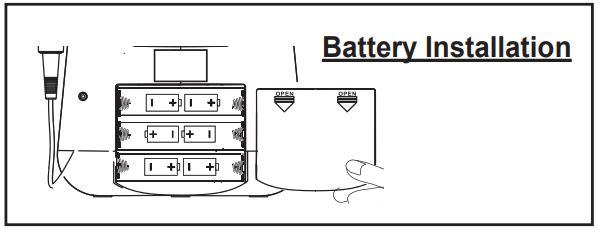
- Open the battery compartment door located on the back of the unit.
- Insert 6 new C batteries in the battery compartment. Make sure batteries match the + and – as indicated in the battery compartment diagram.
- Replace the battery compartment door.
Using AC Power
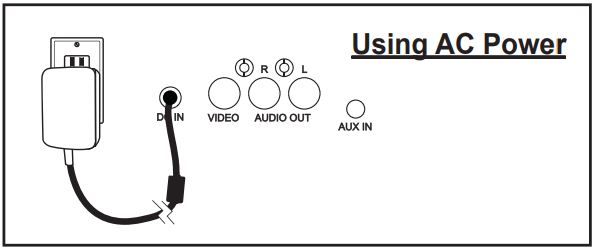
This unit also works on AC Power. Plug the small end of the power adapter (included) into the DC-IN jack on the back of the unit, and plug the power adapter into the household AC outlet.
Using the Microphone
Connect the included microphone to either of the two input jacks (11) on the unit. Turn on the unit and choose Bluetooth, AUX, or CDG modes using the Mode Selector (19).
- Slide the switch on the Microphone to ON. Now you can sing along to your favorite music in either CD, Bluetooth, or AUX modes, and hear your voice through the speaker!
- When not in use, slide the Microphone switch to OFF. Unlock the removable slots on the side of the unit to store your microphone, as shown in the image on the right.
CDG Mode
This unit plays CD, CDR, and CDG formats. To play a CD or CDR, turn on the unit and set the Mode Selector (19) to CDG.
- Open the disc compartment on the front of the unit and insert the disc face up. Close the compartment door.
- Use the controls to play/pause (6), and stop (20). or navigate tracks (3-4). For CD/CDR formats, press & hold (3-4) to fast-rewind or fast-forward within the current playing track.
To play a CDG disc on your television:
- Connect the included RCA cable (white and red connectors) to the RCA audio output jacks located at the rear of the unit (23).
- Connect the other end of the audio cable to the RCA audio input jack of a TV set.
- Connect the RCA video cable (yellow connector) to the RCA video output jack located at the rear of the unit (23).
- Connect the other end of the video cable to the RCA video input jack of a TV set, and make sure your television is set to the corresponding input.
- Turn on the unit and set the Mode Selector (19) to CDG.
- Insert a CDG disc into the unit and press the Play/Pause Button (6). Now you can follow the lyrics on the screen and sing along through the microphone!
- Use the Previous Track (3) and Next Track (4) buttons to navigate tracks on the CDG.
Repeat/Program Button
To repeat a track on your CD, press the Program/Repeat Button (5) on the unit. The “Repeat” LED Indicator will blink. Press again to cancel the play mode.
You can also program up to 20 tracks of the CD in a desired order. With CD playback stopped, press the Program/Repeat button once. The “PROG” LED indicator blinks, and the LED display shows the program number.
Press the Previous Track (3) and Next Track (4) Buttons to select a track number. When the desired track number is displayed, press the Program/Repeat Button to confirm entry. Repeat these steps until all desired tracks are entered.
To begin programmed playback, press the Play/Pause Button (6). To cancel programmed playback, press the STOP button twice.
OVERVIEW
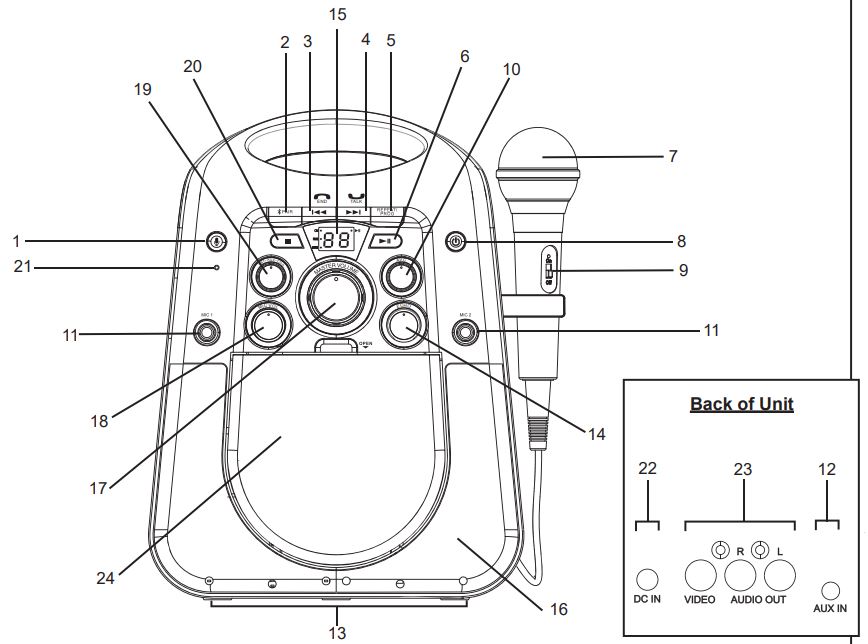
- Voice Control Button
- Bluetooth Pairing Button
- Previous Track/End Call
- Next Track/Answer Call
- Program/Repeat Button
- Play/Pause
- Microphone
- Power On/Off
- Microphone On/Off
- AVC Rotary Dial
- Microphone Input (x2)
- AUX Input
- Color LEDs
- Echo Rotary Dial
- LED Screen + Indicators
- Speaker
- Master Volume
- Microphone Volume
- Mode Selector Dial
- Stop Button
- Speakerphone/Voice Control Microphone
- DC Power Input
- A/V Output
- CD Compartment
Vocal Effects
Use the AVC Rotary Dial (10) or the Echo Rotary Dial (14) to add vocal effects while you sing! Make sure your microphone is connected to the unit and the microphone switch is turned ON.
AVC Rotary Dial:
- Spin the dial as you sing to create the ideal sound mix! Echo Rotary Dial:
- Spin the dial as you sing to add an echo effect to your voice!
AUX Mode
This unit has an AUX-IN jack, through this jack other audio sources (MP3 players, etc) can be connected to this unit and be amplified.
- Turn on the unit and set the Mode Selector Dial to AUX. “AU” will glow solid on the LED screen.
- Connect one end of the included audio cable to the AUX-IN jack and the other end to the headphone jack of your audio device.
- Press PLAY on your audio device to start playback. Control/navigate tracks from your audio device, too.
Pairing Your Device Via Bluetooth
Make sure your Bluetooth device is fully charged. Turn on your Bluetooth device and turn on Bluetooth mode (check-in Options or Settings).
- Turn on the unit and set the Mode Selector Dial (19) to BT mode. Press and hold the Bluetooth Pairing Button (2) for 3 seconds. A tone will sound and the LED screen will flash ‘bt’ as the speaker enters pairing mode.
- “Karaoke 672_mdy” should appear on your device’s screen. If “Not Connected” or a similar message appears, select
“Karaoke 672_mdy” to connect. If your device asks for a passcode, enter ‘1234’. - Once paired, a confirmation tone will sound, and ‘bt” will glow solid on the LED screen. Put your Bluetooth device in Play mode to stream audio to the speaker. Use your Bluetooth device OR the Play/Pause, Previous Track, and Next Track buttons on the unit to control audio functions.
- Use your favorite karaoke apps while in BT mode, too!
Voice Control Button
When the unit is in BT mode, you can access Siri or Google Assistant using Voice Control.
- Press and hold the Voice Control Button (1) for 3 seconds to activate Siri or Google Assistant via your paired smartphone. When you hear a confirmation tone, speak Voice Control Microphone (21) to make your voice commands.
Melody App
The Voice Control Button can also be used to activate Melody, which lets you use voice commands to play any music from iHeartRadio* or Spotify*
To use this feature:
- Download the Melody app on your smartphone using the App Store or Google Play.
- Open the app and sign into your iHeartRadio and/or Spotify account within the Melody app.
- With the unit in BT mode, tap the Voice Control Button (1) to activate the Melody app via your paired smartphone.
- Once you hear a confirmation tone, speak into the Voice Control Microphone (21) to make your voice commands.
- If music is playing, tap the Voice Control Button once to Pause. To make a new voice command, press the Voice Control Button once, wait one second, then press it again.
- * iHeartRadio is not available in Canada
- * A Spotify Premium account required
Speakerphone
The unit is equipped with a speakerphone function that allows you to answer and end phone calls when connected via Bluetooth. This function can be used while in BT mode.
- When your smartphone receives an incoming call, you will hear it ring through the speaker. Press the Next Track/Answer Call Button (4) to accept the call, and speak into the Speakerphone/ Voice Control Microphone (21).
- To end the call, press the Previous Track/ End Call Button (3).
FCC Information
This device complies with Part 15 of the FCC rules.
Operation is subject to the following two conditions:
- This device may not cause harmful interference, and
- This device must accept any interference received, including interference that may cause undesired operation.
NOTE:
This equipment has been tested and found to comply with the limits for a Class B digital device, under Part 15 of the FCC rules. These limits are designed to provide reasonable protection against harmful interference in a residential installation
. This equipment generates, uses, and can radiate radio frequency energy and, if not installed and used by the instructions, may cause harmful interference to radio communications. However, there is no guarantee that interference will not occur in a particular installation.
If this equipment does cause harmful interference to radio or television reception, which can be determined by turning the equipment off and on, the user is encouraged to try to correct the interference by one or more of the following measures:
- Reorient or relocate the receiving antenna.
- Increase the separation between the equipment and the receiver.
- Connect the equipment to an outlet on a circuit different from that to which the receiver is connected.
- Consult the dealer or an experienced radio/TV technician for help.
WARNING: Changes or modifications to this unit not expressly approved by the party responsible for compliance could void the user’s authority to operate the equipment.
CAN ICES-3 (B)/NMB-3(B)
Battery Use Cautions & Tips
For Safety & Best Performance: (Proper use and care of product)
- Only use the recommended/supplied batteries or equivalent.
- Use alkaline batteries for longer life.
- Do not mix old and new batteries, and do not mix alkaline, carbon-zinc, or rechargeable nickel-cadmium batteries.
- Insert batteries with proper polarity (+/–) as indicated.
- Remove exhausted batteries from the product.
- Recharge rechargeable batteries under adult supervision.
- Do not attempt to recharge non-rechargeable batteries.
- Do not open batteries or heat them beyond normal ambient temperatures. To prevent battery leakage or damage remove batteries from a product if it will not be used for a month or longer.
- Use extreme caution when handling leaking batteries (avoid direct contact with eyes and skin). If battery leakage comes in contact with the eyes, IMMEDIATELY flush the eye with lukewarm and gently flowing water for at least 30 minutes. If skin contact occurs, wash the skin with clear water for at least 15 minutes. Seek medical attention if any symptoms occur.
- Store in a cool, dry, ventilated area away from hazardous or combustible material.
- Do not dispose of batteries in the household trash or fire.
- Follow applicable laws and local regulations for the disposal and transportation of batteries.
Cleaning – The unit should be cleaned only using a warm damp cloth. Do not use solvents, etc.
Parents:
Examine your unit periodically for conditions that may result in the risk of fire, electric shock, or injury to persons and that, in the event of such conditions, the product should not be used until properly repaired.
Questions or Comments
For questions or comments regarding this or other eKids products, please call our toll-free number: 1-888-TOP-TOYS Please also visit our website: www.ekids.com
Troubleshooting
If the unit is experiencing a fuzzy or distorted sound, check the batteries. They are most likely weak and need to be replaced with 6 brand new “C” batteries.
IC Statement
This device complies with Industry Canada license-exempt RSS standard(s).
Operation is subject to the following two conditions:
- This device may not cause interference, and
- This device must accept any interference, including interference that may cause undesired operation of the device.
The device meets the exemption from the routine evaluation limits in section 2.5 of RSS 102 and compliance with RSS-102 RF exposure, users can obtain Canadian information on RF exposure and compliance.
Limited One Year Warranty
eKids warrants this product to be free from defects in workmanship and materials, under normal use and conditions, for one (1) year from the date of original purchase. Should this product fail to function satisfactorily, it is best to first return it to the store where it was originally purchased.
Should this fail to resolve the matter and service still be required because of any defect or malfunction during the warranty period, eKids will repair or, at its discretion, replace this product without charge.
This decision is subject to verification of the defect or malfunction upon delivery of this product to the Factory Service Center authorized by Customer Service.
If service is required, please call Customer Service at 1-888-TOP-TOYS (867-8697) to obtain a Return Authorization Number and shipping instructions. A copy of the sales receipt is required to validate in-warranty coverage.
Disclaimer of Warranty
NOTE:
This warranty is valid only if the product is used for the purpose for which it was designed. It does not cover (i) products that have been damaged by negligence or willful actions, misuse, or accident, or which have been modified or repaired by unauthorized persons; (ii) cracked or broken cabinets, or units damaged by excessive heat; (iii) damage to digital media players, CD’s or tape cassettes (if applicable); (iv) the cost of shipping this product to the Factory Service Center and its return to the owner.
This warranty is valid only in the United States of America and does not extend to owners of the product other than to the original purchaser. In no event will eKids or any of its affiliates, contractors, resellers, their officers, directors, shareholders, members, or agents be liable to you or any third party for any consequential or incidental damages, lost profits, actual, exemplary, or punitive damages.
(Some states do not allow limitations on implied warranties or exclusion of consequential damages, so these restrictions may not apply to you.) This warranty gives you specific legal rights; you may also have other rights that vary from state to state.
Your acknowledgment and agreement to fully and completely abide by the disclaimer as mentioned earlier of warranty is contractually binding to you upon your transfer of currency (money order, cashier’s check, or credit card) for the purchase of your eKids product.
© 2017 eKids LLC.
Questions? Visit www.ekids.com
or call 1-888-TOP-TOYS
1299 Main Street Rahway NJ 07065
FAQS About Ekids JJ-672 JoJo Siwa CD+G Karaoke
What is included in the Ekids JJ-672 JoJo Siwa CD+G Karaoke package?
Typically, a karaoke machine package includes the main karaoke unit, a microphone, and a selection of CD+G discs containing songs.
Does the Ekids JJ-672 JoJo Siwa CD+G Karaoke have built-in songs?
Yes, most CD+G karaoke machines come with a selection of built-in songs. However, the number and specific songs may vary depending on the model.
Can I use my CDs or connect to external devices?
Many karaoke machines, including CD+G ones, allow you to play your own CDs or connect external devices such as smartphones, tablets, or MP3 players through an auxiliary input or Bluetooth.
Is the microphone included with the Ekids JJ-672 JoJo Siwa CD+G Karaoke suitable for duets?
The microphone included with the karaoke machine is usually designed for solo use. However, some models may support multiple microphone inputs for duets and group performances.
Can I change the key or pitch of the songs on the Ekids JJ-672 JoJo Siwa CD+G Karaoke?
Some advanced karaoke machines offer features like key/pitch control, allowing you to adjust the key of the song to match your vocal range. You should check the product specifications or manual to see if this feature is available on the Ekids JJ-672 model.
Is there a screen to display lyrics on the Ekids JJ-672 JoJo Siwa CD+G Karaoke?
CD+G karaoke machines typically have a built-in screen to display the lyrics of the songs from the included CD+G discs. However, some models may also have the option to connect to a TV or monitor for a larger display.
Can I record my performances on the Ekids JJ-672 JoJo Siwa CD+G Karaoke?
Recording features are not standard on all karaoke machines. Some advanced models may have built-in recording capabilities or support external recording devices.
What age group is the Ekids JJ-672 JoJo Siwa CD+G Karaoke suitable for?
The age group for the Ekids JJ-672 JoJo Siwa CD+G Karaoke will likely be mentioned by the manufacturer. As it is a JoJo Siwa branded product, it may be targeted towards young fans of JoJo Siwa and her music.
For More Manuals by Ekids, Visit the Latest Manual
- Ekids DG-556 Disney Bluetooth MP3 Karaoke with Mic User Manual
- Ekids FR-556 Bluetooth MP3 Karaoke with Microphone Instructions
- Ekids TR-115 Trolls World Tour Sing-Along Boombox User Manual
- Ekids TR-625 Trolls World Tour DJ Trollex Party Mixer Manual
- Ekids TR-115 Trolls World Tour Sing-Along Boombox User Manual
- Ekids JJ-615 Digital Recording Studio User Manual
- Ekids FR-070 Frozen Magical MP3 Microphone Manual
- Ekids SN-115 Shopkins Sing Along Boom Box User Manual
 |
Ekids JJ-672 JoJo Siwa CD+G Karaoke User Guide [pdf] |

