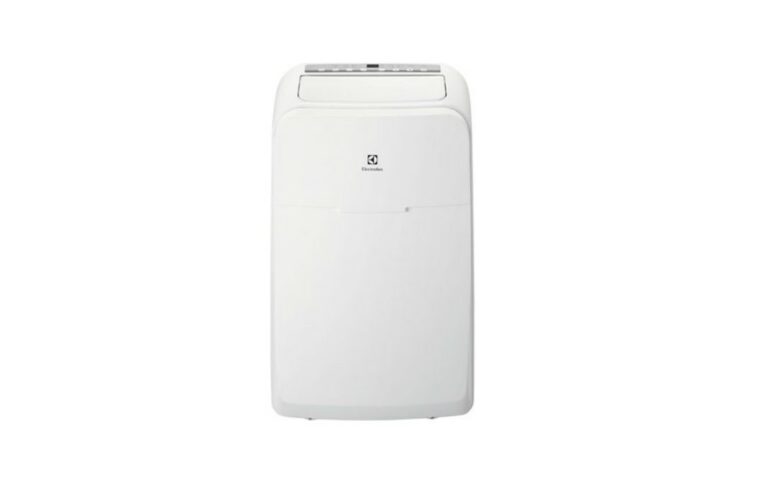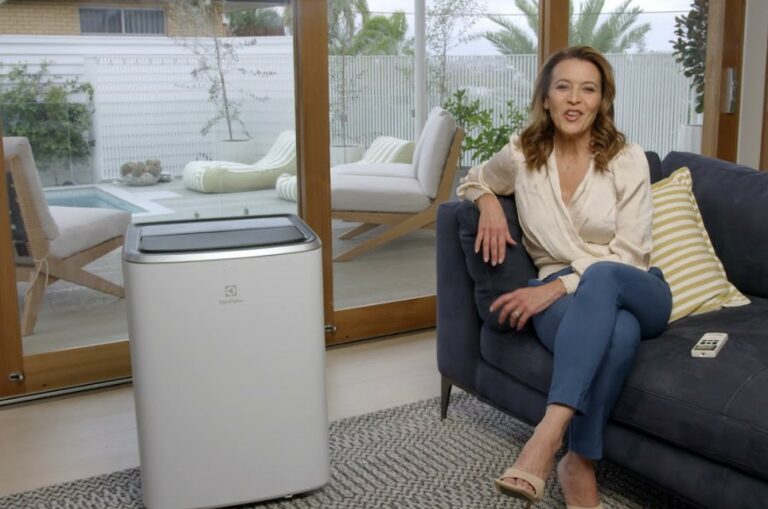
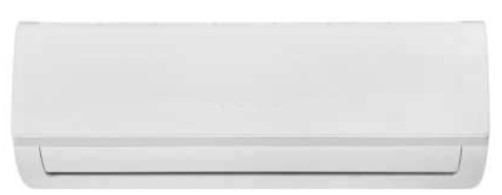
Electrolux EXS09GH1WI
About Electrolux
Congratulations and thank you for choosing our portable air conditioner. We are sure you will find your new portable air conditioner a pleasure and a great asset to your comfort. Before you use the portable air conditioner, we recommend reading through the user manual, which describes the portable air conditioner and its functions.
To avoid the risks always present when you use an electric appliance, it is important that the portable air conditioner is installed correctly and that you read the safety instructions carefully to avoid misuse and hazards. For future reference, please store this manual in a safe place.
Important Reminder
- Keep the remote control where its signal can reach the receiver of the indoor unit.
- When operating the air conditioner, make sure the remote control is pointing to the signal receiver of the indoor unit.
- When the remote control sends out a signal, the symbol will blink for about 1 second on the display of the remote control.
- The indoor unit will acknowledge the signal with a beep when it receives the signal from the remote control.
- Please press the button on the remote control and resend the signal if you do not hear a beep from the indoor unit.
caution
- The air conditioner is not intended for use by young children or infirmed persons without supervision.
- Young children should be supervised to ensure they do not play with the air conditioner.
- Contact an authorized installer for the installation of this air conditioner.
- Contact an authorized service technician for repair or maintenance of this unit.
- If the power cord is to be replaced, replacement work shall be performed by authorized personnel only.
- Installation work must be performed by the national wiring Standards by authorized personnel only.
Conditions of use
This appliance is intended to be used in household and similar applications such as:
- Staff kitchen areas in shops, offices, and other working environments.
- Farm houses.
- By clients in hotels, motels, and other residential-type environments.
- Bed and breakfast type environments.
Important Notes
Contact an authorized installer for the installation of this unit. Contact an authorized service technician for repair or maintenance of this unit.
- The socket outlet required to supply power must be connected and commissioned by a licensed contractor.
- This appliance is not intended for use by persons (including children) with reduced physical, sensory, or mental capabilities, or lack of experience and knowledge unless they have been given supervision or instruction concerning the use of the appliance by a person responsible for their safety.
- Young children should be supervised to ensure they do not play with the air conditioner.
- If the power cord is to be replaced, replacement work shall be performed by authorized personnel only.
- Installation work must be performed by the national wiring standards and the electricity suppliers’ service rules by authorized personnel only.
- If the unit is to be moved to another location or disposed of, only a suitably qualified person is permitted to undertake such work.
- Take care not to catch your fingers on the fan blade when adjusting vertical louvers.
- This air conditioner uses R22 or R410a refrigerant (Confirmed before installation).
Safety precautions
Inside this manual, you will find many helpful hints on how to use and maintain your air conditioner properly. Just a little preventive care on your part can save you a great deal of time and money over the life of your air conditioner.
You’ll find many answers to common problems in the chart of troubleshooting tips on pages 20-21. If you review the chart of troubleshooting tips first, you may not need to call for service. The meanings of symbols used in this manual are shown below:
Important notes:
- Do not operate the unit with a horizontal louver in the closed position.
- Do not operate the unit without the air filter.
warning
If you notice an unusual situation, such as a burning smell, please switch off the power to the air conditioner and contact an Electrolux service agent. If this abnormal status continues the air conditioner may be damaged or even cause electric shock or fire.
caution
Select the most appropriate temperature. It can save electricity.
Before Operation
- Contact an installation qualified for the installation.
- Plug in the power plug properly.
- Do not use a damaged or non-standard power cord.
- Do not share the same outlet with other appliances.
- Do not use an extension cord.
- Do not start/stop the operation by plugging/unplugging the power cord.
Product Description
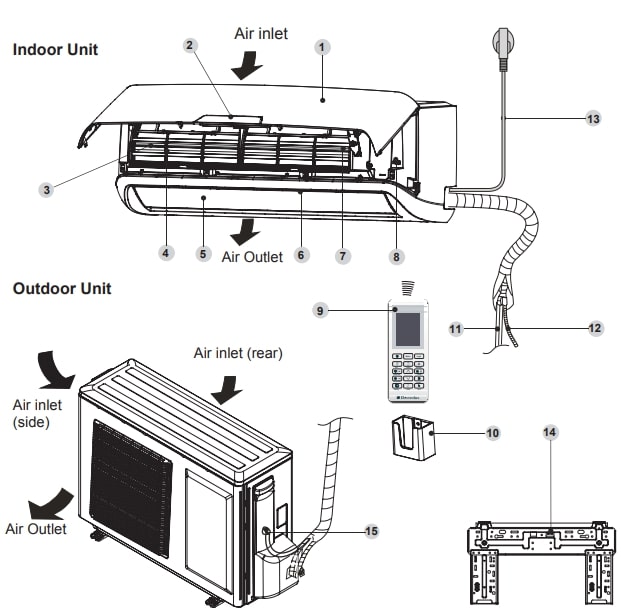
- Front panel
- Digital display
- Healthy air filter (behind the dust filter)
- Pre-dust filter
- Horizontal air louvers
- Vertical air louvers
- Cold plasma generator (if applicable)
- Manual control button
- Remote control
- Remote control holder
- Refrigerant pipe (if applicable)
- Drain hose (if applicable)
- Power cable (if applicable)
- Mounting plate
- Connecting cable (if applicable)
Indoor Unit Display
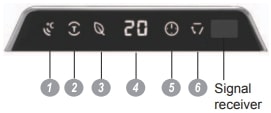
- Feel indicator
It lights when the I Feel function is activated. - Turbo indicator
Illuminates during Turbo operation. - Eco (Economy) indicator
Illuminates when the ECO function is in operation. - Temperature indicator
Displays the temperature settings when the air conditioner is in operation. - Timer indicator
The indicator illuminates when the Timer is set ON and OFF. - Swing indicator
It lights up when the Swing function is activated.
Remote Control
How to use the Remote Control
- Point the remote control to the signal receiver of the indoor unit.
- Make sure no obstacle may interfere with the signal.
Location of the remote control
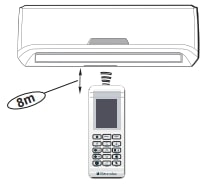
- Keep the remote control where its signal can reach the receiver of the indoor unit (a maximum distance of 8m is allowed)
- When you select the timer operation, the remote control automatically transmits a signal to the indoor unit at the specified time.
- If you keep the remote control in a position that hinders proper signal transmission, a time lag of up to 15 minutes may occur.
- When the remote control sends out a signal, the symbol will blink for about 1 second on the display. The indoor unit will acknowledge the signal with a beep when it receives an effective signal.
caution
- The air conditioner will not operate if curtains, doors, or other materials block the signals from the remote control to the indoor unit.
- Prevent any liquid from falling into the remote control. Do not expose the remote control to direct sunlight or heat.
- If the infrared signal receiver on the indoor unit is exposed to direct sunlight, the air conditioner may not function properly. Use curtains to prevent the sunlight from falling on the receiver.
- If other electrical appliances react to the remote control, either move these appliances or consult your local dealer.
Battery installation/replacement
- Slide the battery compartment cover off and insert two new alkaline dry batteries (2x AAA1.5Volt). Make sure that the polarity of (+) or (-) is installed correctly.
- Slide the battery compartment cover back on.
Remote Control Description
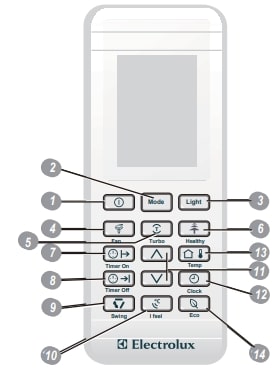
- ON/OFF Button
Press this button to turn the air conditioner ON or OFF. - Mode Button
By pressing this button, AUTO, DEHUMIDIFY, FAN, COOL, and HEAT (the COOL-only model has no HEAT feature) modes can be selected progressively. AUTO mode is default while power is on.- Under AUTO mode, the initial value is 23°C;
- Under HEAT mode, the initial value is 28°C;
- Under other modes, the initial value is 25°C.

- Light Button
Press this button to switch the indicating lights of the indoor unit ON or OFF. The normal condition at start-up is ON. - Fan Button
By pressing this button, Auto, Low, Medium, and High speed can be progressively selected. - Turbo Button
Press this button in COOL or HEAT mode to put the fan into the high-speed Turbo mode and the air conditioner will work at maximum power. - Healthy Button
Press this button to turn the Cold-Plasma function ON or OFF. - Timer On Button
Press this button to set the start time. - Timer Off Button
Press this button to set the stop time. - Swing Button:
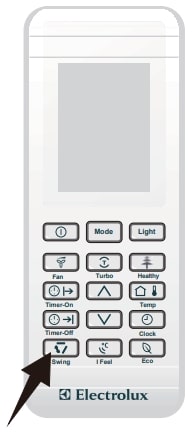
Press this button, the louver will swing up and down automatically. Press again to cancel it and the louver will stay at its last position. - I Feel Button:
Press this button, the remote control will send the temperature information to the indoor unit every 2 minutes. The unit will operate to reach the set temperature at the location of the remote control. Press again to cancel this function. - Control Button:
Press the button to increase the temperature setting. Press the button to decrease the temperature setting. - Clock Button:
Press this button and the Clock symbol will blink. You can press the Control buttons and set the time you want. - Temp (Temperature) Button
Press this button to change the remote control display of the set temperature to the room temperature. - Eco (Economy) Button
Press this button to start the Eco operation. This is ideal for the users to use while sleeping. Press again to cancel the function.
Remote Control Display Indicator
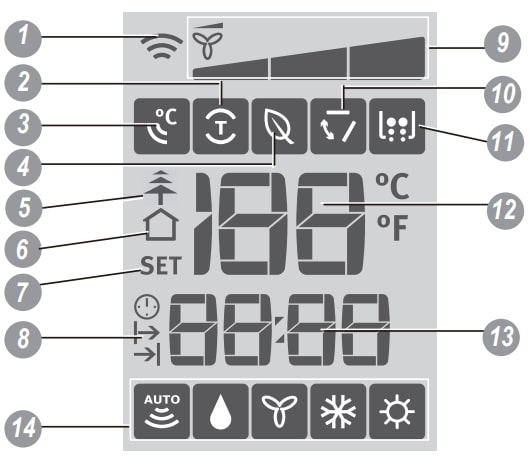
- Transmission Indicator:
Displays when the remote control transmits signals to the indoor unit. - Turbo Display
Displays when the Turbo function is selected. - I Feel Display
Displays when the I Feel function is activated. - Eco Display
Displays when the Eco function is selected. - Healthy Display
Displayed by pressing the Healthy button. Press the Healthy button again to remove it. - Room Temperature Display
Displays when the temperature shown on the LCD screen is room temperature. It can be switched on/off by pressing the Temp button. - Programmed Temperature Display
Lights when the remote control displays the set temperature. It can be switched on/off by pressing the Temp button. - Timer On/Off Display
Displays when the Timer On/Off function is activated. - Fan Speed Display
Displays the selected fan speed in the following sequence: - Swing Display
Displays when the Swing function is selected. - X-Fan Display
Displays when the X-Fan function is activated by pressing the Turbo and Healthy buttons at the same time (for models with Cold-plasma function) or by pressing the X-Fan button (for models without Coldplasma function) - Temperature Display
Displays the room or sets temperature in °C or F. No display in Fan mode. - Time Display
Displays the Clock time (must be set) and/or the on/off time of the timer. - Mode Display
Displays the current operation mode, including Auto.
NOTE: The Cool model does not offer a Heating option.
First Use
- Ensure the unit is plugged in and power is available.
- Be sure the batteries are inserted correctly in the remote control (the lights on the remote control will be on).
- Set the time by Control buttons and confirm by pressing the Clock button.
- Point the remote control to the indoor unit and press the ON/OFF button to turn the unit on.
How to Use the Remote Control
Automatic Operation
When the AUTO mode is selected, the air conditioner will automatically select COOL, HEAT (if applicable), or FAN-only operation, depending on the programmed and/or the room temperature.
Start
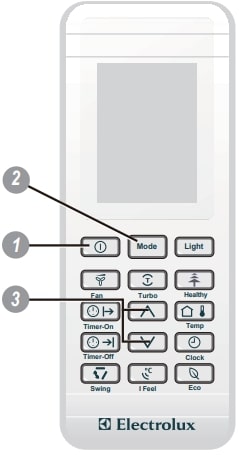
- ON/OFF Button
Press this button to turn the air conditioner on. The temperature indicator on the indoor unit displays lights on. - Mode Button Press to select AUTO.
- Control Buttons
Stop
- ON/OFF Button
Press this button again to turn the air conditioner off. The horizontal louver returns to the position upon shutdown.
If the AUTO mode is uncomfortable, you can select the desired conditions manually.
Dehumidifying Operation
The DEHUMIDIFY mode works based on the difference between the set temperature and the actual room temperature. The temperature is regulated while dehumidifying by repeatedly turning on/off the COOLING operation or FAN-only operation.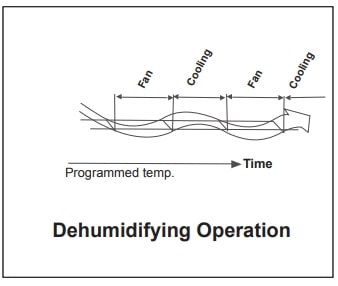
Setting the Clock
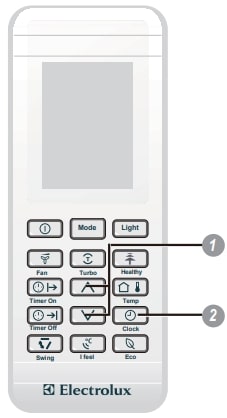
Before you start operating the air conditioner, set the clock of the remote control using the procedure given in this section.
- Control Buttons
Press the Control buttons to set the desired time. - Clock Button
When the desired time is achieved, press the Clock button again or after 5 seconds with no operation, the clock time stops flashing and the clock is set. - Reset the Clock
Press the Clock button and the clock display will start to flash. Follow steps 1 and 2 to set the new time.
Economy (Eco) Operation
Press the Eco button in COOL or HEAT (if applicable) mode, and the air conditioner will automatically increase (in COOL mode) or decrease (in HEAT mode) by 1 C per hour over 2 hours. The set temperature will be steady for the next 5 hours then the unit will stop. This function permits more comfort and saves energy. This operation is recommended for bedtime.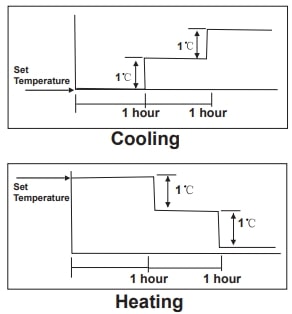
Airflow Direction Control
- Adjust the airflow direction properly, otherwise, it might cause discomfort or uneven room temperatures.
- Adjust the horizontal louvers with the remote control.
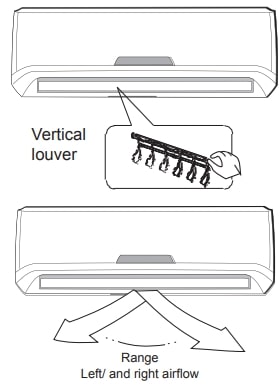
- Adjust the vertical louvers manually.
To set the vertical (up/down) airflow direction automatically
- Perform this function while the unit is in operation.
- Press the Swing button on the remote control, the horizontal louver will swing up and down automatically.
- When the louver moves in the desired direction, press the Swing button again and the louver will stay where it is.
- Press the Swing button again and the louver will start swinging up and down automatically.

To adjust the horizontal (left/right) airflow direction manually
- Adjust the vertical louvers manually using the Left/Right lever of the vertical louver arm.
- Perform these adjustments before you start the unit because once it has been started, there is a risk of your fingers getting caught on the fan.
Emergency Operation
When the remote control is lost or fails to operate, please use the manual switch on the indoor unit. The air conditioner will operate in AUTO mode and the temperature setting or fan speed can not be changed.
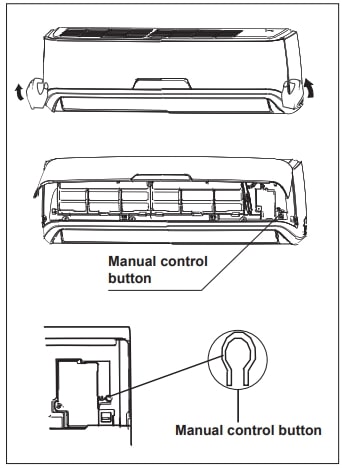
- Press the Manual Control button to enter AUTO mode. The air conditioner will select the mode of COOL, HEAT (heat pump model only), and FAN automatically according to the room temperature to reach the best comfort.
- Press the Manual Control button again to turn the air conditioner off.
Operating Temperature
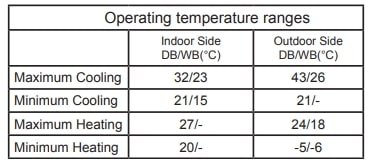
The operation temperature range (outdoor temperature) for the cooling-only model is 21ºC~43ºC, and for the heat pump model is -5ºC~43ºC.
Cleaning and Maintenance
The following maintenance operations must be performed regularly.
Indoor Unit and Remote Control Cleaning
- Use a dry cloth to wipe the indoor unit and remote control.
- A cloth dampened with cold water may be used on the indoor unit if it is too dirty.
- The front panel of the indoor unit can’t be removed and cleaned with water. Then wipe with a dry cloth.
- Do not use brushes, emery paper or burnished to clean the unit because it may cause damage.
Cleaning the Filters
Note: Supply power must be disconnected before cleaning. A clogged dust filter reduces the cooling/heating efficiency of this unit. Please clean the filter every month or more often if necessary.
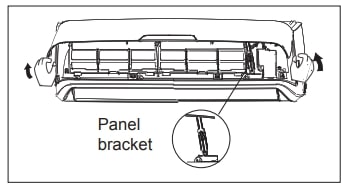
- Lift the indoor unit front panel to an angle until it stops with full support from the bracket.
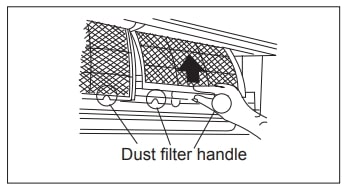
- Hold the dust filter handle and lift it slightly to take it out from the filter holder.
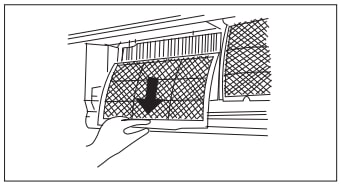
- Then pull the dust filter downwards out of the indoor unit.
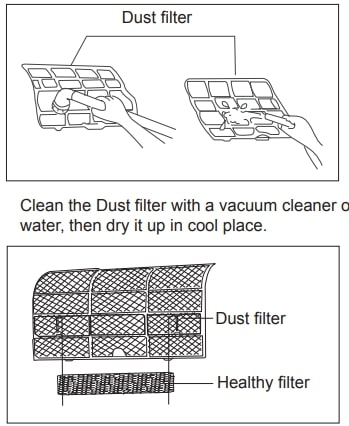
- The healthy air freshening filters (if applicable) like Active carbon filter / BIO filter / Vitamin C filter / Silver ion filter are fixed on the dust filter.
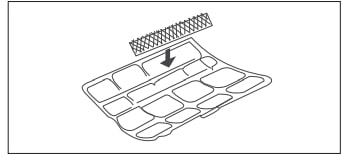
- Install the healthy air freshening filters back in position.
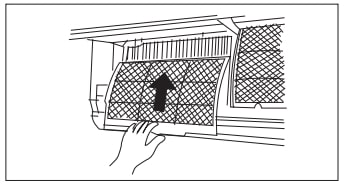
- Install the upper portion of dust filers back into the unit, ensuring the left and right edges line up correctly, and place dust filters into position.
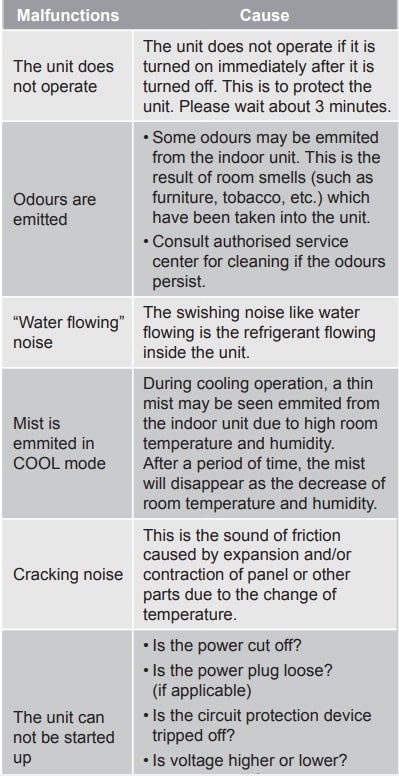
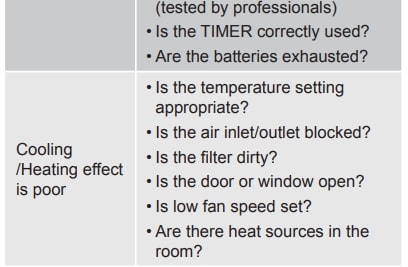
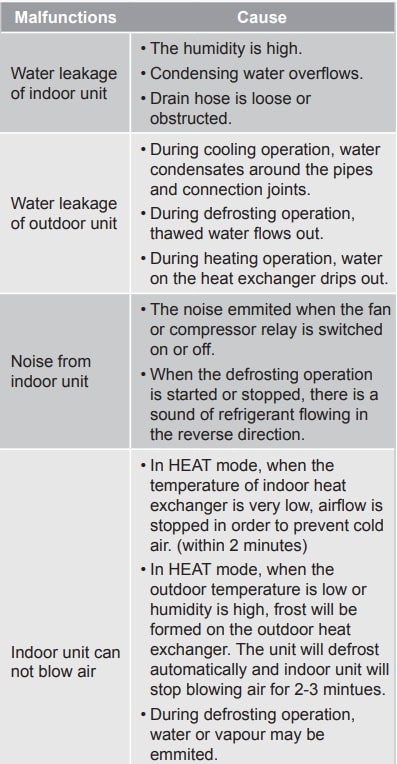
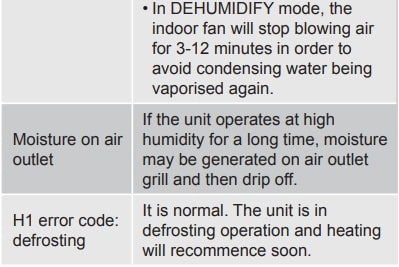
Trouble Shooting
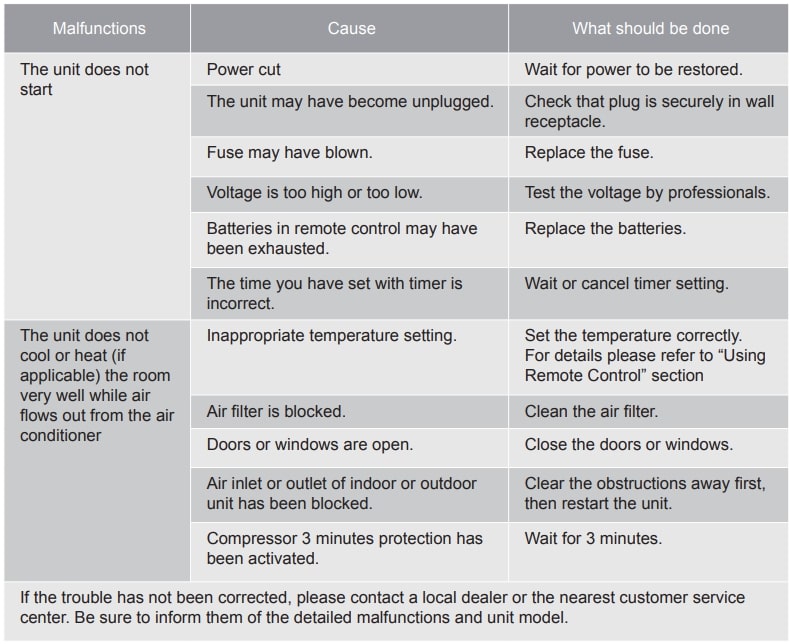
The air conditioner is not user-serviceable. Incorrect repair may cause electric shock or fire. Please contact an authorized service center for professional repair.
warning
If one of the following situations occurs, immediately stop the air conditioner, disconnect the power, and contact the authorized service center.
- If an error code appears on the display window of the indoor unit.
- Power indicator or other indicator flash rapidly and this flashing can not be stopped by disconnecting the power and then connecting it again.
- The fuse blows frequently or the circuit breaker often trips.
The pressure in the refrigeration system is low and could result in the unit breaking down. Ask a certified installer to control it.
Do not dispose of this product as unsorted municipal waste. Collection of such waste separately for special treatment is necessary.
FAQs About Electrolux EXS09GH1WI
What settings are available on an Electrolux air conditioner?
16–30 °C (61–86 °F) is the temperature range. Use the button to alter the timer or set the clock when using the Timer-On/Off or Clock features. To select an operating mode (AUTO, DRY, FAN, COOL, or HEAT), press the button.
Which AC mode works best?
Econ Mode. Among the settings and functions on your air conditioner that uses the least amount of energy is the eco mode. The AC unit’s compressor and fan are used more effectively in the eco mode, requiring less energy to reach the target temperature.
Which AC mode uses less power?
Benefits of running your air conditioner in fan mode include the following: Cut back on the amount of energy you use. Compared to the cooling, heating, and dry modes of the air conditioner, the fan mode consumes a lot less energy. This is so because running the fan requires less energy than running the compressor.
May I use the dry mode continuously?
The majority of HVAC manufacturers advise using dry mode for no more than an hour at a time. You could not have enough moisture inside your home after utilizing dry mode on your air conditioner for a few hours if it is particularly good at removing humidity.
Is AC in auto mode a good idea?
In auto mode, the system automatically modifies the fan speed and temperature to keep the temperature at a steady, comfortable level. As a result, there is no need to manually change the temperature, which can lead to increased energy efficiency and decreased energy usage.
A 1.5-ton air conditioner uses how much electricity in one hour?
A 1.5-ton, five-star air conditioner uses about 1.5 units of electricity per hour, while a 1.5-ton, three-star air conditioner uses 1.6 units.
What is the AC’s auto fan speed?
needs to be heated or cooled. The entire system turns off when the thermostat reaches the appropriate temperature.
Which mode works best with an AC inverter?
If the name doesn’t already tell you, the eco-mode, also known as the energy-saving mode, is meant to use less electricity. This is the best mode for those who want to reduce their energy costs by using a less powerful air conditioner and compressor.
What is the most cost-effective AC temperature?
According to the Nebraska Energy Office, you may save 10% annually on your cooling bills by raising the temperature of your thermostat by just 10 to 15 degrees Fahrenheit for eight hours a day. When you’re at home, the US Department of Energy advises setting an indoor temperature of 78 degrees Fahrenheit.
Is it safe to use Dry mode?
Not all of the moisture in the air will be eliminated by the dry mode. Rather, it will assist in bringing the humidity down to a safe level. To prevent overly drying out the air, it is advised against using your air conditioner in dry mode for longer than one or two hours at a time.
For More Manuals by Electrolux, Visit the Latest Manual
- Electrolux EXP09CS1WI Portable Air Conditioning Unit User Manual
- Electrolux EXP09CS1WI User Manual
- Electrolux EXP09EN1WI User Manual
- Electrolux EXP12EN1WI User Manual
- Electrolux Frigidaire Operating Instructions
 |
Electrolux EXS09GH1WI User Manual [pdf] |

