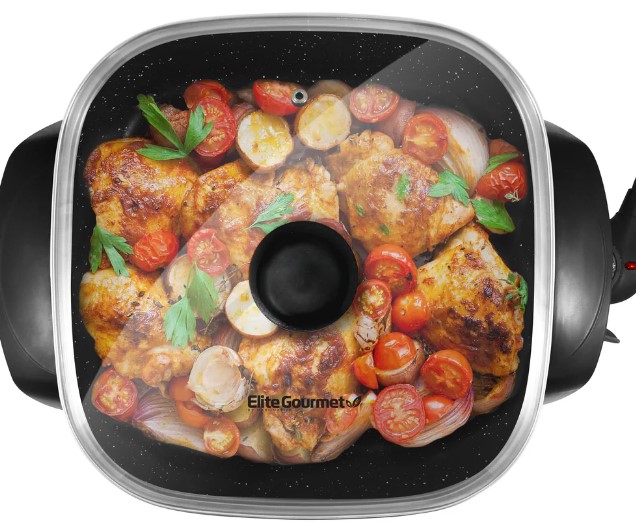
Elite Gourmet EG6201 Electric Skillet
About Elite Gourmet
Families are spending less quality time together in today’s hectic society. For over 37 years, Elite has persisted in creating and providing high-quality, user-friendly kitchen goods. To cut down on preparation time and maximize quality time spent with loved ones, friends, food, and creating memories, we suggest using Elite products as a cooperative activity.
Everywhere you go in the globe, families gather in the kitchen every day, making it the center of the home. For this reason, we still advocate for home cooking with natural ingredients and developing our goods to help achieve this objective.
IMPORTANT SAFEGUARDS
The Elite Brand takes consumer safety very seriously. Products are designed and manufactured with our valued consumers’ safety in mind.
Additionally, we ask that you exercise a level of caution when using any electrical appliance by following all instructions and important safeguards.
- Do not touch hot surfaces. Use handles or knobs if applicable.
- Remove all packaging plastics, stickers labels, and any other materials from the unit before operating.
- Wash all removable accessories before using them or for the first time.
- To protect against electrical shock, do not immerse the cord, plug, or appliance itself in water or any other liquids.
- Close supervision is always necessary when the appliance is used by or near children.
- Always unplug from the outlet when not in use and before cleaning. Allow to cool before putting on or taking off any parts.
- Do not operate any appliance with a damaged cord or plug or after the appliance malfunctions, has been dropped, left outdoors, submerged in water, or has been damaged in any manner. Contact Customer Service at Maxi-Matic for further instructions on examination, repair, or adjustment.
- The use of accessory attachments not recommended by the appliance manufacturer may cause injuries.
- Do not use it outdoors or on a wet surface.
- Do not let the cord or plug hang over the edge of the table or counter or touch hot surfaces.
- Do not handle plugs or appliances with wet hands.
- Do not place on or near a hot gas stove or electric burner, or in a heated oven.
- Always attach the plug to the appliance first, then plug the cord into a wall outlet. To disconnect, turn any controls to the OFF position, then remove the plug from the wall outlet.
- Oversized foods or metal utensils must not be used with the appliance as they may cause a fire or risk of electrical shock or damage the non-stick coating.
- Only use wooden or high heat-resistant plastic utensils when using this appliance.
- Do not use this appliance for other than the intended use.
- Avoid sudden temperature changes with the Glass Lid. Moving a hot lid to a cold surface could cause it to shatter. Allow the lid to cool completely before removing.
- A fire may occur if the appliance is covered or touching flammable material including curtains, draperies, walls, and the like when in operation.
- Do not clean this appliance with metal scouring pads. Pieces can break off the pad and touch electrical parts, causing a risk of electrical shock. Metal scouring pads may also damage the finish.
- Do not store any materials other than the manufacturer’s recommended accessories in this unit when not in use.
- Do not place any of the following materials in the unit: Paper, cardboard, plastic, and the like.
- This appliance is intended for household, indoor use only.
- Do not place the temperature control probe in the dishwasher.
SHORT CORD PURPOSE
Note
A short power cord is provided to reduce the risk of personal injury resulting from becoming entangled in or tripping over a long cord.
Longer power-supply cords or extension cords may be used if care is exercised in their use.
If an extension cord is used: (1) the marked electrical rating of the extension cord should be at least as great as the electrical rating of the product; (2) the extension cord should be arranged so that it will not drape over the countertop or tabletop where it can unintentionally be pulled on or tripped over by children or pets.
POLARIZED PLUG
If this appliance is equipped with a polarized plug (one blade is wider than the other),
please follow the below instructions:
To reduce the risk of electrical shock, this plug is intended to fit into a polarized outlet only one way. If you are unable to fit the plug into the electrical outlet, try reversing the plug.
If the plug still does not fit, contact a qualified electrician. Never use the plug with an extension cord unless the plug can be fully inserted into the extension cord. Do not alter the plug of the product or any extension cord being used with this product. Do not attempt to defeat the safety purpose of the polarized plug.
PARTS IDENTIFICATION
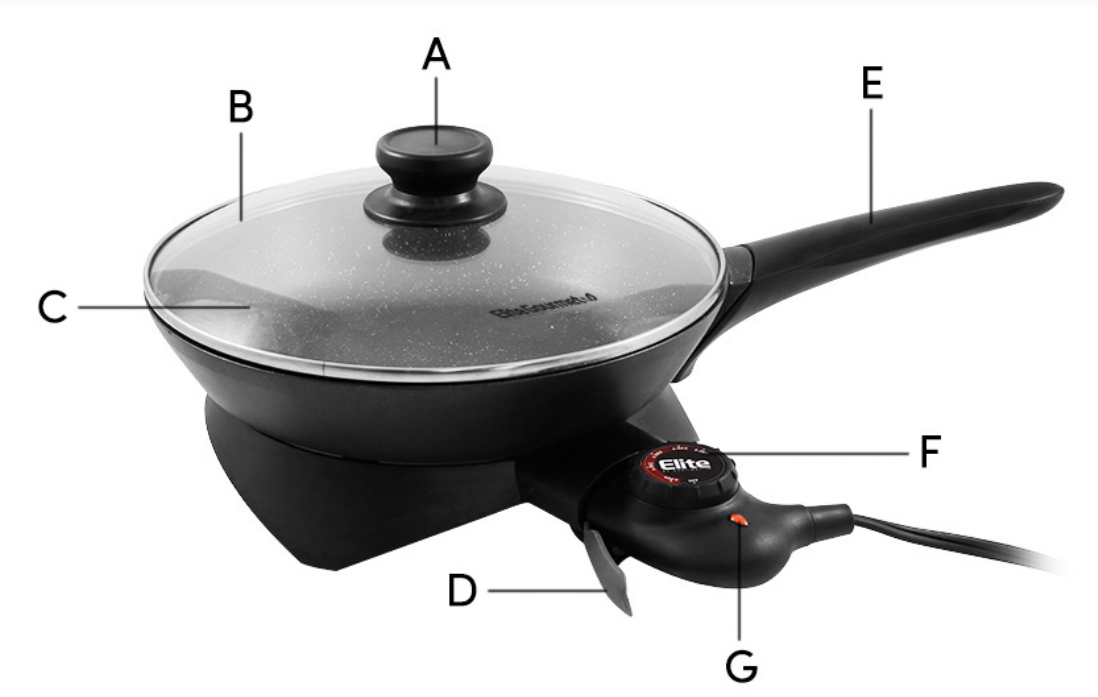
- Cool touch knob
- Tempered glass lid
- Non-stick cooking surface
- Quick release trigger
- Cool touch handle
- Temperature control
- Indicator light
BEFORE FIRST USE
Read all instructions and important safeguards before first use.
- Remove all packaging materials including plastics, cardboard, Styrofoam, and any promotional stickers or labels and any literature. Do not remove warning labels
- Examine and make sure that all parts of the Non-Stick Electric Skillet with Glass Lid are in good working condition.
- Unplug the cord and removable temperature control before cleaning.
- Wash the glass lid in warm soapy water, rinse, and dry thoroughly.
- Wipe the inside and outer body of the skillet with a clean and damp cloth.
- Thoroughly dry all parts before using the electric skillet.
WARNING
Do not place extremely cold/ frozen foods or liquids into a hot fry pan as it may result in excessive steam, spitting, and spattering causing personal injury.
HOW TO USE
- Place the skillet on a dry, flat stable surface.
- Make sure the temperature control knob is in the OFF position and insert the thermostat control probe into the side of the skillet body.
- Line up the metal conductor and push in gently.
- Plug the power cord into a wall outlet. Set the thermostat to the desired temperature. Wait a few minutes for the skillet to heat up and place the prepared food into the skillet.
- When the selected temperature is reached, the light will go OFF.
Note
The light will cycle ON and OFF during cooking, indicating the selected cooking temperature is being maintained. - If desired, place a glass lid over the skillet and keep covered to prevent heat from escaping or liquid from splattering.
- The steam vent allows steam to escape while cooking with the lid in place.
Note
Remember, the skillet takes several minutes to cool down after use. - When removing the lid from the skillet, always tilt the lid away from you when lifting.
- When food is fully cooked, set the temperature to 200°F to keep food at serving temperature.
- To use a skillet for table service, unplug the power cord from the wall and the appliance: To remove the variable temperature control probe, hold the cool-touch handle on the side of the skillet and gently pull out the control.
HINTS AND TIPS
- Do not use any metal utensils or knives on the skillet surface. Only use wooden or high-heat-resistant plastic utensils to avoid scratching or damaging the nonstick surface.
- Do not place or store the temperature control probe on the skillet surface, as it may scratch or damage the non-stick surface.
- Do not use any abrasive cleaners, nylon metal scouring pads, or brushes on a skillet or glass lid, as they may scratch or damage the surfaces.
- To season the non-stick surface of your electric skillet, apply a light coat of cooking oil and heat for 2-3 minutes. Allow the unit to cool completely before storing.
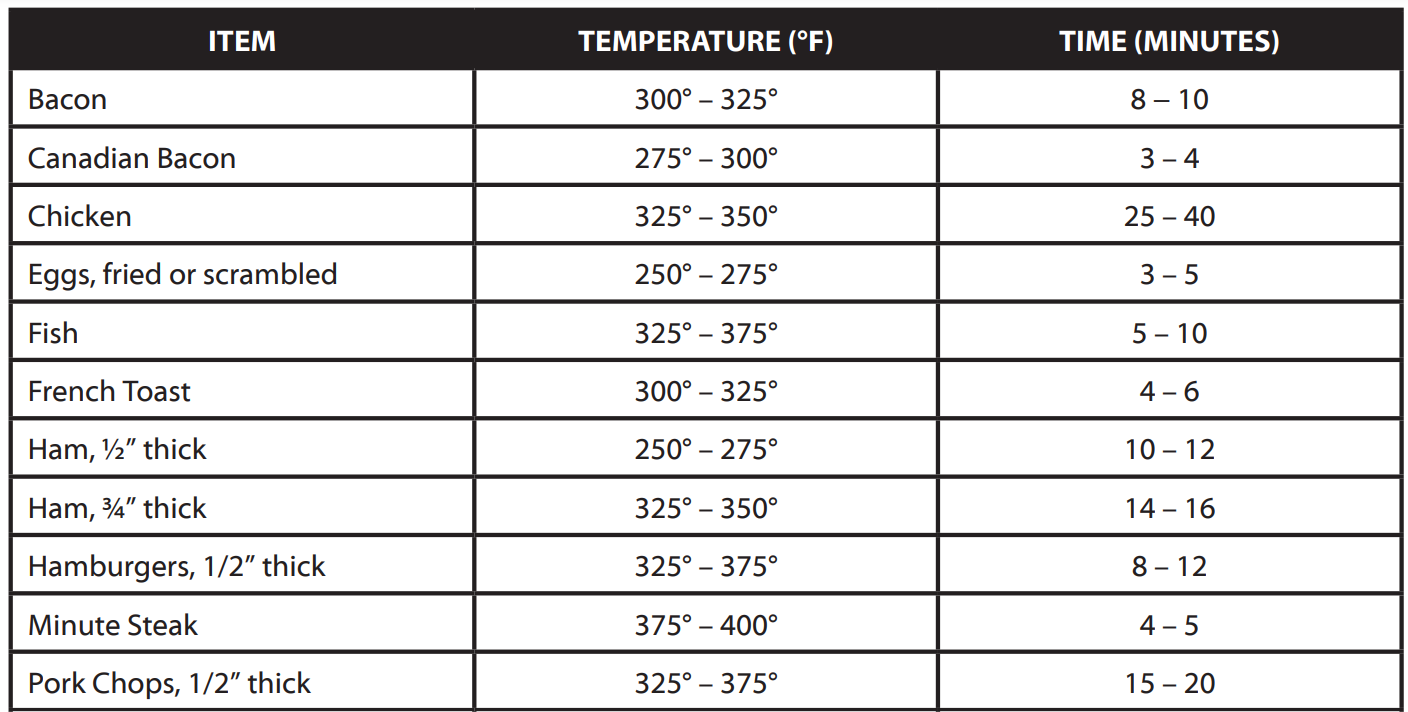
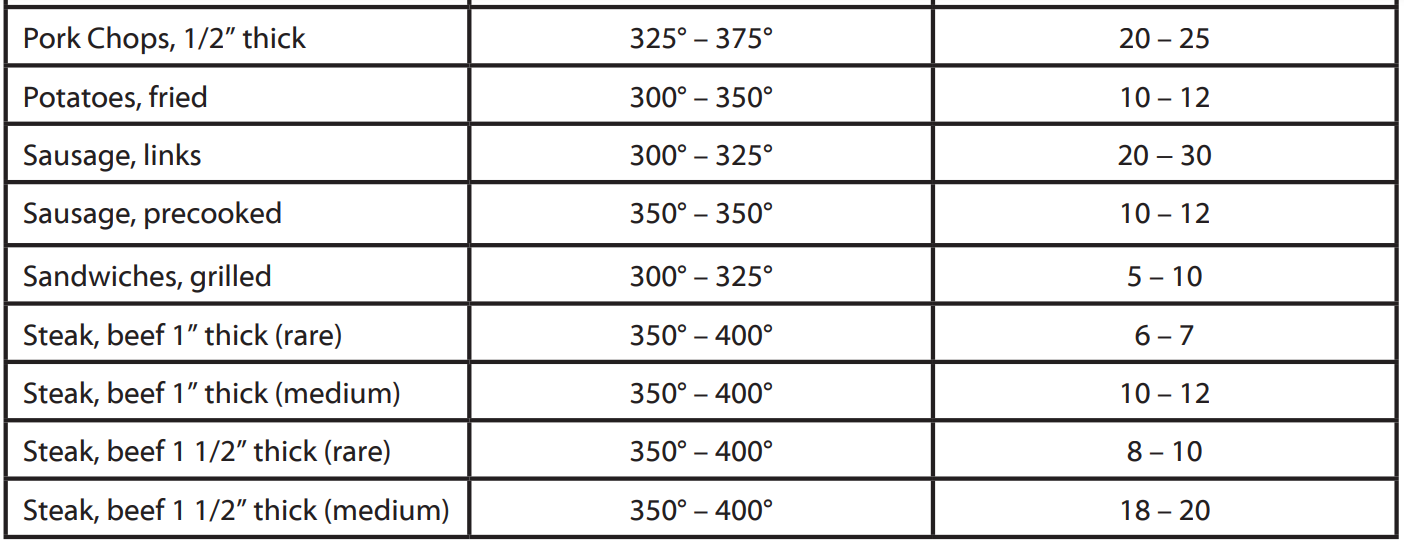
COOKING TIME & TEMPERATURES
The following cooking guide temperatures and times are approximate and are for reference only.
For Simmering
In an electric skillet, foods will heat to a simmering point between the ON setting and 200°F. Heat the skillet at 350°F until the food boils; then place the lid on the skillet and reduce heat to a simmering level by turning the temperature control between ON and 200°F.
For Braising or Pot Roasting
This cooking method involves browning food, usually meat or vegetables in oil, butter, or margarine and then simmering in a small amount of liquid over low heat. To brown meat and/or vegetables, use a temperature between 325°F and 350°F. After browning, simmer as instructed above.
CLEANING & MAINTENANCE
- Allow the appliance to cool completely before cleaning. Exposing your skillet to water while hot may cause warping and/or damage.
- Once cooled, filling the skillet with water and allowing it to soak will assist in the removal of tough baked-on particles.
- Make sure the temperature control knob is in the OFF position and the power cord is unplugged.
- When washing, non-abrasive cloths and plastic bristle kitchen brushes may be used to remove stubborn food particles from your skillet. Do not use abrasive cloths and cleaning materials as they may damage the non-stick surface.
- The glass lid and skillet body (with Temperature Control Probe removed) are dishwasher safe (TOP RACK ONLY) or can be washed by hand with warm soapy water and a clean non-abrasive sponge or cloth. The inner body of the skillet can be cleaned with a damp soapy cloth or sponge.
CAUTION
DO NOT USE ABRASIVE CLEANSERS OR MATERIALS TO CLEAN ANY PARTS OF THE SKILLET FOR THIS MAY DAMAGE THE SURFACES AND NON-STICK COATING! - If the non-stick surface is hard to clean, add enough water to barely cover the bottom of the skillet and reheat the unit for 2-3 minutes.
- Ensure both probe and skillet are completely dry before inserting pa robe into skilled for use.
- Should your skillet require cleaning of stubborn stains and build-up, the following method is recommended: Combine 2 tablespoons of baking soda and 2 teaspoons of water. -Pre-heat the skillet for approximately 1-11/2 minutes on setting 300°F. -Turn the power OFF at the power outlet, remove the plug from the power outlet, and remove the probe from the skillet. -Brush the above paste solution onto the non-stick surface and allow to stand for one hour. -Wash the skillet in warm soapy water using a mild household cleaner and a soft washing sponge.
- Dry ALL parts of the electric skillet thoroughly before storing it away.
DANGER
Do not under any circumstances immerse the power cord, mains plug or temperature control probe in water or any other liquid.
WARNING
Do not place the temperature control probe in the dishwasher.
RECIPES
Skillet Pepper Steak Makes 4 servings
- 3 tablespoons olive oil, divided
- 4 medium-sized potatoes, peeled
- and thinly sliced
- 1/2 teaspoon salt
- 1/4 teaspoon black pepper
- 1 pound beef chuck steak, very thinly sliced
- 2 garlic cloves, minced
- 1 large green bell pepper, cut into 1/4-inch strips
- 2 tablespoons soy sauce
- Set the temperature control knob to medium-high, 375 degrees.
- In the skillet, heat the 2 tablespoons of olive oil. Add potatoes and sprinkle with salt and black pepper. Sauté for 12 to 15 minutes or until potatoes are golden, turning halfway through cooking.
- Transfer potatoes to a platter and cover to keep warm.
- In the skillet, add the remaining 1 tablespoon of olive oil then add the steak, garlic, and bell pepper. Increase the heat to high, 400 degrees, and sauté for 4 to 5 minutes, or until steak is cooked to the desired doneness.
- Add soy sauce, and stir to coat. Cook for 1 minute then spoon steak and pepper mixture over potatoes.
Rosemary Chicken and Wild Rice Makes 5 servings
- 1 (6.2-ounce) package of fast-cooking long-grain and wild rice
- 5 (6-ounce) boneless, skinless chicken breasts
- 3 tablespoons all-purpose flour
- 2 teaspoons dried rosemary, crushed
- 1/8 teaspoon black pepper
- 1 tablespoon olive oil, divided
- 1 cup baby carrots
- 1 cup chopped onion (1 medium)
- 2 teaspoons prepared minced garlic
- 1 cup water
- 1 (14-ounce) fat-free, less-sodium chicken broth
- 2 cups coarsely chopped fresh spinach
- Remove the seasoning packet from the rice. Sprinkle chicken with 1-1/2 tablespoons seasoning mixture. Reserve the remaining seasoning mixture.
- Combine flour, rosemary, and pepper in a shallow dish. Dredge chicken in flour mixture.
- In a skillet over medium heat, 325 degrees, heat 2 teaspoons of olive oil. Add chicken to skillet; cook 3 to 4 minutes on each side or until lightly browned. Remove chicken from skillet; set aside.
- Heat the remaining 1 teaspoon of olive oil in a skillet over medium heat; add carrots, onion, and garlic, and sauté 2 minutes. Add water and broth; bring to a boil. Stir in rice and reserved seasoning mixture; top with chicken. Cover skillet with a lid, reduce heat to 200- 250 degrees, and simmer for 15 minutes or until chicken is done.
- Remove from heat, and place chicken on serving plates. Add spinach to rice mixture, and stir until spinach wilts. Serve chicken with rice mixture.
Sweet and Sour Chicken with Vegetables Makes 20 servings
- 2 tablespoons canola oil
- 2 1/2 pounds boneless, skinless chicken breasts, cut into thin strips
- 1 (20-ounce) can pineapple chunks in syrup, drained and liquid reserved
- 1 (8-ounce) can of sliced water chestnuts, drained
- 1 cup fresh broccoli florets
- 1 medium-sized red bell pepper, cut into 3/4-inch chunks
- 2 tablespoons low-sodium soy sauce
- 1 tablespoon white vinegar
- 1 tablespoon ketchup
- 2 tablespoons cornstarch
- 1 tablespoon sugar
- 1 cup fresh snow peas, trimmed Cooked White Rice (optional)
- Set the temperature control knob to high, 400 degrees.
- Heat oil and add chicken and stir-fry for 4 to 5 minutes, or until no pink remains.
- Add pineapple chunks, water chestnuts, broccoli, and red pepper. Stir-fry for 3 to 4 minutes, or until the vegetables are crisp-tender.
- In a small bowl, combine the reserved pineapple liquid, soy sauce, vinegar, ketchup, cornstarch, and sugar; mix well. Stir into skillet and cook for 3 minutes.
- Add snow peas and cook for 1 minute, or until the sauce has thickened. Remove from heat and serve immediately. *Serve over white rice if desired.
Skillet Barbecued Pork Makes about 4 servings
- 1/3 cup honey
- 1/3 cup barbecue sauce
- 1/3 cup Italian dressing
- 1 teaspoon chili powder
- 4 boneless pork chops, 1/2 inch thick (about 1 pound)
- Using a large re-sealable plastic storage bag, combine honey, barbecue sauce, Italian dressing, and chili powder; mix well.
- Add pork chops to marinade; seal bag, shake to coat meat well then refrigerate for 30 to 60 minutes.
- Set the temperature control knob to medium-high, 375 degrees.
- Add pork chops to skillet with sauce mixture and cook for 5 to 7 minutes per side or until no pink remains.
- Serve and top with sauce.
LIMITED WARRANTY* ONE (1) YEAR
- Your small kitchen appliance is warranted to the original purchaser to be free from any manufacturing defects under normal use and conditions for one (1) year, cord excluded. This Warranty applies only to the original purchaser of this product.
- Retail stores/merchants selling this product do not have the right to alter, modify, or in any way revise the terms and conditions of the warranty.
- If you use your appliance for household use and according to instructions, it should give you years of satisfactory service.
- At its sole discretion, Maxi-Matic USA will either repair or replace the product found to be defective during the warranty period.
- The repaired or replacement product will be in warranty for the remaining balance of the one-year warranty period and an additional one-month period.
- Consumer’s remorse is not an acceptable reason to return a product to our Service Center.
- This limited warranty covers appliances purchased and used within the 50 U.S. states plus the District of Columbia and does NOT cover normal wear of parts or:
- Damages caused by unreasonable use, neglect, normal wear and tear, commercial use, improper assembly or installation of product.
- Damages caused in shipping.
- Damages caused by replacement or resetting of house fuses or circuit breakers.
- Defects other than manufacturing defects.
- Breakage is caused by misuse, abuse, accident, alteration, lack of proper care and maintenance, or incorrect current or voltage.
- Lost or missing parts of the product. Parts will need to be purchased separately.
- Damages of parts that are not electrical; i.e. cracked or broken plastic/glass, scratched/dented inner pots.
- Damage from service or repair by unauthorized personnel.
- Extended warranties are purchased via a separate company or reseller.
- Acts of nature such as fire, floods, hurricanes, tornadoes, etc.
This warranty does not apply to re-manufactured merchandise
Maxi-Matic, USA shall not be liable for any incidental or consequential damages caused by the breach of any express or implied warranty.
Apart from the extent prohibited by applicable law, any implied warranty of merchantability or fitness for a particular purpose is limited in time to the duration of the warranty.
Year Limited Warranty valid only in the 50 U.S. states plus the District of Columbia, excluding Puerto Rico and the Virgin Islands.
This warranty is effective only if the product is purchased and operated in the USA; product usage that violates the written instructions provided with the unit will void this warranty. For an international warranty, please contact the local distributor.
This warranty gives you special legal rights and you may also have other rights to which you are entitled which may vary by state, province, and/or jurisdiction.
RETURN INSTRUCTIONS
- Any return of defective merchandise to the manufacturer must be processed accordingly by first contacting customer service (support@maxi-matic.com) to obtain an RA # (Return Authorization Number). We will not accept any returns of merchandise without an applicable RA #.
- IMPORTANT RETURN INSTRUCTIONS. Your Warranty depends on your following these instructions if you are returning the unit to Maxi-Matic, USA:
- Carefully pack the item in its original carton or other suitable box with sufficient cushioning to avoid damage in shipping.
- Before packing your unit for return, be sure to enclose: Your name, full address with zip code, daytime telephone number, and RA#, A dated sales receipt or PROOF OF PURCHASE, The model number of the unit, and the problem you are having (Enclose in an envelope and tape directly to the unit before the box is sealed,) and Any parts or accessories related to the problem.
- Maxi-Matic, USA recommends that you ship the package via UPS ground service for tracking purposes. We cannot assume responsibility for lost or damaged products returned to us during incoming shipment. For your protection, always carefully package the product for shipment and insure it with the carrier. C.O.D. shipments cannot be accepted.
All return shipping charges must be prepaid by you. - Once your return has been received by our warehouse, Maxi-Matic, USA will repair or replace the product if it is defective in material or workmanship, subject to the conditions in paragraph B.
- Maxi-Matic will pay the shipping charges to ship the repaired or replacement product back to you.
FAQS About Elite Gourmet EG6201 Electric Skillet
What are the dimensions of the EG6201 Electric Skillet?
The skillet’s dimensions are approximately 16″ x 12″ x 3″.
What is the cooking surface made of?
The cooking surface is made of a non-stick material, ensuring easy food release and cleanup.
What is the maximum temperature this skillet can reach?
The skillet can reach temperatures up to 400°F (approximately 204°C).
Is the skillet dishwasher safe?
No, the skillet is not dishwasher safe. It should be hand-washed with mild detergent.
Does it come with a lid?
Yes, the EG6201 Electric Skillet comes with a tempered glass lid that allows you to monitor cooking progress.
What is the wattage of this electric skillet?
The skillet operates at 1400 watts.
Can it be used for deep frying?
Yes, the skillet’s depth allows for shallow frying and sautéing, but it may not be suitable for deep frying large quantities of food.
Does it have temperature control settings?
Yes, it features an adjustable temperature control knob for precise cooking.
Is the skillet suitable for use on a camping trip?
While it’s electric and requires an outlet, it could be used in certain camping scenarios where electricity is available.
What is the warranty period for the EG6201 Electric Skillet?
The warranty period typically lasts for one year from the date of purchase. Be sure to check the specific terms and conditions provided by Elite Gourmet.
For More Manuals by Elite Gourmet, Visit the Latest Manual
- Elite Gourmet EG-6203 Electric Skillet Instruction Manual
- Elite Gourmet EQD413 Electric Quesadilla Maker Instruction Manual
- Hamilton Beach Panini Press Sandwich Maker Manual
- Elite Gourmet EPN-2976 2-in-1 Nonstick Panini Press Instruction Manual
 |
Elite Gourmet EG6201 Electric Skillet Instruction Manual [pdf] |

