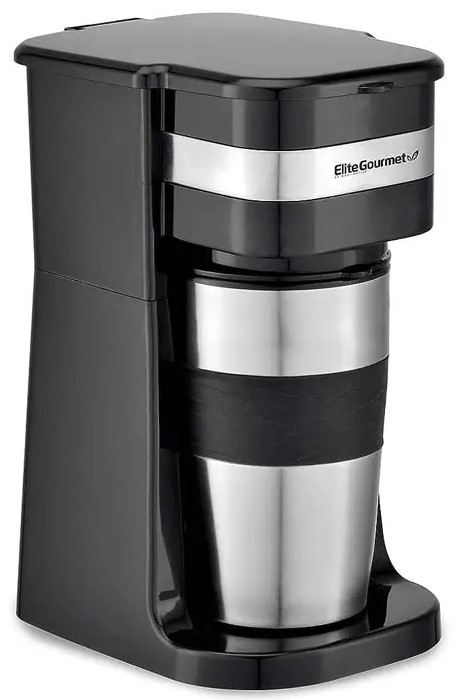
Elite Gourmet EHC111A Personal Single-Serve Compact Coffee Maker
About Elite Gourmet
Families are spending less quality time together in today’s hectic society. For over 37 years, Elite has persisted in creating and providing high-quality, user-friendly kitchen goods. To cut down on preparation time and maximize quality time spent with loved ones, friends, food, and creating memories, we suggest using Elite products as a cooperative activity.
Everywhere you go in the globe, families gather in the kitchen every day, making it the center of the home. For this reason, we still advocate for home cooking with natural ingredients and developing our goods to help achieve this objective.
IMPORTANT SAFEGUARDS
The Elite Brand takes consumer safety very seriously. Products are designed and manufactured with our valued consumers’ safety in mind. Additionally, we ask that you exercise a level of caution when using any electrical appliance by following all instructions and important safeguards.
READ ALL INSTRUCTIONS BEFORE USE AND SAVE THEM FOR FUTURE REFERENCE.
WARNING:
When using electrical appliances, basic safety precautions should always be followed as below.
- Read all instructions and retain the instruction manual in a safe place.
- Do not touch hot surfaces always use the handles and knobs.
- Do not immerse the cord, plug, or base unit in water or other liquids.
- Close supervision is recommended when the appliance is used near children.
- Unplug when not in use or before cleaning.
- Always allow the percolator to cool before cleaning.
- Do not operate any appliance with a damaged cord or plug or after the appliance malfunctions or has been damaged.
- The use of accessories or attachments is not recommended.
- Do not use outdoors or in wet/damp environments
- Do not let the power cord hang over the edge of the table, or counter, or touch hot surfaces.
- Do not place on or near a hot gas or electric burner, or in a heated oven.
- Always fill the percolator first, then set the appliance onto the swivel base and plug it in. To disconnect, turn any control to off, then remove the plug from the wall outlet.
- Do not operate when the water is below the minimum level.
- The appliance is not intended to be operated employing an external timer or a separate remote-control system.
- The housing may get hot when the appliance is operating.
- If the tank of the appliance is overfilled, boiling water may be ejected.
- This appliance is not intended for use by persons (including children) with reduced physical, sensory, or mental capabilities, or lack of experience and knowledge unless they have been given supervision or instruction concerning the use of the appliance by a person responsible for their safety.
- Children should be supervised to ensure that they do not play with the appliance.
- If the SUPPLY CORD is damaged, it must be replaced by the manufacturer, its service agent, or a similarly qualified person to avoid a hazard.
- The appliances are not intended to be operated using an external timer or separate remote-control system.
- This appliance is intended to be used in household and similar applications such as:
- staff kitchen areas in shops, offices, and other working environments;
- farmhouses;
- by clients in hotels, motels, and other residential-type environments;
- bed and breakfast type environments.
- To prevent damage or serious injury discontinue the use of the Percolator and contact customer support if Brew Progress Knob is loose and/or will not screw onto the lid tightly.
- The appliance is only to be used with the stand provided.
- To against electric shock, never make spillage on the connector of the stand.
- Do not use appliances for other than intended use.
SHORT CORD PURPOSE
Note: A short power cord is provided to reduce the risk of personal injury resulting from becoming entangled in or tripping over a long cord. Longer power-supply cords or extension cords may be used if care is exercised in their use.
If an extension cord is used:
- The marked electrical rating of the extension cord should be at least as great as the electrical rating of the product;
- The extension cord should be arranged so that it will not drape over the countertop or tabletop where it can unintentionally be pulled on or tripped over by children or pets.
POLARIZED PLUG
If this appliance is equipped with a polarized plug (one blade is wider than the other), please follow the below instructions:
To reduce the risk of electrical shock, this plug is intended to fit into a polarized outlet only one way. If you are unable to fit the plug into the electrical outlet, try reversing the plug.
If the plug still does not fit, contact a qualified electrician. Never use the plug with an extension cord unless the plug can be fully inserted into the extension cord.
Do not alter the plug of the product or any extension cord being used with this product. Do not attempt to defeat the safety purpose of the polarized plug.
PARTS IDENTIFICATION
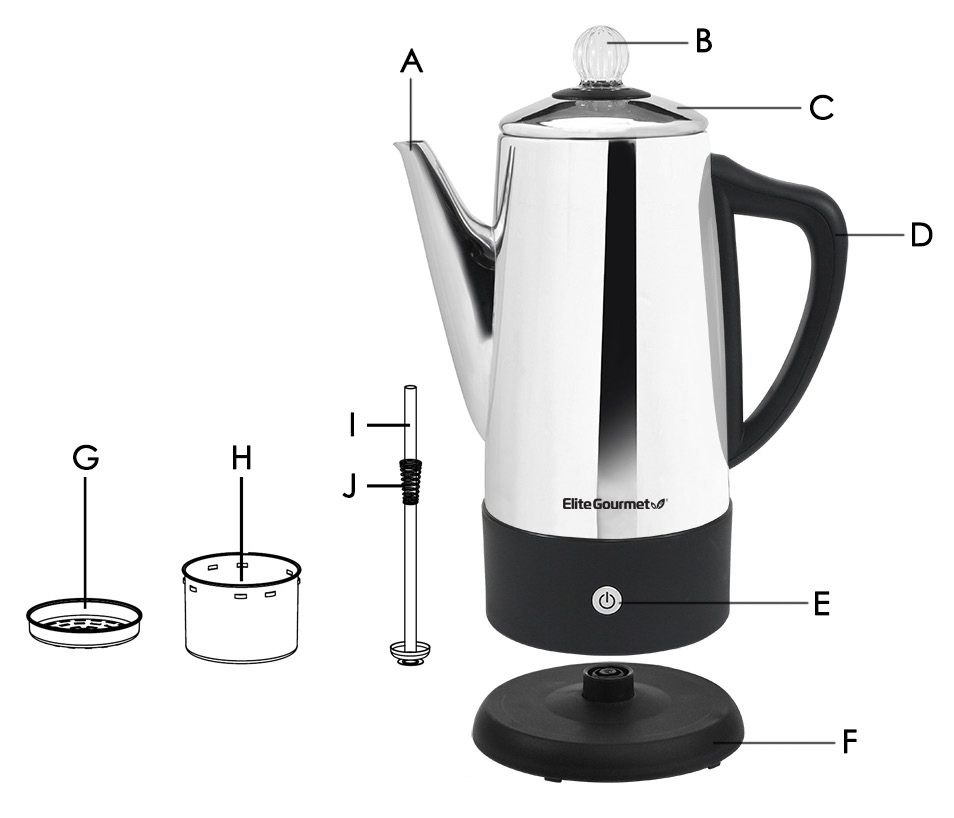
- Spout
- Brew Progress Knob
- Lid
- Cool Touch Handle
- On/Off Button with Indicator
- Light
- Base
- Coffee Basket Lid
- Coffee Basket
- Pump Tube
- Spring
STOP! Under NO circumstances should this percolator or any of its parts or components be placed ON or NEAR a stovetop, range, or open flame.
Doing so will cause serious damage to the percolator and/or injury to a person. This is NOT a stovetop percolator.
BEFORE FIRST USE
- Before using your percolator for the first time, thoroughly wash all parts of the percolator.
- Always ensure that the Brew Progress Knob is in position on the lid. Ensure that it is not loose or unstable.
- To remove the Brew Progress Knob on the lid, simply twist counter-clockwise to unscrew. To reattach the knob back to the lid, simply twist it clockwise to lock it back into place. Do NOT snap or push the knob back into position. Make sure the black washer ring is always in position.
- If the Brew Progress Knob feels loose or unstable in any way, please contact Customer Support to obtain a replacement.
- Discontinue the use of the Coffee Percolator if it has a loose or unstable Progress Knob to reduce the risk of damage or personal injury.
HOW TO USE
- Remove the coffee basket lid, coffee basket, stainless steel lid, and pump tube with spring. Using the measurement markings found on the inside of the unit, fill the Percolator with the desired amount of water. For best results, please use cold water.
- Place the Coffee Basket over the pump tube and spring. Add the desired amount of coffee grounds using the markings found inside the Coffee Basket.
- Place the Coffee Basket and Pump Tube assembly into the Percolator so that the bowl-shaped end of the Pump Tube fits directly into the well found on the bottom of the inside of the Percolator. Place the Coffee Basket Lid over the Coffee Basket and push the Stainless Steel Lid on top of the Percolator.
- Plug the Swivel Base into an outlet and place the Percolator onto the Swivel Base. Press the On/Off button to brew coffee (the red indicator will illuminate). When the brewing cycle is complete, the blue light will illuminate indicating the Keep Warm timer has begun and will automatically turn off after 2 hours. You may also manually end the Keep Warm timer by pressing the Power Button once.
| No. of Cups of Coffee | Mild
(tbsp) |
Medium
(tbsp) |
Strong
(tbsp) |
| 12 | 6 | 8 | 10 |
| 10 | 5 | 7 | 9 |
| 8 | 4 | 6 | 8 |
| 6 | 3 | 4 | 6 |
| 4 | 2 | 3 | 4 |
NOTE:
- It is best to use coarse-ground coffee as finer grounds will sift through the holes in the stainless steel coffee basket and settle at the bottom of the percolator. If finer grounds are used, a coffee filter disc must be used.
- The chart on page 5 can be referenced as a guide for brewing coffee at various strengths.
- Please note that when the percolator is removed from the base, the Keep Warm timer will pause. Placing the percolator back on the base will resume the Keep Warm timer for up to 2 hours total.
CAUTION: Never fill the percolator above the maximum level since hot foaming coffee or other liquids might overflow during heating.
CLEANING & MAINTENANCE
- Always remove the Percolator from the Swivel Base then unplug the Swivel Base from the wall outlet before attempting to clean the Percolator.
- Allow the Percolator to cool before cleaning.
- Remove the Percolator body from the swivel base. Make sure the unit is sitting evenly on a flat surface. Grasp the lid with the Brew Progress knob and gently pull it straight up.
- Gently, pull the Coffee Basket, Coffee Basket Lid, and Pump Tube straight up and out of the body. Take the Coffee Basket Lid off the Coffee Basket and dispose of used coffee grounds.
- The Stainless Steel Lid, Coffee Basket, Coffee Basket Lid, and Pump Tube (with spring) can all be placed into the upper rack of a dishwasher or washed in warm soapy water and rinsed thoroughly.
- Simply wipe the Percolator body and base with a clean, damp cloth and dry before storing.
- Storage: The power supply cord is attached to the swivel base. Wrap the power cord into a coil underneath the swivel base for clutter-free storage.
Brew Progress Knob
- To remove the Brew Progress Knob on the lid, simply twist counter-clockwise to unscrew.
- Rinse under warm water to clean and dry thoroughly. To reattach the knob back to the lid, simply twist it clockwise to lock it back into place. Do NOT snap or push the knob back into position. Make sure the black washer ring is always in position.
- If the Brew Progress Knob feels loose or unstable in any way, please get in touch with Customer Support to obtain a replacement.
- Discontinue the use of the Coffee Percolator if it has a loose or unstable Progress Knob to reduce the risk of damage or personal injury.
Removal Of Mineral Deposits And Lime Scale: Lime Scale forms over time when water is heated. Though the scale is natural and harmless, it may produce a powdery substance or mineral-like chunks that can get into your hot beverages and affect the taste.
Mineral deposits in tap water may cause the percolator interior to discolor. To remove this build-up, use Liquid De-scaler, a simple-to-use, non-toxic cleaner.
Alternatively:
- Fill the percolator with 3 cups of white vinegar and the remainder with water and allow to stand overnight. DO NOT BOIL!
- Empty the solution from the percolator, any stains remaining inside the spout can be removed by rubbing it with a damp cloth. Fill the percolator with clean water, bring it to a boil, and then discard the water. Repeat and the percolator will then be ready to use.
NOTE: The washer at the bottom of the pump tube must be able to move freely to ensure error-free operation. If coffee grounds become trapped near the washer, loosen the trapped coffee grounds with a toothpick, and then run under water to clean them.
CAUTION:
- Never immerse the swivel base, its cables, or the plug into water or wash in a dishwasher.
- Do not use scouring agents or harsh cleaners on any part of the percolator.
LIMITED WARRANTY
PLEASE DO NOT RETURN TO THE STORE OF PURCHASE. If you have any problems with this unit, contact Customer Service for support.
- Your small kitchen appliance is warranted to the original purchaser to be free from any manufacturing defects under normal use and conditions for one (1) year, cord excluded. This Warranty applies only to the original purchaser of this product.
- Retail stores/merchants selling this product do not have the right to alter, modify, or in any way revise the terms and conditions of the warranty.
- If you use your appliance for household use and according to instructions, it should give you years of satisfactory service.
- At its sole discretion, Maxi-Matic USA will either repair or replace the product found to be defective during the warranty period.
- The repaired or replacement product will be in warranty for the remaining balance of the one-year warranty period and an additional one-month period.
- Consumer’s remorse is not an acceptable reason to return a product to our Service Center.
- This limited warranty covers appliances purchased and used within the 50 U.S. states plus the District of Columbia and does NOT cover normal wear of parts or:
- Damages caused by unreasonable use, neglect, normal wear and tear, commercial use, improper assembly, or installation of the product.
- Damages caused in shipping.
- Damages caused by replacement or resetting of house fuses or circuit breakers.
- Defects other than manufacturing defects.
- Breakage is caused by misuse, abuse, accident, alteration, lack of proper care and maintenance, or incorrect current or voltage.
- Lost or missing parts of the product. Parts will need to be purchased separately.
- Damages of parts that are not electrical; i.e. cracked or broken plastic/glass, scratched/dented inner pots.
- Damage from service or repair by unauthorized personnel.
- Extended warranties are purchased via a separate company or reseller.
- Acts of nature such as fire, floods, hurricanes, tornadoes, etc.
- This warranty does not apply to re-manufactured merchandise.
Maxi-Matic, USA shall not be liable for any incidental or consequential damages caused by the breach of any express or implied warranty.
Apart from the extent prohibited by applicable law, any implied warranty of merchantability or fitness for a particular purpose is limited in time to the duration of the warranty.
Year Limited Warranty valid only in the 50 U.S. states plus the District of Columbia, excluding Puerto Rico and the Virgin Islands.
This warranty is effective only if the product is purchased and operated in the USA; product usage that violates the written instructions provided with the unit will void this warranty.
For an international warranty, please contact the local distributor. This warranty gives you special legal rights and you may also have other rights to which you are entitled which may vary by state, province, and/or jurisdiction. **Any instruction or policy included in this manual may be subject to change at any time.
MAXI-MATIC, USA 18401 E. Arenth Ave. The City of Industry, CA 91748 Visit: shopelitegourmet.com for Live Chat Support and Contact Us Form
RETURN INSTRUCTIONS
RETURNS: Any return of defective merchandise to the manufacturer must be processed accordingly by first contacting customer service to obtain an RA # (Return Authorization Number). We will not accept any returns of merchandise without an applicable RA #.
IMPORTANT RETURN INSTRUCTIONS. Your Warranty depends on your following these instructions if you are returning the unit to Maxi-Matic, USA:
- Carefully pack the item in its original carton or another suitable box with sufficient cushioning to avoid damage in shipping.
- Before packing your unit for return, be sure to enclose:
- Your name, full address with zip code, daytime telephone number, and RA#,
- A dated sales receipt or PROOF OF PURCHASE,
- The model number of the unit and the problem you are having (Enclose in an envelope and tape directly to the unit before the box is sealed,) and
- Any parts or accessories related to the problem.
- Maxi-Matic, USA recommends that you ship the package via UPS ground service for tracking purposes. We cannot assume responsibility for lost or damaged products returned to us during incoming shipment. For your protection, always carefully package the product for shipment and insure it with the carrier. C.O.D. shipments cannot be accepted.
- All return shipping charges must be prepaid by you.
- Once your return has been received by our warehouse, Maxi-Matic, USA will repair or replace the product if it is defective in material or workmanship, subject to the conditions in paragraph B.
- Maxi-Matic will pay the shipping charges to ship the repaired or replacement product back to you.
FAQs About Elite Gourmet EHC111A Personal Single-Serve Compact Coffee Maker
What type of coffee can I use with this coffee maker?
The Elite Gourmet EHC111A Personal Single-Serve Compact Coffee Maker is compatible with most types of ground coffee.
How long does it take to brew a cup of coffee with this coffee maker?
This coffee maker can brew a single cup of coffee in just a few minutes.
Is the coffee maker easy to clean?
Yes, the Elite Gourmet EHC111A Personal Single-Serve Compact Coffee Maker is easy to clean. The brew basket and drip tray are both removable and dishwasher safe, making cleanup a breeze.
Does the coffee maker come with a travel mug?
Yes, this coffee maker comes with a 14 oz travel mug that fits perfectly under the brew basket.
Can I adjust the strength of the coffee with this coffee maker?
No, this coffee maker does not have a strength adjustment feature. However, you can adjust the strength of the coffee by using more or less coffee grounds.
Does this coffee maker have an automatic shut-off feature?
No, the Elite Gourmet EHC111A Personal Single-Serve Compact Coffee Maker does not have an automatic shut-off feature. You will need to manually turn off the coffee maker after use.
Is this coffee maker easy to use?
Yes, this coffee maker is very easy to use. Simply add your desired amount of ground coffee to the brew basket, add water to the reservoir, and press the “On” button.
How big is this coffee maker?
The Elite Gourmet EHC111A Personal Single-Serve Compact Coffee Maker is compact and measures approximately 9.25 inches tall by 6.5 inches wide by 8.5 inches deep.
What is the wattage of this coffee maker?
This coffee maker has a wattage of 650 watts.
Can I make tea with this coffee maker?
Yes, you can use this coffee maker to brew tea as well. Simply add your desired tea leaves to the brew basket and follow the same brewing instructions as you would for coffee.
How long is the power cord on this coffee maker?
The power cord on the Elite Gourmet EHC111A Personal Single-Serve Compact Coffee Maker is approximately 2 feet long.
Is this coffee maker compatible with reusable filters?
Yes, this coffee maker is compatible with most standard-sized reusable filters.
For More Manuals by Elite Gourmet, Visit the Latest Manual
- Elite Gourmet EHC111A Single Cup Coffee Maker Instruction Manual
- Hamilton Beach Programmable Dispensing Drip Coffee Maker User Guide
- Hamilton Beach 12 Cup Programmable Front-Fill Drip Coffee Maker Manual
- BLACK DECKER Rice Cooker Instructions Manual
- BLACK DECKER CM1110B Coffee Maker Use and Care Manual
 |
Elite Gourmet EHC111A Personal Single-Serve Compact Coffee Maker User Manual [pdf] |

