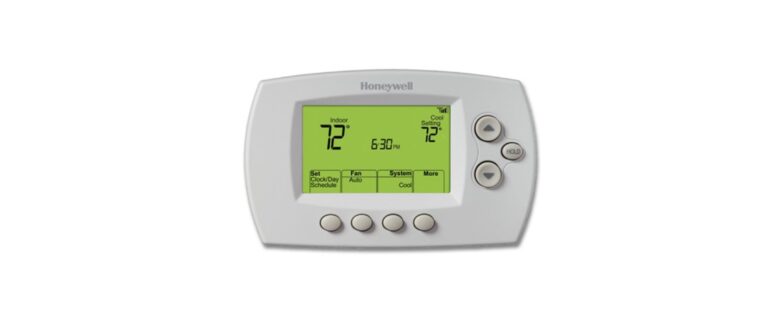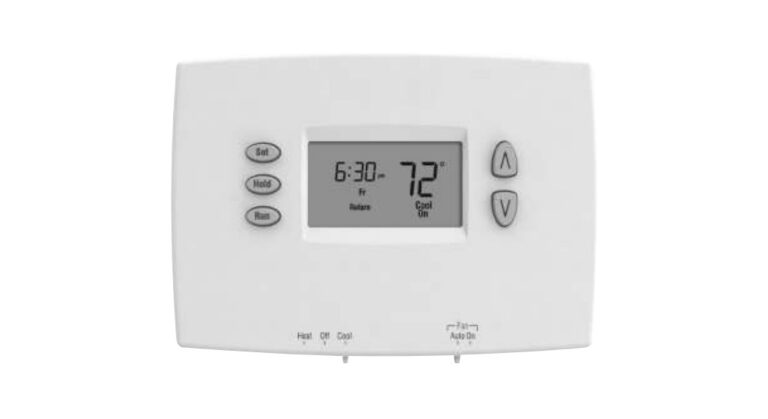
Honeywell Pro 3000 Series Non-Programmable Digital Thermostat
About Honeywell
We hold approximately 3,000 active and pending patents worldwide for our Honeywell Home products, and we continue to create dependable technology crafted for your comfort.
Our connected technology is based on 130 years of experience and the proven expertise of the Honeywell Home brand, a brand Resideo continues to offer today.
Wall Plate Installation
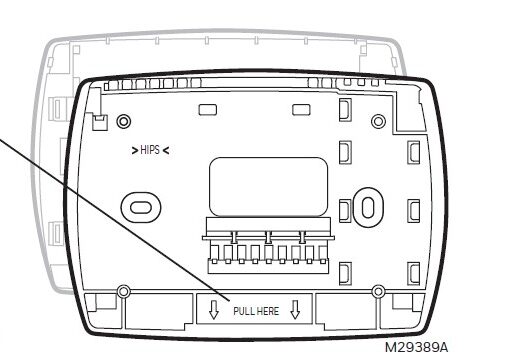
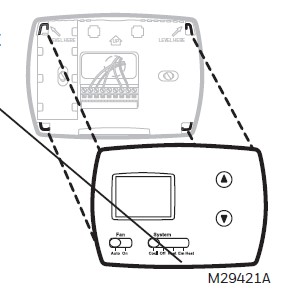
Remove the wallplate from the thermostat by pulling from the bottom, then follow the directions below for mounting.
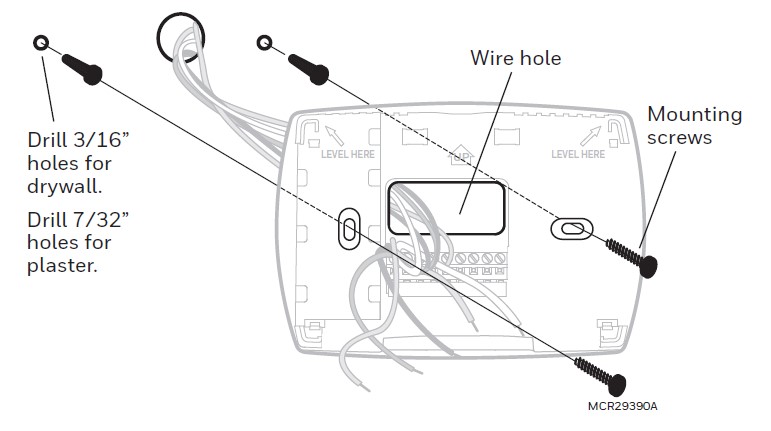
- Pull wires through the wire hole.
- Position the wallplate on the wall, level, and mark hole positions with a pencil.
- Drill holes at marked positions as shown below, then tap in supplied wall anchors.
- Place wallplate over anchors, and insert and tighten mounting screws.
Power options
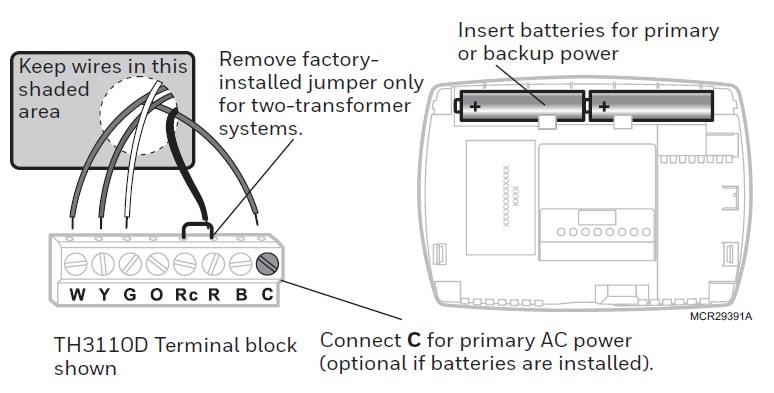
Wiring Terminal Designations

TH3110D
- C: 24 Vac common. For 2 transformer systems, use common wire from the cooling transformer.
- B: Changeover valve energized in heating
- R: 24 Vac power from the heating transformer
- Rc: 24 Vac power from cooling transformer
- O: Changeover valve energized in cooling
- G: Fan relay
- Y: Compressor contactor
- W: Heat relay
TH3210D
- C: 24 Vac common
- B: Changeover valve energized in heating
- R: 24 Vac power
- L: Sends output when set to Em. Heat
- O: Changeover valve energized in cooling
- G: Fan relay
- Y: Compressor contactor
- Aux: Auxiliary heat relay
- E: Emergency heat relay
Wiring conventional and heat pump systems

2H/1C Heat Pump System TH3210D
- C: 24 Vac common [3]
- B: Changeover valve energized in heating [5]
- R: Power [1]
- L: Sends output when set to Em. Heat [8]
- O: Changeover valve energized in cooling [5]
- G: Fan relay
- Y: Compressor contactor Aux Auxiliary heat relay [9]
- E: Emergency heat relay [9]
1H/1C Heat Pump System TH3110D [7]
- C: 24 Vac common [3]
- B: Changeover valve energized in heating [5]
- R: [R+Rc joined by jumper] Rc Power [1]
- O: Changeover valve energized in cooling [5]
- G: Fan relay
- Y: Compressor contactor [6]
- W: [W+Y joined by jumper]

1H/1C System TH3110D (1 transformer)
- C: 24 Vac common [3]
- R: [R+Rc joined by jumper]
- Rc: Power [1]
- G: Fan relay
- Y: Compressor contactor
- W: Heat relay
1H/1C System TH3110D (2 transformers)
- C: 24 Vac common [3, 4]
- R: Power (heating transformer) [1, 2]
- Rc: Power (cooling transformer) [1, 2]
- G: Fan relay
- Y: Compressor contactor
- W: Heat relay

Heat Only System with Fan TH3110D
- C: 24 Vac common [3]
- R: [R+Rc joined by jumper]
- Rc: Power [1]
- G: Fan relay
- W: Heat relay
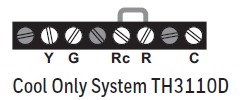
Cool Only System TH3110D
- C: 24 Vac common [3]
- R: [R+Rc joined by jumper]
- Rc: Power [1]
- G: Fan relay
- Y: Compressor contactor
NOTES
Wire specifications
Use 18- to 22-gauge thermostat wire. A shielded cable is not required.
- Power supply. Provide disconnect means and overload protection as required.
- Remove jumper for 2-transformer systems.
- Optional 24 Vac common connection.
- The common connection must come from the cooling transformer.
- Use either O or B terminals for the change-over valve.
- Use a small piece of wire (not supplied) to connect the W and Y terminals.
- Set fan operation switch to Heat Pump (see page 5) and configure system type for heat pump (see page 6).
- L terminal sends a continuous output when the thermostat is set to Em. Heat. Connect to Honeywell Home zoning panels to switch the panel to Emergency Heat.
- Install field jumper between Aux and E if there is no emergency heat relay.
Fan operation settings (TH3110D only)
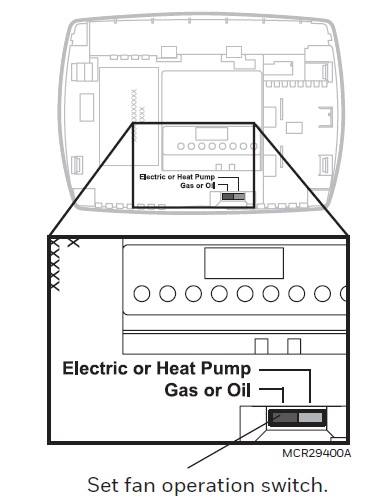
Gas or Oil: For gas or oil heating systems, leave the fan operation switch in this factory-set position. (This setting is for systems that control the fan in a call for heat.)
Electric or Heat Pump: hang the switch to this setting for heat pump or electric heat systems. (This setting is for systems that allow the thermostat to control the fan in a call for heat if a fan wire is connected to the G terminal.)
Thermostat mounting
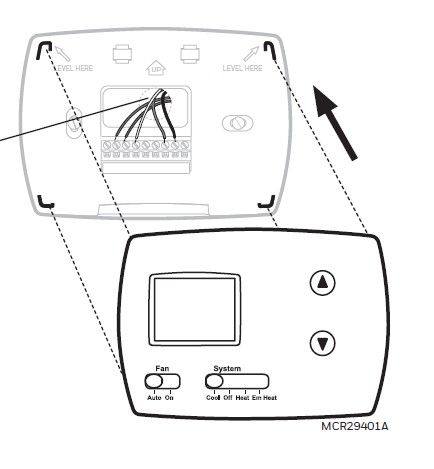
- Align the 4 tabs on the wall plate with the corresponding slots on the back of the thermostat.
- Push gently until the thermostat snaps in place.
- Push excess wire back into the wall opening.
- Plug the wall opening with non-flammable insulation.
Installer Setup
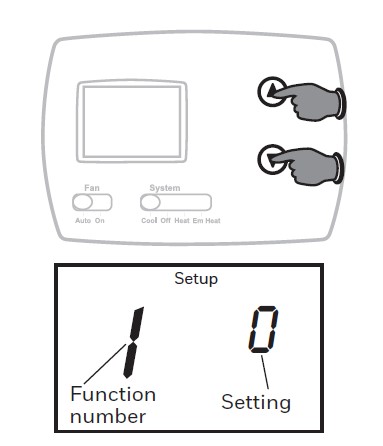
Follow the procedure below to configure the thermostat to match the installed heating/cooling system, and customize feature operation as desired. To begin, press and hold the s and t buttons until the display changes.
- Press t to change settings.
- Press s to advance to the next function.
- Press and hold ts to exit and save settings.
Setup function: Settings & options (factory settings in bold)
- 1 System type TH3110D only
- 0 Gas, oil, or electric heat with air conditioning
- 1 The heat pump (5-minute compressor off time in heating and cooling)
- 5 Heating cycle rate (CPH: cycles/hour) TH3110D only
- 5 For gas or oil furnaces of less than 90% efficiency
- 1 For steam or gravity systems
- 3 For hot water systems & furnaces of over 90% efficiency
- 9 For electric furnaces
[Other cycle rate options: 2, 4, 6, 7, 8, 10, 11, or 12 CPH]
- 5 For gas or oil furnaces of less than 90% efficiency
- 6 Auxiliary heat cycle rate (CPH) TH3210D only
- 5 For gas or oil furnaces of less than 90% efficiency
- 1 For steam or gravity systems
- 3 For hot water systems & furnaces of over 90% efficiency
- 9 For electric furnaces
[Other cycle rate options: 2, 4, 6, 7, 8, 10, 11, or 12 CPH]
- 5 For gas or oil furnaces of less than 90% efficiency
- 8 Emergency heat cycle rate (CPH) TH3210D only
- 9 For electric emergency heat
- 1 For steam or gravity systems
- 3 For hot water systems & furnaces of over 90% efficiency
- 5 For gas or oil furnaces of less than 90% efficiency
[Other cycle rate options: 2, 4, 6, 7, 8, 10, 11 or 12 CPH]
- 9 Compressor cycle rate (CPH)
- 3 Recommended for most compressors
[Other cycle rate options: 1, 2, 4, 5, or 6 CPH]
- 3 Recommended for most compressors
- 14 Temperature display
- 0 Fahrenheit
- 1 Celsius
- 15 Compressor protection
- 5 Five-minute compressor off time
[Other options: 0, 1, 2, 3, or 4-minute off time]
- 5 Five-minute compressor off time
Compressor Protection
(Setup Function 15): Forces the compressor to wait a few minutes before restarting, to prevent damage. During the wait time, the message Cool On or Heat On (heat pumps only) will flash on the display.
Installer System Test
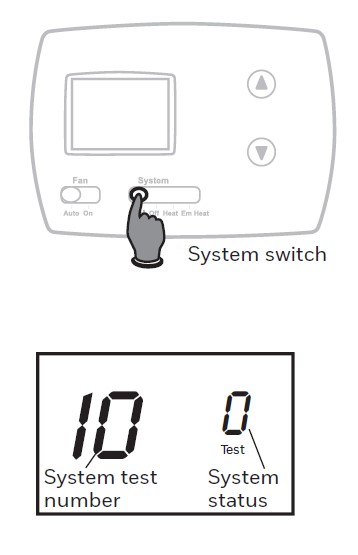
- Set the SYSTEM switch to Heat.
- Press t to turn on and check systems (see table, below).
- Press t until the systems turn off.
- Set the SYSTEM switch to Em Heat and repeat steps 2-3 above (TH3210D only).
- Set the SYSTEM switch to Cool and repeat steps 2-3 above.
- Press and hold ts to terminate the test at any time.
System test / System status
- 10 Heating system
- 0 Heat and fan turn off.
- 1 Heat turns on.
- 2 Auxiliary heat turns on (TH3210D only).
- 20 Emergency heat
- 0 Heat and fan turn off. (TH3210D only).
- 1 Heat and fan turn on. (TH3210D only).
- 2 Auxiliary heat turns on. (TH3210D only).
- 30 Cooling system
- 0 Compressor and fan turn off.
- 1 Compressor and fan turn on.
- 70 Thermostat information (for reference only)
- 71 Software revision number (major revisions)
- 72 Software revision number (minor revisions)
- 73 Configuration identification code (major)
- 74 Configuration identification code (minor)
- 75 Production configuration date code (week)
- 76 Production configuration date code (year)
Troubleshooting
If you have difficulty with your thermostat, please try the following suggestions. Most problems can be corrected quickly and easily.
Display is blank
- Check the circuit breaker and reset if necessary.
- Make sure the power switch at the heating & cooling system is on.
- Make sure the furnace door is closed securely.
- Ensure fresh AA alkaline batteries are installed correctly (see page 2).
The heating or cooling system does not respond
- Set the system switch to Heat. Make sure the temperature is set higher than the Inside temperature.
- Set the system switch to Cool. Make sure the temperature is set lower than the Inside temperature.
- Wait 5 minutes for the system to respond.
Temperature settings do not change
Make sure heating and cooling temperatures are set to acceptable ranges:
- Heat: 40° to 90°F (4.5° to 32°C).
- Cool: 50° to 99°F (10° to 37°C).
“Cool On” or “Heat On” is flashing
The compressor protection feature is engaged. Wait 5 minutes for the system to restart safely, without damage to the compressor.
“Heat On” is not displayed
Set the System switch to Heat, and set the temperature level above the current room temperature.
“Cool On” is not displayed
Set the System switch to Cool, and set the temperature level below the current room temperature.
Specifications
- Temperature Ranges
- Heat: 40° to 90°F (4.5° to 32°C)
- Cool: 50° to 99°F (10° to 37°C)
- Operating Ambient Temperature
- 32° to 120°F (0° to 48.9°C)
- Shipping Temperature
- -20° to 120°F (-28.9° to 48.9°C)
- Operating Relative Humidity
- 5% to 90% (non-condensing)
- Physical Dimensions
- 3-13/16” H x 5-3/8” W x 1-1/4” D
- 97 mm H x 137 mm W x 32 mm D
- Input:
- 24 V~ @ 60 Hz, 1.0 A
Electrical Ratings
System Voltage (50/60Hz) Running Current
- Heat (1st stage) 20-30 Vac 0.02-1.0 A
- (Powerpile) 750 mV DC 100 mA DC
- Emergency heat 20-30 Vac 0.02-1.0 A
- Auxiliary heat 20-30 Vac 0.02-1.0 A
- Cooling 20-30 Vac 0.02-1.0 A
Need Help?
For assistance with this product, please visit customer.resideo.com. Or call Customer Care toll-free at 1-800-468-1502.
Pull at the bottom to remove the thermostat from the wallplate.
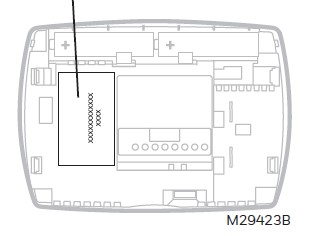
Turn the thermostat over to find the model number and date code.
CAUTION: EQUIPMENT DAMAGE HAZARD
Compressor protection is bypassed during testing. To prevent equipment damage, avoid cycling the compressor quickly.
CAUTION: ELECTRICAL HAZARD
Can cause electrical shock or equipment damage. Disconnect power before beginning installation.
CAUTION: MERCURY NOTICE
If this product is replacing a control that contains mercury in a sealed tube, do not place the old control in the trash. Contact your local waste management authority for instructions regarding recycling and proper disposal.
CAUTION: ELECTRONIC WASTE NOTICE
The product should not be disposed of with other household waste. Check for the nearest authorized collection centers or authorized recyclers.
The correct disposal of end-of-life equipment will help prevent potential negative consequences for the environment and human health.
https://customer.resideo.com/en-US/support/residential/codes-and-standards/FCC15105/Pages/default.aspx
Resideo Inc., 1985 Douglas Drive North
Golden Valley, MN 55422
69-1929EFS—07 M.S. Rev. 08-20 | Printed in United States
FAQs About Honeywell Pro 3000 Series Non-Programmable Digital Thermostat
How do you use a Honeywell nonprogrammable thermostat?
If you have a manual thermostat, setting the temperature on your Honeywell thermostat is simple. All you need to do is press the up and down buttons to set the temperature. The temperature you set will stay until you change the temperature again.
How do I reset my Honeywell Pro 3000 thermostat?
Resetting a Honeywell Thermostat Power off the thermostat and remove the batteries. Put the batteries in the wrong way, with negative to positive and positive to negative. Wait ten seconds and put them back in the correct way. Your thermostat will be reset to factory settings.
How long does a nonprogrammable thermostat last?
As with all other systems, your thermostat will eventually become old and outdated. The lifespan of most home thermostats is 10 years. However, you may need to replace yours sooner as newer, more efficient thermostats enter the market.
Why is my Honeywell thermostat not changing temperature?
When the Honeywell thermostat does not reach a set temperature, reboot the thermostat. Turn off the power to the thermostat for ten to twenty seconds. Then turn it back on. This is easy with many smart models because they can detach from furnace power.
What is the lifespan of a Honeywell thermostat?
Thermostats don’t typically have a set lifespan for maintenance, repair, or replacement (unlike air conditioners that need a tune-up every year). Still, you can generally expect your thermostat to last at least 10 years. After a decade, thermostats may start malfunctioning.
Does the Honeywell Pro Series need batteries?
Batteries are not required if the Honeywell T6 Pro Z-Wave Programmable Thermostat was wired to run on 24 VAC power when installed. To provide optional backup please install three fresh AA alkaline batteries immediately when the low battery alert appears.
What is a non-digital thermostat called?
Analog thermostats are the most basic kinds of thermostats and they are also the least expensive. However, they are not as accurate when it comes to displaying the temperature of the home. Digital Thermostats.
What is better a programmable or nonprogrammable thermostat?
Here’s the answer: Both a programmable and non-programmable thermostat have the potential to save you money if you know how to use your thermostat correctly. However, a programmable thermostat changes your home’s temperature automatically and therefore makes it EASIER to save money.
What causes a thermostat to fail?
Thermostat failure can be caused by contaminated fluid or simply an old thermostat with weakened springs. Contamination happens when incompatible coolants are mixed, old coolant is not changed as recommended or particulate matter from gaskets or elsewhere breaks off.
Why is my thermostat not controlling my heat?
If your thermostat is not working, change the batteries, make sure it is turned on, and the thermostat is set to the correct mode, and check the power supply and airflow. If your thermostat is still not working, the best thing to do is call an HVAC professional! hey will be able to help you diagnose and repair the issue.
For More Manuals by Honeywell, Visit the Latest Manual
- Honeywell Pro 2000 Series Horizontal Programmable Thermostat Operating Guide
- Honeywell Home RTH6580WF Wi-Fi Programmable Thermostat User Guide
- Honeywell Home RTH6500WF Wi-Fi Programmable Thermostat Quick Start Guide
- Honeywell Pro 3000 Series Non-Programmable Digital Thermostat User Guide
- Honeywell Pro 1000 Series Vertical Non-Programmable Thermostat Operating Guide
 |
Honeywell Pro 3000 Series Non-Programmable Digital Thermostat Installation Instructions [pdf] |

